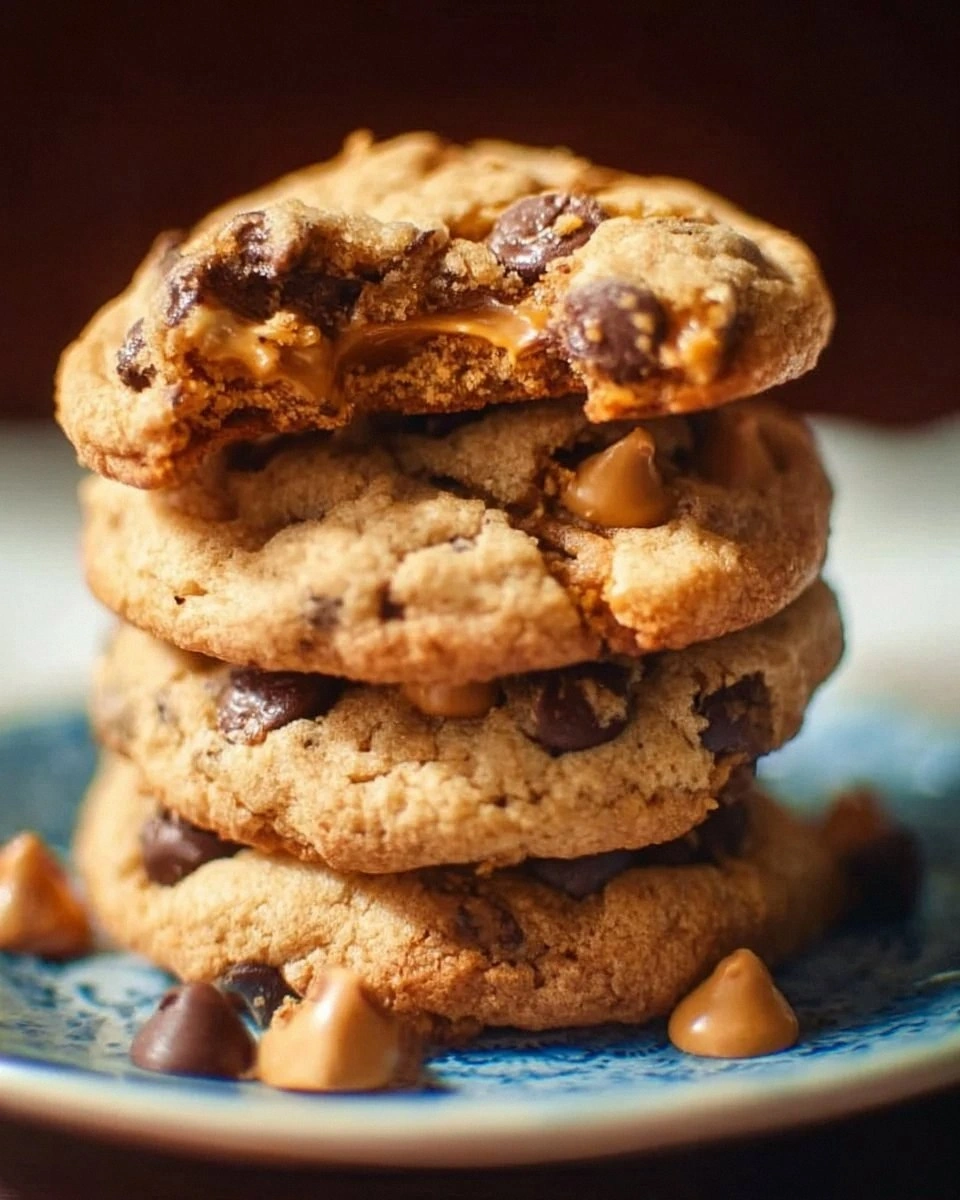
I’ll be honest — I ate half the batch before anyone else got a chance to try it. It all started on a rainy Tuesday when my kitchen smelled like burnt toast and I was desperately searching for something that could turn that disappointment into a triumph. I grabbed whatever I had: a half‑empty bag of butterscotch chips, a lonely box of chocolate chips, and a stick of butter that was soft enough to melt on contact. I was daring myself to create a cookie that could out‑shine every store‑bought version, and let me tell you, the stakes were high. I dared you to taste this and not go back for seconds, because once you bite into the caramel‑kissed chocolate pockets, you’ll be hooked for life.
Picture yourself pulling this out of the oven, the whole kitchen smelling incredible, like a warm hug wrapped in sugar and butter. The cookies are golden on the edges, yet they hold a chewy, almost gooey center that stretches like taffy when you break them apart. The butterscotch chips melt into a buttery caramel river, while the chocolate chips give that familiar snap that we all love. That sizzle when the dough hits the hot tray? Absolute perfection. I’m talking about a cookie that sings a duet of buttery richness and chocolate depth, a flavor combo that most recipes get completely wrong. Most recipes either drown the butterscotch in chocolate or forget to give the dough enough structure; here, every element is balanced like a well‑orchestrated symphony.
What makes this version truly stand out is a secret technique I stumbled upon while watching a vintage cooking show: chilling the dough for exactly 30 minutes before baking. This tiny pause lets the butter solidify just enough to create those coveted crispy edges that shatter like thin ice, while the interior stays soft and chewy. I also toss in a pinch of sea salt at the very end, which amplifies the caramel notes and makes the chocolate pop like fireworks on a dark night. Most people skip the salt or add it too early, and the result is a flat, one‑dimensional cookie. Not here. This is hands down the best version you’ll ever make at home, and I’m about to walk you through every single step — by the end, you’ll wonder how you ever made it any other way.
Okay, ready for the game‑changer? I’m about to reveal the one ingredient that most bakers overlook: high‑quality butterscotch chips. They’re the heart of this cookie, delivering that buttery, caramel‑rich flavor that turns an ordinary bite into an unforgettable experience. I’ll also share a few hacks that will keep your cookies from spreading too thin and ensure they stay perfectly thick and pillowy. Stay with me here — this is worth it. Let me walk you through every single step — by the end, you’ll wonder how you ever made it any other way.
What Makes This Version Stand Out
- Flavor Fusion: The marriage of butterscotch and chocolate creates a layered taste experience that feels like a dessert duo in every bite.
- Texture Contrast: Crispy, caramelized edges give way to a soft, chewy center that stretches like a warm blanket.
- Simplicity: Only ten ingredients, all pantry staples, yet the result feels like a bakery masterpiece.
- Unique Ingredient: Premium butterscotch chips deliver a deep, buttery caramel flavor that ordinary chocolate can’t match.
- Crowd Reaction: Guests invariably ask for the recipe, and the “I dare you to eat just one” challenge becomes a party staple.
- Ingredient Quality: Using unsalted butter and real sea salt lets you control the flavor balance precisely.
- Cooking Method: A short chill before baking ensures the cookies hold their shape and develop that perfect edge‑to‑center contrast.
- Make‑Ahead Potential: These cookies freeze beautifully, so you can bake a batch and keep them ready for any impromptu craving.
Inside the Ingredient List
The Flavor Base
Unsalted butter is the canvas on which everything else paints its flavor. When softened, it emulsifies with the sugars, creating a glossy, tender crumb. If you use salted butter, you’ll lose control over the final salt level, and the delicate balance between sweet and salty will be off. For a richer taste, opt for European‑style butter with a higher butterfat content; it yields a deeper, more buttery mouthfeel. Pro tip: Let the butter sit at room temperature for about 30 minutes — this ensures it’s soft but not melted, which is crucial for proper creaming.
The Sweet Duo
Brown sugar, packed tightly, brings molasses‑laden depth, while granulated sugar adds crispness and helps the cookies spread just enough. Skipping the brown sugar would make the cookies taste flat, and omitting the white sugar would result in a dense, overly chewy texture. If you’re looking for a lower‑glycemic option, you can substitute half the brown sugar with coconut sugar, but expect a slight caramel twist. When measuring brown sugar, press it down with a spoon to eliminate air pockets; this ensures you get the full flavor intensity.
The Texture Crew
All‑purpose flour provides the structure, while baking soda acts as a leavening agent that creates lift and a tender crumb. Too much soda will give you a metallic aftertaste; too little and the cookies will be dense. Salt isn’t just a flavor enhancer; it also strengthens gluten, giving the cookie that satisfying snap at the edge. If you’re gluten‑intolerant, a 1‑to‑1 gluten‑free flour blend works fine, but add a teaspoon of xanthan gum to mimic the elasticity of wheat flour.
The Unexpected Star
Butterscotch chips are the hero here. They melt into a buttery caramel river that infuses the entire dough, unlike regular chocolate which stays more contained. If you can’t find butterscotch chips, try chopping a high‑quality butterscotch candy bar into small chunks. The vanilla extract adds a fragrant backdrop that ties the caramel and chocolate together, making the flavor profile feel cohesive rather than disjointed.
The Final Flourish
Semi‑sweet chocolate chips provide the classic chocolate punch without overwhelming the butterscotch. If you love dark chocolate, swap half of the semi‑sweet chips for 70% cacao chunks for a bittersweet twist. Eggs act as binders, adding richness and helping the dough hold together during baking. Over‑beating the eggs can incorporate too much air, leading to a cakey texture, so add them one at a time and mix just until combined.
Everything's prepped? Good. Let's get into the real action…
The Method — Step by Step
Preheat your oven to 350°F (175°C) and line two baking sheets with parchment paper. The heat should be steady; an uneven oven can cause some cookies to brown too fast while others stay pale. As the oven warms, you’ll hear that faint hum that signals a perfect baking environment. This is the moment of truth — get everything ready before the dough hits the heat.
In a large mixing bowl, cream together the softened butter, brown sugar, and granulated sugar until the mixture is light, fluffy, and pale yellow. Use a handheld mixer on medium speed for about 3‑4 minutes; you’ll notice the bowl sides become slick and the texture resembles a cloud. Power transition: Okay, ready for the game‑changer? Add the vanilla extract now and give it a quick pulse. This infuses the butter with aromatic notes that will later mingle with the caramel.
Add the eggs one at a time, beating just until each egg is fully incorporated before adding the next. You’ll hear a subtle “whoosh” as the mixture thickens; this is the structure forming.
Kitchen Hack: Crack eggs into a separate bowl first to avoid shell fragments, then whisk lightly before adding to the batter.In a separate bowl, whisk together the all‑purpose flour, baking soda, and salt. This dry blend ensures the leavening agent is evenly distributed, preventing pockets of soda that could create bitter spots. If you prefer a slightly thicker cookie, sift the flour before mixing; the extra aeration will make the dough a bit lighter.
Gradually add the dry ingredients to the wet mixture, stirring on low speed until just combined. Over‑mixing here can develop gluten, leading to a tougher cookie. You’ll see the dough come together in soft clumps — that’s exactly what you want.
Watch Out: Stop mixing the moment you no longer see streaks of flour; over‑mixing will make the cookies cakey.Fold in the butterscotch chips and semi‑sweet chocolate chips with a rubber spatula. The dough should look speckled with golden and dark islands, like a night sky dotted with stars. Take a moment to scrape the bowl sides; every bit of chocolate and butterscotch counts toward the final flavor explosion.
Cover the dough with plastic wrap and chill in the refrigerator for exactly 30 minutes. This short rest firms the butter, preventing excessive spread and giving you those coveted crispy edges. While you wait, picture the aroma that will soon fill your kitchen — it’s a mental teaser that keeps you motivated.
Scoop the dough onto the prepared baking sheets using a cookie scoop (about 2‑tablespoon portions). Space them 2 inches apart; they’ll expand, but not merge. Gently flatten each mound by pressing the back of the scoop — this creates a uniform thickness that bakes evenly.
Kitchen Hack: For perfectly round cookies, dip the scoop in a little flour before each use; it prevents sticking and gives a clean release.Bake for 12‑14 minutes, or until the edges are a deep golden brown and the centers still look slightly soft. The cookies will continue to set as they cool on the sheet, so pulling them out too early can result in a soggy bottom. As they bake, you’ll hear a faint crackle as the sugar caramelizes — that’s the sound of flavor forming.
Allow the cookies to cool on the baking sheet for 5 minutes before transferring them to a wire rack. This short rest lets the interior finish cooking without over‑drying the edges. Once on the rack, they’ll firm up just enough to snap when you bite, yet remain chewy in the middle. And now the fun part — taste testing! I dare you to try one and not go back for seconds.
That's it — you did it. But hold on, I've got a few more tricks that'll take this to another level...
Insider Tricks for Flawless Results
The Temperature Rule Nobody Follows
Never bake cookies straight from the freezer unless you’ve adjusted the time. Frozen dough needs an extra minute or two, otherwise the edges will over‑brown before the center thaws. I once tried skipping this step and ended up with burnt rims and a raw middle — a disaster that taught me the value of a quick temperature check. Keep a thermometer handy; a dough temperature of around 68°F (20°C) is ideal for consistent spreading.
Why Your Nose Knows Best
Your sense of smell is a more reliable indicator than a timer. When the cookies start to give off a nutty, caramel aroma, you’re within a few seconds of perfect doneness. If you smell a hint of burnt sugar, pull them out immediately. I’ve learned to trust that “just‑right” scent more than any clock, and it has saved countless batches from becoming charcoal.
The 5‑Minute Rest That Changes Everything
After the cookies have cooled on the rack, let them sit for another five minutes before storing. This rest allows the moisture to redistribute, making each bite uniformly soft. Skipping this step can lead to a dry edge and a gummy center. Trust me, those extra minutes are a small price for a cookie that stays perfect for days.
The Salt‑Finish Secret
Just before baking, sprinkle a tiny pinch of flaky sea salt on top of each cookie. The salt dissolves slightly, creating little flavor bursts that highlight the butterscotch caramel. It’s a tiny addition that makes a massive impact, turning good cookies into unforgettable ones.
The Double‑Layer Cooling Trick
If you’re baking multiple sheets, rotate the trays halfway through the bake. This compensates for any hot spots in the oven and guarantees an even golden hue across all cookies. I once left a tray on one side for the entire time and ended up with a batch that was unevenly baked — a lesson that reinforced the importance of rotation.
Creative Twists and Variations
This recipe is a playground. Here are some of my favorite ways to switch things up:
Salted Caramel Pretzel Crunch
Swap half of the butterscotch chips for crushed pretzel pieces and drizzle a light caramel glaze after baking. The salty pretzel adds a satisfying crunch that contrasts beautifully with the chewy interior.
Espresso Infusion
Dissolve a tablespoon of instant espresso powder in the vanilla extract before adding it to the butter mixture. The coffee notes deepen the chocolate flavor, turning the cookies into a sophisticated after‑dinner treat.
Nutty Delight
Fold in ½ cup of toasted chopped pecans or walnuts. The nuts add a buttery richness and a pleasant bite, making the cookies feel more substantial.
White Chocolate & Raspberry
Replace the semi‑sweet chocolate chips with white chocolate chips and add a handful of dried raspberry pieces. The tart fruit balances the sweet butterscotch, creating a bright, festive flavor profile.
Spiced Autumn Version
Add a teaspoon of pumpkin spice and a pinch of ground cinnamon to the dry ingredients. This variation is perfect for cooler months, evoking the aroma of a cozy kitchen on a crisp fall evening.
Storing and Bringing It Back to Life
Fridge Storage
Place cookies in an airtight container with a slice of bread on top. The bread will release moisture, keeping the cookies soft for up to a week. If you prefer a firmer texture, omit the bread and store them in a dry container.
Freezer Friendly
Layer cookies between parchment sheets and seal them in a zip‑top bag. They’ll freeze beautifully for up to three months. When you’re ready to indulge, let them thaw at room temperature for 15 minutes, then pop them in a 300°F oven for 5 minutes to revive the crisp edges.
Best Reheating Method
Add a tiny splash of water (about a teaspoon) to the bottom of the container before microwaving for 10‑15 seconds. The steam revives the chewy interior without making the cookie soggy. This trick works wonders for cookies that have been sitting out for a day or two.