Picture this: it's December 23rd, the tree lights are twinkling like a disco ball on overdrive, and the house smells like a cinnamon stick exploded in the best possible way. I'm standing in my kitchen wearing a flour-dusted apron that reads "Santa's Favorite Baker" (a complete lie, by the way), frantically trying to whip up something that'll keep my nephew from eating all the candy canes before dinner. The pressure's on because my sister-in-law just announced she's bringing her new boyfriend who's apparently a "food blogger" and now suddenly my casual Christmas Eve snack situation feels like an episode of Chopped.
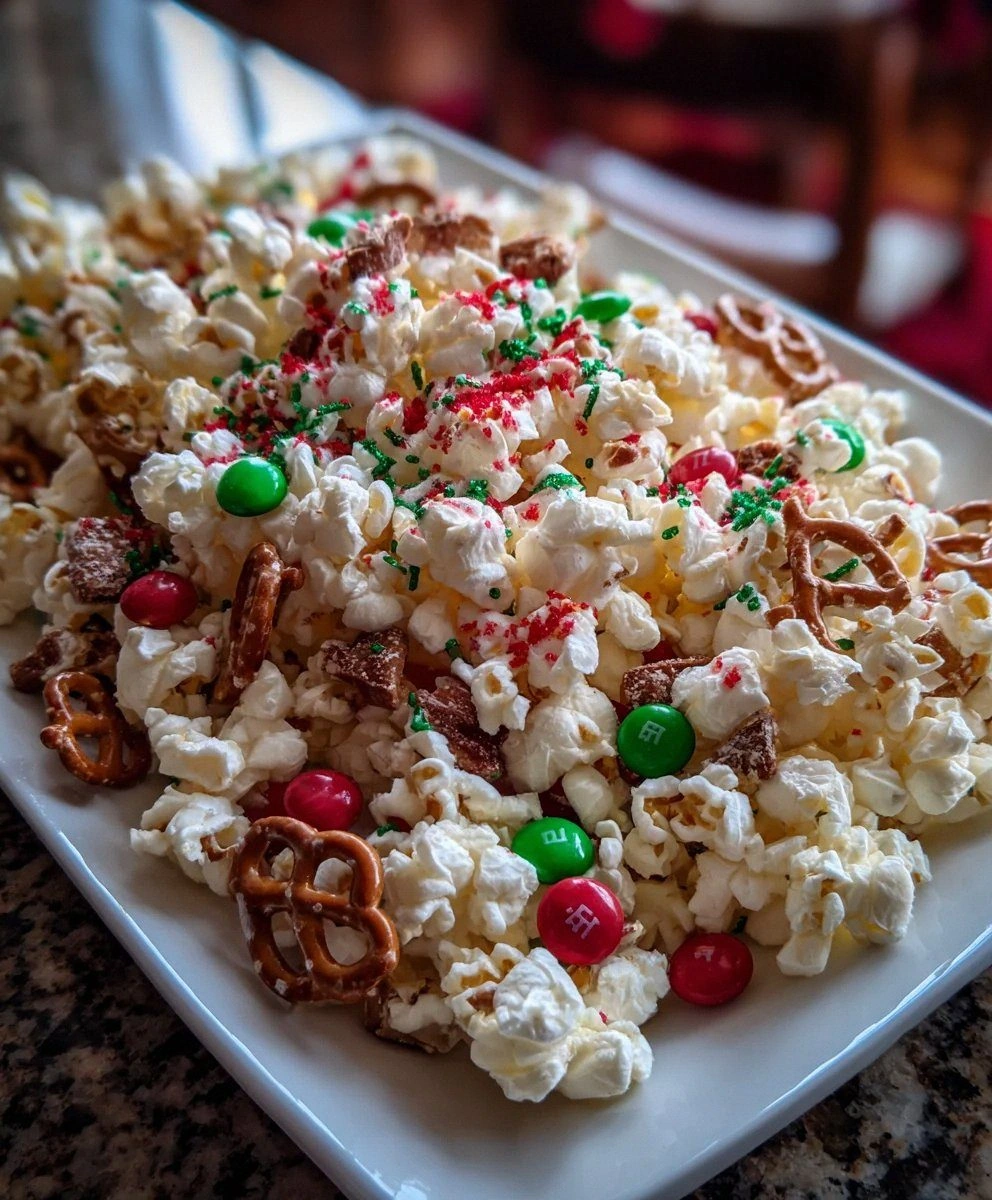
That's when Christmas Popcorn saved my holiday sanity. Not the sad, dry stuff you get in those massive tins that taste like cardboard dipped in artificial butter. I'm talking about the kind of popcorn that makes you involuntarily close your eyes when you taste it — white chocolate coating every kernel like fresh snow, red and green M&Ms peeking out like hidden gems, pretzels adding that perfect salty crunch that keeps you reaching for more. The first batch disappeared in approximately seven minutes flat, and my nephew actually paused his video game to ask for seconds, which in teenager language is basically a Michelin star.
I've made this recipe every Christmas since that fateful evening three years ago, tweaking and perfecting it like a mad scientist with a sweet tooth. Friends start texting me in November asking if I'm "doing the popcorn thing again this year," and I've been stopped at holiday parties by strangers who've heard about "that woman who makes the addictive Christmas crack." The best part? It looks like you slaved away for hours, but it's actually easier than wrapping a present (and way more fun than fighting with tape dispensers).
Ready for the game-changer? This isn't just another candied popcorn recipe that'll leave your dentist weeping. This version uses a technique that keeps the popcorn crispy for days (if it lasts that long), a secret ingredient that prevents the white chocolate from turning into a chalky mess, and a layering method that ensures every single kernel gets its fair share of the good stuff. Plus, I'm sharing my foolproof method for preventing those dreaded unpopped kernels from breaking Uncle Bob's crown — again. Let me walk you through every single step — by the end, you'll wonder how you ever made it any other way.
What Makes This Version Stand Out
Flavor Bomb: This isn't your typical one-note sweet popcorn. We're building layers of flavor that dance between sweet and salty, creamy and crunchy, with little pockets of chocolate that melt on your tongue like tiny presents. Each bite delivers a different combination — sometimes you get the pure white chocolate coating, sometimes you hit a pretzel nugget, and occasionally you score an M&M that adds that perfect candy shell crack.
Texture Paradise: Most holiday popcorns either turn into dental work hazards or soggy disappointments faster than you can say "fruitcake." This version maintains that perfect balance of crispy popcorn, smooth white chocolate, crunchy pretzels, and that satisfying snap when you bite into a cold M&M. The secret lies in the temperature dance we'll do — too hot and everything melts into a sad puddle, too cool and the coating turns grainy.
Looks Like a Million Bucks: When you dump this onto a crystal bowl (or let's be real, your favorite chipped mixing bowl), it looks like someone scattered edible Christmas ornaments across fresh snow. The red and green candies peek through like buried treasure, and the white chocolate catches the light like tiny diamonds. I've had more "oohs" and "aahs" over this simple popcorn than over my great-aunt's famous bourbon pecan pie.
Make-Ahead Magic: Unlike those fussy cookies that go stale if you look at them wrong, this popcorn actually improves after a day in an airtight container. The flavors marry, the coating sets perfectly, and it travels like a dream. I've shipped this across the country to my college roommate, and she swears it arrived tasting freshly made (though she might have been lying because she wanted more).
Zero Baking Skills Required: If you can operate a microwave without setting off smoke alarms, you can make this recipe. No candy thermometers, no tempering chocolate, no praying to the baking gods. Just melt, mix, and magic happens. I've taught this to my eight-year-old niece, and now she makes it for her teachers — though she eats half the M&Ms during the process (future chef in training).
Customizable Canvas: This recipe is like the little black dress of holiday treats — it works for every occasion and can be dressed up or down. Swap the M&Ms for crushed candy canes, add some dried cranberries for a sophisticated twist, or throw in some mini marshmallows for extra whimsy. I've even made a "grown-up" version with candied ginger and pistachios that disappeared at my book club.
The Gift That Keeps on Giving: Package this in mason jars with ribbon, and suddenly you're the friend who gives homemade gifts that don't end up in the re-gift pile. Add a cute tag with the recipe, and you'll be getting thank-you texts well into the new year. Pro tip: make double what you think you need — half for giving, half for "quality control testing."
Inside the Ingredient List
The Flavor Base
The popcorn itself is where most recipes go wrong faster than you can say "movie theater butter." You want plain, unbuttered, unsalted popcorn — the blank canvas that'll let our other flavors shine. Air-popped is my go-to because it gives you those light, fluffy kernels that practically float off the baking sheet. If you're using microwave popcorn (no judgment here, we've all been there), go for the lightest, plainest variety you can find. That fake butter flavor will fight with our white chocolate like two divas fighting for the spotlight.
Here's the thing about popcorn measurements: six cups sounds like a lot until you realize how much disappears during "quality control sampling." I always make eight cups and tell myself it's for "insurance," but we all know what's really happening. The key is starting with warm popcorn — not hot, not cold, but just warm enough to help the coating spread without melting the M&Ms into colorful puddles.
The Sweet Glue
White candy wafers are the unsung heroes of this operation. They're like the reliable friend who always shows up on time and never flakes on plans. Unlike regular white chocolate that can seize faster than my car in a Minnesota winter, these wafers are engineered to melt smoothly and set with a professional shine that'll make you look like you went to pastry school. You'll find them in the baking aisle, usually near the chocolate chips, looking like little pastel coins of happiness.
The quality matters here more than anywhere else. Cheap wafers will taste like sweetened wax and leave a greasy film that makes you regret every life choice. Look for brands like Ghirardelli or Merckens — yes, they cost a few extra dollars, but this is the difference between "meh" and "holy snowflakes, this is incredible." Plus, you'll have leftovers for dipping pretzels or making bark, which is really just future you thanking present you for being so smart.
The Color Crew
Red and green M&Ms aren't just festive — they're strategic. The candy coating provides a satisfying crunch that contrasts beautifully with the soft popcorn, while the chocolate inside melts just enough to create these little pockets of surprise. I mix regular and peanut varieties because I'm a texture junkie who lives for variety, but you do you. The key is keeping them cold until the very last minute so they don't bleed their colors into the white chocolate like a Christmas crime scene.
Here's where I get controversial: I pick out the brown ones. I know, I know, they taste the same, but this is about visual impact, people. We're creating edible art here, not just throwing candy at popcorn like we're feeding pigeons in the park. If you're feeling fancy, try the mint or dark chocolate varieties for a grown-up twist that'll have your guests asking for your secret.
The Crunch Factor
Pretzels are the plot twist that takes this from good to legendary. They bring that salty punch that makes the sweet elements sing louder, plus they hold their crunch like champions. I use the mini twists because they're adorable and distribute evenly, but feel free to go with sticks or even those pretzel chips if that's what you've got. The salt level matters here — you want just enough to create that sweet-salty harmony, not so much that you feel like you just swallowed seawater.
Smash them up with your hands for that rustic, homemade vibe that says "I made this with love and also maybe some frustration." You want pieces ranging from dust (for that salty seasoning) to nickel-sized chunks (for the big crunch moments). This is where kids become useful kitchen helpers — give them a sealed bag and let them go to town. Just maybe do this away from your good china.
The Festive Finish
Red and green sprinkles are like the confetti at the end of our edible parade. They add color, sure, but they also bring tiny sugar crystals that provide little pops of sweetness when you hit them. Go for the long jimmies rather than the tiny balls — they hold their color better and don't bleed into the white chocolate like cheap dye. Mix shapes and sizes for visual interest: some stars, some trees, maybe even some edible glitter if you're feeling extra.
Quality matters with sprinkles too. Those dollar store varieties will turn your beautiful creation into a faded mess faster than you can say "artificial colors." Invest in good sprinkles — they'll last forever (because let's face it, you don't use that many) and they'll make everything you decorate look professional. I keep mine in mason jars on a shelf because they're basically colorful art supplies for your kitchen.
Everything's prepped? Good. Let's get into the real action...
The Method — Step by Step
- Start with your popcorn prep, because this is where timing matters more than my attempts at yoga. Pop your corn using whatever method makes you happy — air popper, stove-top shaking like you're training for a marathon, or yes, even microwave if that's your jam. The key is getting it plain and unbuttered, then spreading it on a baking sheet to cool slightly. You want it warm to the touch but not hot enough to melt chocolate — think "cozy blanket fresh from the dryer" temperature. This is crucial because too hot and your M&Ms will weep colorful tears, too cold and the coating won't stick properly.
- While your popcorn is doing its cooling dance, prep your add-ins like you're setting up a candy assembly line. Measure out your M&Ms and stick them in the freezer — yes, the freezer. This is my grandmother's trick that prevents them from turning into chocolate puddles when they hit the warm popcorn. Smash your pretzels in a zip-top bag using whatever heavy object you have handy — I've used everything from a rolling pin to a wine bottle (empty, of course, we're not wasting good wine on pretzels). You want a mix of fine pretzel dust and chunky pieces, because variety is the spice of life and also of good popcorn.
- Now for the melting moment that separates the pros from the amateurs. Set up a double boiler with barely simmering water — not boiling, not simmering aggressively, just the gentlest whisper of heat. Add your white candy wafers and stir like you're conducting a very slow, very patient orchestra. The key here is patience: white chocolate scorches faster than my skin in summer, and once it seizes, there's no saving it. If you're feeling brave, you can microwave in 30-second bursts, stirring between each one, but I find the double boiler method more forgiving for my easily-distracted brain.
- Here's where the magic happens — the temperature sweet spot that most recipes completely miss. Your melted wafers should be warm enough to flow like liquid silk but not so hot they'll cook your popcorn. Test it by letting a drop fall from your spatula — it should ribbon down and hold its shape for a second before melting back into the bowl. If it's too thick, add a teaspoon of coconut oil or shortening to thin it out. This is the difference between popcorn that looks professionally coated versus something that looks like it got caught in a snowstorm.
- Time to bring everything together in what I call the "holiday hurricane." Transfer your warm popcorn to the largest bowl you own — seriously, go big or go home with this one. Pour the melted coating in a slow, steady stream while tossing with a spatula or your impeccably clean hands. The goal is every kernel getting a light, even coating without turning into a massive clump. Work quickly but gently, like you're handling tiny edible clouds that could collapse under too much pressure.
- Now comes the fun part — adding the mix-ins in a specific order that prevents everything from sinking to the bottom like sad treasure. Start with your frozen M&Ms, tossing them through immediately so the chocolate coating starts to set around them. Add your pretzel pieces next, distributing them evenly so every handful gets that salty crunch. Finally, shower everything with sprinkles while the coating is still tacky — this is your moment to feel like you're decorating the world's most delicious Christmas tree.
- Spread your creation on parchment-lined baking sheets in a single layer, resisting the urge to sample every fifth piece for "quality control." Let it set at room temperature for about 30 minutes, or speed things up by popping the trays in the fridge for 10 minutes. The coating should be firm and slightly glossy, holding everything together like edible glue but not so hard that it cracks when you break it apart. This is when your kitchen starts smelling like Willy Wonka's factory and neighbors mysteriously drop by.
- The final step is the break-up, and I'm not talking about your ex. Once set, break the popcorn into manageable clusters — some people like big chunks, others prefer individual pieces. I go for a mix because life is too short for uniform popcorn. Store in airtight containers, layering with parchment paper if you're stacking them high. Properly stored, this will keep for up to a week, though I've never personally witnessed it lasting longer than three days before mysterious disappearances occur.
That's it — you did it. But hold on, I've got a few more tricks that'll take this to another level...
Insider Tricks for Flawless Results
The Temperature Rule Nobody Follows
Here's the thing that separates popcorn that makes angels sing from the sad, soggy stuff that gets fed to the garbage disposal: temperature is everything, but not in the way you think. Your popcorn should be warm (around 100°F), your coating should be warm but not hot (around 110°F), and your mix-ins should be cold. This creates a perfect storm where everything sticks together without the chocolate bleeding or the popcorn wilting. I keep a kitchen thermometer handy like I'm conducting edible science experiments, because in a way, I am.
The room temperature matters too — if your kitchen is a tropical paradise, everything will stay sticky longer. If it's an ice palace, your coating will set before you can get it mixed. Aim for a comfortable 68-72°F, and if your kitchen runs hot, work in smaller batches or near an open window. This is why I make this recipe in December when nature provides free air conditioning, rather than July when my kitchen feels like a sauna.
Why Your Nose Knows Best
Trust your sense of smell — it's like having a built-in candy thermometer. When the white chocolate is properly melted, it should smell sweet and creamy, almost like vanilla ice cream. If it starts to smell sharp or slightly burnt, you've gone too far and need to start over. I learned this the hard way after serving what my family now calls "the popcorn that tasted like disappointment" at Thanksgiving. Your nose will also tell you when the coating is setting — there's a subtle change from hot-chocolate smell to cool-candy smell that's your cue to work quickly.
This is also how you know when your popcorn is perfectly popped — it should smell toasty and slightly nutty, never burnt or bitter. If you're using microwave popcorn (again, no judgment), sniff the bag before opening. If it smells like a movie theater floor, it's overdone and will make your final product taste like regret.
The 5-Minute Rest That Changes Everything
After you've mixed everything together, walk away for five minutes. I know, I know — easier said than done when you're staring at what looks like edible Christmas magic. But this brief rest lets the coating start to set without being fully hardened, which means when you go to break it apart, you'll get those perfect clusters instead of everything shattering like my dreams of being tall. Set a timer and go wrap a present or pretend to check on the kids, but whatever you do, don't skip this step.
During this rest, the pretzels are absorbing just enough moisture to become perfectly crisp, the M&Ms are warming up slightly so they don't crack your teeth, and the coating is developing that perfect snap when you bite into it. It's like the popcorn equivalent of letting a steak rest — patience pays off in texture.
The Storage Secret That Keeps It Fresh
Here's where most people go wrong: they store this like regular popcorn, which is basically a death sentence for texture. Instead, layer it between sheets of parchment paper in an airtight container, and add one of those silica gel packets from your vitamin bottles (wrapped in a coffee filter so it doesn't look like you're serving poison). The silica absorbs any excess moisture that would make everything soggy, while the parchment prevents the pieces from fusing into one massive popcorn brick.
Store it in a cool, dry place — not the fridge (too much moisture) and definitely not near the oven (too much heat). If you're making this more than three days ahead, consider vacuum-sealing portions. Yes, it's extra work, but opening a bag of popcorn that tastes as fresh as day one is basically Christmas magic in July.
The Gift-Wrapping Trick That Impresses Everyone
When giving this as a gift, presentation is everything. Layer it in a clear cellophane bag with parchment paper between layers, then tie with ribbon that matches your sprinkle colors. Add a handwritten tag with the recipe on the back — people love getting recipes for things they actually want to make. For extra points, include a little bag of extra sprinkles or M&Ms tied to the jar with ribbon. It's like giving them the tools to recreate the magic, and it costs you maybe fifty cents but looks like you planned this for months.
Creative Twists and Variations
This recipe is a playground. Here are some of my favorite ways to switch things up:
The Winter Wonderland Version
Swap the red and green M&Ms for white chocolate ones and use silver and white sprinkles instead. Add some edible pearl dust for shimmer that looks like fresh snow in moonlight. This version is perfect for New Year's Eve parties or when you want something that looks elegant but still tastes like childhood happiness. The all-white color scheme makes it look expensive, even though you're basically just eating candy and popcorn.
The "Adults Only" Edition
Keep everything the same but add a teaspoon of peppermint extract to the melted white chocolate, then use crushed candy canes instead of M&Ms. The mint makes it taste sophisticated while still hitting all those nostalgic notes. For extra adult points, add a tablespoon of white rum or peppermint schnapps to the coating — the alcohol burns off, leaving just the flavor. This version pairs beautifully with hot cocoa spiked with the same spirit, creating a matching set that'll impress your book club.
The Birthday Party Remix
Use birthday cake-flavored candy wafers (yes, that's a thing) and rainbow sprinkles with mini marshmallows instead of M&Ms. Add some mini chocolate chips for extra texture, and you've got popcorn that tastes like birthday cake but travels way better than actual cake. This is my go-to for summer parties when cake would melt into a puddle of frosting and regret.
The Movie Night Makeover
Replace half the popcorn with caramel corn for that sweet-salty thing that makes you unable to stop eating. Use peanut M&Ms and add some chopped peanuts for extra protein (so you can pretend it's healthy). Drizzle everything with a little melted dark chocolate at the end for that gourmet touch. This version disappears during movie marathons faster than the plot of a bad rom-com.
The Valentine's Day Romance
Pink and red M&Ms with heart-shaped sprinkles turn this into the perfect February treat. Add some dried strawberries or raspberries for a sophisticated touch, and package it in little cellophane bags tied with lace ribbon. I've made this for my single friends as "Happy Galentine's Day" gifts, and it's way better than those chalky conversation hearts that taste like disappointment.
The Back-to-School Boost
Use school colors for the M&Ms and sprinkles, add some mini chocolate chips for brain food, and package in small bags for lunchbox treats. This is perfect for teacher gifts or those first-day-of-school nerves. Add a little tag that says "You're one smart cookie!" because terrible puns make everything better.
Storing and Bringing It Back to Life
Fridge Storage
Despite what your instincts might tell you, never store this in the fridge unless you enjoy eating soggy disappointment. The cold creates condensation that turns your crispy creation into something resembling wet cardboard. Instead, keep it in an airtight container at room temperature, away from heat sources and direct sunlight. If your house runs warm, consider storing it in the coolest room, maybe near a window (but not in direct sun). Properly stored, it'll stay fresh for up to a week, though I've never witnessed it lasting that long without mysterious disappearances.
Freezer Friendly
Here's a plot twist: you can freeze this for up to three months if you do it right. Portion it into freezer bags, squeeze out all the air, and lay flat to freeze. When you're ready to eat, let it come to room temperature in the bag (this prevents condensation), then give it a gentle toss to redistribute any separated coating. It won't be quite as perfect as fresh, but it's miles better than store-bought holiday popcorn and makes you look incredibly prepared when unexpected guests drop by.
Best Reheating Method
If your popcorn has absorbed moisture and gone a bit soft, you can revive it with this trick: spread it on a baking sheet and pop it in a 200°F oven for 10-15 minutes. This drives off the moisture without melting the coating. Let it cool completely before storing again. This works once, maybe twice before the coating starts to break down, so don't make a habit of it. Think of it as popcorn CPR, not a regular beauty treatment.