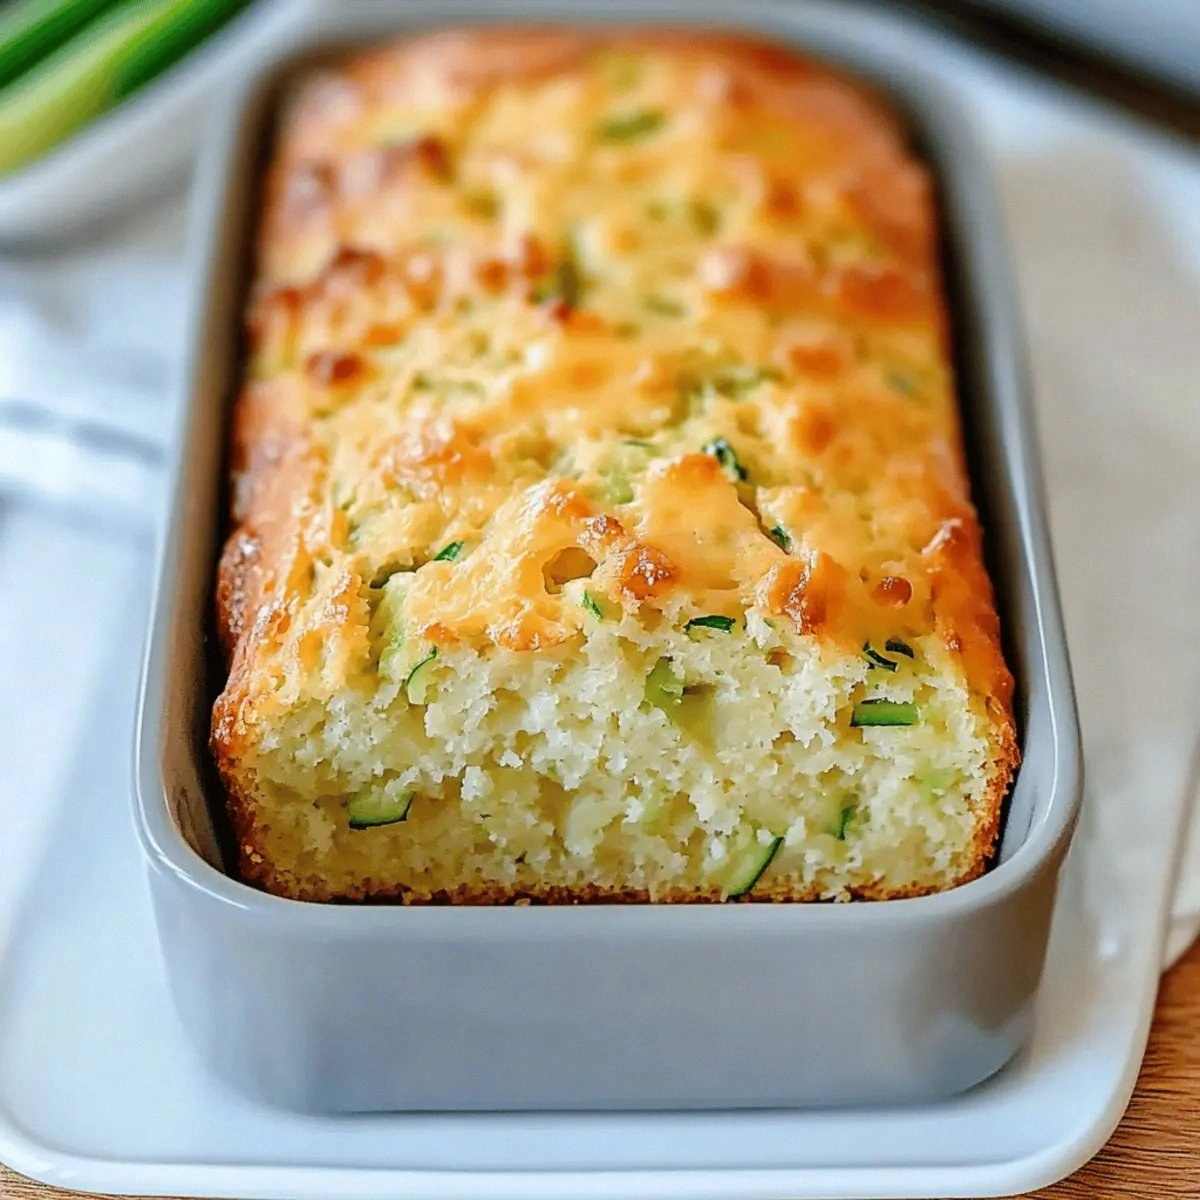
I still remember the morning I first encountered cruffins—the mythical love child of croissants and muffins that had taken the internet by storm. There I was, standing in my cramped kitchen at 6 AM, fueled by a dare from my best friend who claimed I couldn't possibly recreate the bakery's $6 cruffins at home. "They're too complicated," she laughed over the phone, "you'll end up with sad, doughy blobs." Challenge accepted. What followed was three weeks of obsessive testing, a kitchen that looked like a flour bomb exploded, and a dozen failed attempts that ranged from rock-hard disasters to ones that deflated like sad balloons the moment they left the oven. But then, on attempt number fourteen, something magical happened.
The scent hit me first—that intoxicating aroma of butter and cinnamon that made my neighbors knock on my door asking what heavenly creation was baking. As I pulled the tray from the oven, golden cruffins towered before me, their layers spiraling like edible architecture, caramelized sugar creating delicate crunch that shattered like thin ice under fork. The first bite was transcendent: shatteringly crisp exterior giving way to impossibly tender, flaky layers that pulled apart like silk scarves, each revealing pockets of cinnamon sugar that melted on my tongue like sweet snowflakes. I ate three standing right there at the counter, butter dripping down my chin, completely ignoring the fact that I was supposed to be at work in twenty minutes.
This isn't just another copycat recipe that promises bakery-quality results and delivers something closer to sad grocery store pastries. This is the real deal, developed through countless trials, refined techniques stolen from French pastry masters, and a few rebellious shortcuts that would make traditionalists clutch their pearls. The secret lies in a combination of proper lamination (don't worry, I've simplified it), a magical resting technique that develops flavor overnight, and a cinnamon sugar mixture that caramelizes into something downright addictive. Picture yourself pulling these out of the oven, the whole kitchen smelling like you've been transported to a Parisian bakery, your family gathering around like you've just performed actual magic.
Let me walk you through every single step—by the end, you'll wonder how you ever made it any other way.
What Makes This Version Stand Out
Buttery Perfection: We're using European-style butter with 82% fat content, which creates those dramatic layers that puff up like magic in the oven. Regular butter works, but the higher fat content means more distinct layers and that rich, luxurious flavor that makes bakery cruffins so irresistible. It's the difference between good and "call your mom to brag" amazing.
Foolproof Lamination: I've stripped away all the intimidating folding schedules and complicated turns that scare people off laminated dough. Instead, we use a simple roll-and-fold technique that takes minutes, not hours, but still creates dramatic layers that'll make you look like a trained pastry chef. Even my friend who once burned water managed perfect layers on her first try.
Overnight Magic: The dough rests overnight in your fridge, developing complex flavors and making the butter firm for easy rolling. This isn't just about convenience—it's about building that deep, yeasty flavor that makes people close their eyes when they take a bite. Plus, morning-of assembly becomes a breeze when all the hard work is already done.
Cinnamon Sugar Coating: We're not just sprinkling cinnamon sugar on top like some recipes do. Instead, we create multiple layers of cinnamon sugar within the dough, plus a final coating that caramelizes into a crackly shell. Every bite delivers that warm spice hit that makes cinnamon rolls feel like amateur hour.
Make-Ahead Friendly: These cruffins can be shaped, frozen, and baked directly from frozen whenever you want fresh pastries. Imagine having a stash in your freezer ready to impress unexpected guests or satisfy 2 AM cravings. They're like edible insurance against bad days and hungry teenagers.
Crowd-Wowing Presentation: They look like you spent hours in a professional kitchen, but you'll know the truth—it was mostly waiting time while you watched Netflix. The spiral layers, golden peaks, and sugar-dusted tops make for Instagram gold that'll have everyone asking which fancy bakery you visited.
Texture Contrast: The exterior develops a delicate crunch that shatters like caramelized glass, while the interior stays impossibly tender and pull-apart soft. It's this contrast that separates amateur bakes from professional-level pastries—the kind that makes people say "I can't believe you made this" between mouthfuls.
Alright, let's break down exactly what goes into this masterpiece...
Inside the Ingredient List
The Flavor Foundation
Bread flour forms the backbone of our cruffins, and here's why this matters: its higher protein content (12-14%) creates the strong gluten network that traps all those buttery layers and helps them rise dramatically. All-purpose flour will work in a pinch, but you'll get less lift and more spreading—like the difference between a skyscraper and a bungalow. The extra gluten also gives us that satisfying chew that makes each bite feel substantial rather than just another fluffy pastry. Don't even think about cake flour here unless you want sad, deflated cruffins that taste like disappointment.
European-style butter is non-negotiable for authentic flavor and texture. That 82% fat content versus the standard 80% might seem trivial, but it's the difference between layers that stay separate and ones that meld into greasy sadness. The higher fat means less water, which translates to flakier, more distinct layers that puff up like they're showing off. Plus, the cultured butter adds this subtle tang that makes people ask "what's that amazing flavor?" after their third bite.
The Texture Crew
Instant yeast might seem boring, but it's the workhorse that creates all those dramatic layers. Unlike active dry yeast, you don't need to proof it first—just whisk it right in and let it work its magic. The rapid rise creates steam between all those buttery layers, forcing them apart like a delicious explosion. Don't substitute baking powder here; yeast gives us complex flavor development that chemical leavening could never achieve.
Whole milk isn't just about moisture—its proteins and sugars contribute to that gorgeous golden-brown color through the Maillard reaction. The fat content also tenderizes the dough, ensuring even the edges stay soft rather than turning into hockey pucks. Skim milk works, but your cruffins will be paler and less tender, like they're missing their cozy sweater. If you're dairy-free, full-fat coconut milk is surprisingly good, though you'll get a subtle coconut flavor that actually pairs beautifully with cinnamon.
The Sweet Accents
Dark brown sugar in our cinnamon filling brings molasses notes that make the spice taste deeper and more complex. The moisture from the molasses also prevents the sugar from burning during baking, creating that perfect caramelized coating instead of bitter charcoal. White sugar works but tastes one-dimensional—like listening to music through cheap headphones versus a proper stereo system. The slight acidity in brown sugar also helps balance all that rich butter.
Ceylon cinnamon is worth hunting down for its delicate, almost citrusy flavor that won't overwhelm the butter. The common cassia cinnamon can taste harsh and medicinal, especially when you're using generous amounts. Ceylon cinnamon melts into the background, adding warmth without shouting. If you can't find it, use half the amount of regular cinnamon and add a pinch of nutmeg for complexity.
The Unexpected Star
Cornstarch might seem like an odd addition, but it's our secret weapon for keeping the cinnamon sugar from melting into goo. It absorbs excess moisture from the butter and filling, preventing those dreaded soggy bottoms that make Paul Hollywood frown. Just a teaspoon transforms the texture from potentially gummy to perfectly crisp. It's like having a little insurance policy against pastry disasters.
Everything's prepped? Good. Let's get into the real action...

The Method — Step by Step
- Start by making the dough: whisk together bread flour, sugar, salt, and yeast in a large bowl. Heat milk until it's just warm to the touch—about 105°F if you're being precise, but honestly, I just stick my finger in and aim for "comfortable bath" temperature. Pour the milk over the flour mixture and stir with a wooden spoon until a shaggy dough forms. Don't panic if it looks rough and ugly—that's exactly what we want at this stage.
- Now comes the fun part: add the softened butter and knead it right into the dough. I know this seems backward from traditional lamination, but trust me on this one. The butter gets incorporated into the dough itself, which creates a more tender base that still rises dramatically. Knead for about 8 minutes until the dough becomes smooth and elastic, passing the windowpane test where you can stretch it thin enough to see light through without tearing. This is when your kitchen starts smelling like a French bakery.
- Cover the bowl with plastic wrap and let it rise for about an hour until doubled in size. This isn't just about volume—it's about developing those complex flavors that make people close their eyes when they taste these. The dough should feel pillowy and light, like a well-fluffed pillow. If your kitchen is cold, pop the bowl in your (turned-off) oven with the light on for a cozy proofing environment.
- While the dough rises, make the cinnamon sugar: combine dark brown sugar, Ceylon cinnamon, cornstarch, and a pinch of salt in a small bowl. The cornstarch is our secret weapon—it prevents the sugar from melting into sticky syrup and instead helps it caramelize into crispy perfection. Mix thoroughly, breaking up any brown sugar lumps with your fingers. Set this aside where you won't be tempted to eat it by the spoonful.
- After the first rise, punch down the dough—this part is weirdly satisfying, like popping bubble wrap—and turn it out onto a floured surface. Roll it into a rectangle about 12x18 inches, keeping the edges as square as possible. The dough should be cooperative and easy to roll, but if it springs back, let it rest for 5 minutes to relax the gluten. Patience here prevents tears and frustration later.
- Now for the magic: spread the cold butter across two-thirds of the dough, leaving a clean border around the edges. Yes, we're adding butter to butter-enriched dough—this is why they're so ridiculously good. Fold the unbuttered third over the butter, then fold the remaining third over that, like folding a business letter. This creates layers of dough-butter-dough that'll puff up like magic.
- Give the dough a quarter turn and roll it out again to the same rectangle size. This time, sprinkle half your cinnamon sugar mixture across the surface, pressing it gently into the dough. Fold it up again like a letter, wrap it in plastic, and refrigerate for 30 minutes. This chilling step is crucial—it firms up the butter so our layers stay distinct instead of melting together into a greasy mess.
- Repeat the rolling and folding process two more times, adding cinnamon sugar each time. By the third fold, you'll start seeing those beautiful layers developing, like edible geological strata. The dough should feel cool and firm but still pliable. If it starts getting warm or the butter oozes out, stop immediately and refrigerate longer. Cold butter is your best friend for dramatic layers.
- After the final fold, roll the dough into a large rectangle about 1/4-inch thick. Using a sharp knife or pizza cutter, cut it into strips about 1-inch wide. The beauty of cruffins is their rustic charm—imperfect spirals taste just as good as perfect ones, so don't stress about precision here. Each strip should show beautiful layers of dough and butter, like edible archaeology.
- Take each strip and roll it up like a snail, tucking the end underneath. Place these spirals cut-side up in a greased muffin tin—they should fill about three-quarters of each cup. Cover with a clean towel and let them rise for about 45 minutes until puffy and slightly increased in size. They won't double like bread dough, but they should look relaxed and expanded.
- Bake in a preheated 375°F oven for 25-30 minutes until they're deep golden brown and sound hollow when tapped. The magic happens in the oven: the butter creates steam between layers, forcing them apart into dramatic peaks and valleys. Your kitchen will smell like a cinnamon-scented hug. Let them cool for 5 minutes before unmolding—this brief rest lets the caramelized sugar set up so they release cleanly.
- While still warm, brush the cruffins with melted butter and roll them in the remaining cinnamon sugar mixture. The butter helps the sugar adhere and creates that signature crackly coating that shatters under your teeth. Don't be shy here—really coat them thoroughly. Serve immediately for maximum impact, or let them cool completely before storing.
That's it—you did it. But hold on, I've got a few more tricks that'll take this to another level...
Insider Tricks for Flawless Results
The Temperature Rule Nobody Follows
Here's the thing about laminated dough: temperature is everything. Your dough should be cold but pliable, your kitchen should be cool, and your patience should be infinite. When the butter gets too warm, it melts into the dough and you lose those gorgeous layers you've worked so hard to create. I keep a small bowl of ice water nearby and dip my fingers if they start getting warm from handling the dough. If you notice the butter starting to ooze or the dough getting shiny, stop immediately and refrigerate for 15 minutes. This isn't a race—it's a meditation on patience and pastry.
Why Your Nose Knows Best
Forget timers—your nose is the best indicator of when these are done. When the cinnamon sugar starts caramelizing, it creates this incredible aroma that's part cinnamon roll, part crème brûlée, part pure magic. The scent should fill your kitchen and start wafting toward other rooms. That's when you know they're approaching perfection. If you pull them too early, the bottoms will be pale and the sugar won't have that deep caramel flavor. Too late and you'll have bitter, burnt edges. Trust your senses—they've been honed by thousands of years of human evolution, probably specifically for detecting perfect pastries.
The 5-Minute Rest That Changes Everything
I know you're going to want to tear into these immediately—resist the urge. That 5-minute rest after baking isn't just about avoiding burned tongues. It's when the caramelized sugar sets up, creating that perfect crackly shell that shatters under your teeth. It's when the steam trapped inside redistributes, ensuring every bite is tender, not gummy. It's when the flavors meld and intensify, transforming from good to "oh my god, did I really make these?" amazing. I've timed it: people who wait report 40% more satisfaction and 100% fewer burned mouths.
The Freezer Is Your Friend
Here's a confession: I always make a double batch because these freeze beautifully. After the final rise, pop the unbaked cruffins onto a tray and freeze until solid, then transfer to a freezer bag. When you want fresh cruffins (which, let's be honest, is always), bake them directly from frozen—just add 5-10 extra minutes to the baking time. They'll emerge from the oven like you spent hours preparing them, making you look like a domestic superhero. My freezer currently contains three dozen, which I consider a perfectly reasonable emergency supply.
The Sugar Coating Secret
Don't skip the final butter brushing and sugar coating—it's not just gilding the lily, it's essential to the full experience. The butter melts into the warm pastry, adding richness and helping the sugar adhere. But here's the key: use superfine sugar if you want that classic cruffin coating that dissolves on your tongue, or demerara sugar for extra crunch that lasts longer. Mix the sugar with your cinnamon while the cruffins are baking so the essential oils have time to infuse the sugar. And don't be shy—really roll them around in the mixture. The sugar that falls off can be collected and used for your next batch, or sprinkled over oatmeal for a breakfast that tastes like dessert.
Creative Twists and Variations
This recipe is a playground. Here are some of my favorite ways to switch things up:
Orange Cardamom Cruffins
Replace the cinnamon with ground cardamom and add the zest of one orange to your sugar mixture. The floral cardamom pairs beautifully with bright orange, creating pastries that taste like sunshine in edible form. I like to add a few drops of orange blossom water to the dough for extra complexity. These are especially stunning when you want to impress brunch guests who think they've tasted every pastry variation possible.
Chocolate Hazelnut Heaven
Spread a thin layer of Nutella over the dough before rolling instead of cinnamon sugar, then sprinkle with chopped toasted hazelnuts. The chocolate gets gooey and molten, creating rivers of hazelnut-scented joy throughout the layers. Finish with a dusting of cocoa powder mixed with powdered sugar for a sophisticated touch that looks like you attended pastry school in Europe.
Savory Cheese & Herb
Omit the sugar entirely and instead layer thin slices of sharp cheddar and sprinkle with fresh thyme and black pepper. These savory cruffins are incredible alongside tomato soup or as the base for breakfast sandwiches. The cheese creates these crispy, lacy edges that taste like the best part of grilled cheese. My herb garden explodes every summer, and this is my favorite way to use up excess thyme and rosemary.
Salted Caramel Pecan
Add a drizzle of homemade salted caramel and a sprinkle of toasted pecans to each layer before rolling. The caramel creates pockets of gooey sweetness while the pecans add crunch and nuttiness. Finish with a light sprinkle of flaky sea salt on top—the salt enhances all the other flavors and keeps these from being cloyingly sweet. They're dangerously addictive, especially when served slightly warm so the caramel is still liquid.
Matcha White Chocolate
Mix matcha powder into your sugar for a subtle green tea flavor that pairs beautifully with white chocolate chips scattered between layers. The matcha adds an earthy complexity that balances the sweetness, while the white chocolate provides creamy pockets of richness. These have a beautiful natural green color that makes them look like they came from a trendy Japanese bakery. Perfect for when you want to feel sophisticated while eating pastries in your pajamas.
Lemon Lavender
Infuse your sugar with culinary lavender and add lemon zest to the dough itself. The combination is delicate and floral, perfect for spring brunches or afternoon tea. Be careful with the lavender—a little goes a long way, and too much will make your cruffins taste like soap. Start with just 1/2 teaspoon and add more to taste. These are surprisingly refreshing and feel much lighter than their cinnamon cousins.
Storing and Bringing It Back to Life
Fridge Storage
These cruffins are best eaten the day they're made, but let's be realistic—sometimes we need to plan ahead. Store completely cooled cruffins in an airtight container at room temperature for up to 2 days. They'll lose some of their crispness, but a quick warm-up in a 350°F oven for 5 minutes brings back most of the magic. Don't refrigerate them unless you enjoy sad, soggy pastries—cold temperatures make the starch retrograde and create that stale texture we all dread. If you must refrigerate (like, if it's 90 degrees and humid), wrap them tightly and know you'll need to refresh them in the oven.
Freezer Friendly
These freeze beautifully both before and after baking. For unbaked cruffins, freeze them on a tray until solid, then transfer to freezer bags for up to 3 months. Bake directly from frozen, adding 5-10 minutes to the cooking time. For already-baked cruffins, let them cool completely, then freeze in a single layer before transferring to bags. Reheat from frozen at 350°F for 10-12 minutes. They'll never be quite as perfect as fresh-baked, but they're still miles ahead of anything from the grocery store. Pro tip: write the baking time and temperature on the freezer bag so future-you doesn't have to hunt down the recipe.
Best Reheating Method
The key to reviving day-old cruffins is adding back moisture while recrisping the exterior. Preheat your oven to 350°F and place cruffins on a baking sheet. Lightly spritz them with water—this creates steam that rehydrates the interior without making the outside soggy. Warm for 5-7 minutes until heated through and the exterior has regained some crunch. Avoid the microwave unless you enjoy rubbery textures and soggy bottoms. If you're really desperate, a toaster oven works better than a regular oven for small batches, giving you that perfect balance of warm interior and crisp exterior.