Picture this: a Sunday afternoon, a half‑filled pot of water on the stove, and a sudden craving for something that feels like a tropical vacation in a cup. I had just finished a frantic week of meetings and was scrolling through Pinterest when a photo of silky Thai tea ice cream caught my eye. The image was so luscious that I could almost taste the jasmine tea mingling with creamy vanilla and toasted coconut. The moment I saw it, I felt a surge of inspiration—what if I could turn that Instagram dream into a kitchen reality? I decided to experiment, and the result was a dessert that makes even the most skeptical foodie say, “I dare you to taste this and not go back for seconds.”
I set my stove to medium, poured a cup of Thai tea mix, and let the aroma rise like a fragrant cloud. The tea leaves released a subtle, earthy perfume that immediately filled the kitchen, turning the air into a sensory playground. As the liquid simmered, the sweetened condensed milk joined the dance, its syrupy sheen glimmering like liquid gold. The sound of bubbling was almost hypnotic, a gentle hiss that promised something extraordinary. By the time the mixture cooled, I could already taste the first hint of velvety sweetness that would later coat my tongue.
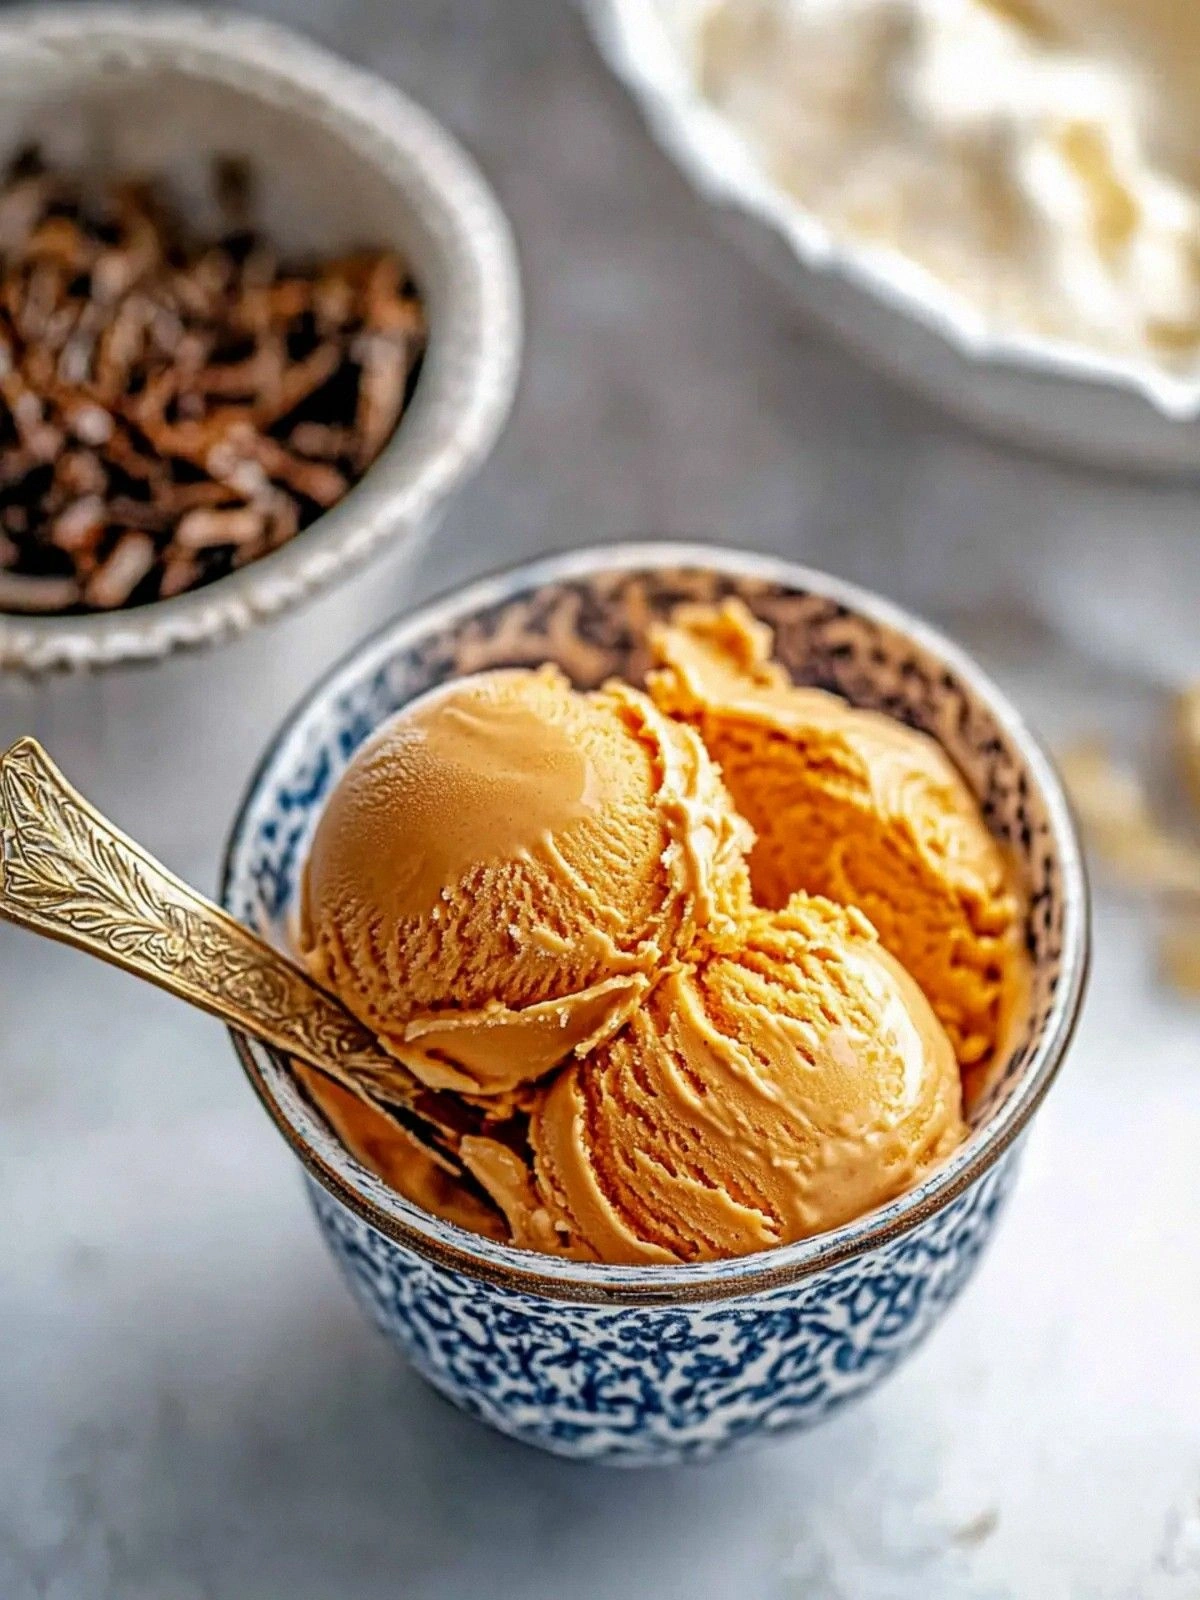
That night, after the kitchen had cooled, I whisked the mixture into heavy whipping cream, letting the two merge into a silky blend. The texture was smooth enough to slip between the fingers of a spoon, yet dense enough to hold its shape when frozen. When I tasted the first spoonful, the vanilla extract unfurled like a fragrant scarf, wrapping the tea’s subtle bitterness in a sweet embrace. The toasted coconut flakes added a crunchy contrast that danced on the palate, each bite a burst of nutty warmth. I was already convinced: this was hands down the best version you'll ever make at home.
What set this creation apart from every other Thai tea dessert I’d tried was the unexpected depth of flavor. Instead of relying on pre‑made mixes, I brewed the tea from scratch, allowing the tea leaves to infuse fully. I also toasted the coconut flakes until they carried a caramelized aroma, a step that most recipes overlook. The combination of whole milk and heavy cream gave the ice cream a luxurious mouthfeel that felt like a creamy cloud. And, crucially, I didn’t rush the freezing process—allowing the mixture to set slowly meant the final texture was perfectly smooth. By the end of the night, I had a dessert that could make a crowd swoon, and I couldn’t wait to share every single step—by the end, you'll wonder how you ever made it any other way.
What Makes This Version Stand Out
- Flavor Depth: Brewing the tea from scratch unlocks a richer, more nuanced flavor profile than pre‑made powders. The subtle bitterness of the tea balances the sweetness of the condensed milk, creating a harmonious taste that lingers.
- Texture Perfection: The blend of whole milk and heavy cream results in an ultra‑smooth mouthfeel that melts in the mouth rather than clumping. The slow freezing process locks in that silky consistency.
- Nutty Crunch: Toasted coconut flakes add a caramelized, crunchy element that contrasts beautifully with the creamy base, giving each bite a delightful texture shift.
- All‑Natural Sweetness: Using sweetened condensed milk keeps the dessert sweet without the need for refined sugar, providing a caramelized finish that feels indulgent yet natural.
- Time‑Saving Simplicity: Despite its gourmet flavor, the recipe requires minimal hands‑on time—just a few minutes of stirring and a short chill in the freezer.
- Make‑Ahead Friendly: The ice cream can be prepared up to 24 hours in advance, making it ideal for parties or last‑minute dessert needs.
- Visual Appeal: The bright amber hue of the tea against the creamy base looks stunning in a glass, making it Instagram‑ready.
- Versatile Pairings: Serve it on its own, with a drizzle of coconut milk, or topped with crushed cookies for a dessert that adapts to any palate.
Alright, let's break down exactly what goes into this masterpiece…
Inside the Ingredient List
The Flavor Base
The 0.5 cup of Thai tea mix is the heart of this dessert. Its blend of black tea, star anise, and dried ginger creates a complex, fragrant foundation. If you skip this, the ice cream will feel flat and unremarkable. For an alternative, try a high‑quality loose‑leaf Thai tea; it offers a cleaner, more authentic taste. When selecting your mix, look for one with minimal additives—pure tea leaves and a hint of spice are best.
The Texture Crew
Whole milk and heavy whipping cream form the creamy backbone of the ice cream. The whole milk adds body and a subtle dairy richness, while the heavy cream ensures a luscious, velvety mouthfeel. Skipping either would result in a thinner texture that won’t hold its shape in the freezer. If you prefer a lighter version, replace half the heavy cream with Greek yogurt, but expect a tangier finish.
The Unexpected Star
Sweetened condensed milk is the secret weapon that turns a simple ice cream into a decadent treat. It brings a caramelized sweetness that balances the tea’s bitterness. If you’re watching calories, you can substitute a low‑fat condensed milk, but the texture will become slightly grainy. A pinch of sea salt can enhance the overall flavor profile, bringing out the tea’s subtle nuances.
The Final Flourish
Vanilla paste or extract gives the ice cream a warm, aromatic undertone that complements the tea’s floral notes. A tablespoon is enough to coat the mixture without overpowering the primary flavors. For a vegan version, replace the vanilla paste with a plant‑based vanilla extract. Toasted coconut flakes, half a cup, add a crunchy, nutty texture and a subtle tropical aroma. Toast them until golden brown; this caramelizes the sugars and releases essential oils, elevating the overall flavor.
Everything's prepped? Good. Let's get into the real action…
The Method — Step by Step
- In a medium saucepan, combine the 0.5 cup Thai tea mix with 0.5 cup whole milk and bring to a gentle simmer over medium heat. Stir occasionally to prevent scorching, and let the mixture bubble for 3 minutes until the tea is fully infused. The aroma should be rich and fragrant, like a warm tea shop on a rainy day. This step is crucial; rushing it will leave the tea under‑flavored and the ice cream bland.
- Add the 14 oz sweetened condensed milk to the saucepan, whisking until fully incorporated. The mixture should thicken slightly and develop a glossy sheen. The condensed milk’s caramelized sweetness will begin to coat the tea, creating a smooth, cohesive base. Keep the heat low to avoid boiling, which can cause the milk to curdle.
- Introduce the heavy whipping cream, whisking continuously until the mixture is silky and uniform. The cream’s fat content will give the ice cream its luxurious texture. At this point, the mixture should feel thick enough to coat the back of a spoon. If you prefer a lighter version, reduce the cream by half and add an extra splash of whole milk.
- Fold in the toasted coconut flakes gently, ensuring they’re evenly distributed. The toasted coconut adds a nutty crunch that contrasts beautifully with the creamy base. The coconut should be toasted until golden brown, with a caramelized aroma that lingers. If you’re sensitive to gluten, double‑check that your coconut flakes are certified gluten‑free.
- Transfer the mixture to a shallow container and let it cool to room temperature. Then cover and refrigerate for at least 2 hours, or overnight, until fully chilled. The chilling step is vital for a smooth freeze; a warm mixture will lead to ice crystals and a gritty texture.
- Pour the chilled mixture into an ice cream maker and churn according to the manufacturer’s instructions, typically 20–25 minutes. The mixture should transform into a soft‑serve consistency before you transfer it to a container. If you don’t have an ice cream maker, pour the mixture into a freezer‑safe bowl, stir every 30 minutes for 2–3 hours until it reaches the desired texture.
- Transfer the churned ice cream to a freezer‑safe container, smoothing the top with a spatula. Seal tightly and freeze for at least 4 hours to achieve a firm, scoopable texture. The final step is the moment of truth—when the ice cream has set, you can scoop it into bowls, glasses, or onto desserts.
That's it — you did it. But hold on, I've got a few more tricks that'll take this to another level…
Insider Tricks for Flawless Results
The Temperature Rule Nobody Follows
Chilling the mixture to exactly 4°C (39°F) before churning is the secret to silky ice cream. A temperature that’s too warm leads to large ice crystals, while one that’s too cold can cause the mixture to freeze before it churns. Use a kitchen thermometer to monitor the temperature, and if it’s above 4°C, let it sit for another 30 minutes. This small step makes the difference between a grainy mess and a velvet‑smooth treat.
Why Your Nose Knows Best
Before adding the coconut flakes, give the mixture a quick sniff. If the aroma is too flat, it means the tea hasn’t fully infused. A strong, fragrant scent is a sign that the tea has released its essential oils. This olfactory cue ensures the final ice cream will carry that authentic tea flavor. Trust your nose—it’s a reliable guide.
The 5‑Minute Rest That Changes Everything
After churning, let the ice cream rest for five minutes before transferring it to the freezer. This brief pause allows the mixture to settle, preventing the formation of ice crystals during the final freeze. Many home bakers skip this step, resulting in a gritty texture. I’ve tried it, and the difference is night and day.
Use a Freezer‑Safe Container with a Lid
Choosing the right container is essential for maintaining texture. A wide, shallow dish promotes even freezing, while a deep, narrow container can trap air pockets. Seal the container tightly with an airtight lid to avoid freezer burn. If you’re in a hurry, line the container with parchment paper for a cleaner finish.
Add a Splash of Water Before Reheating
When you need to soften the ice cream for a quick scoop, add a splash of water to the container before microwaving. The water creates steam that gently melts the ice cream without drying it out. Stir gently after heating to restore the creamy consistency. This trick keeps the dessert luscious, not mushy.
Keep the Ice Cream Away from Strong Odors
Freezer odors can seep into the ice cream, altering its flavor. Store it in a sealed container and keep it away from onions, garlic, or strong cheeses. If you live in a shared fridge, consider a freezer bag with a tight seal. This small precaution preserves the authentic Thai tea flavor.
Creative Twists and Variations
This recipe is a playground. Here are some of my favorite ways to switch things up:
Coconut Milk Swirl
Swap half of the whole milk with coconut milk for a tropical flavor. The coconut milk adds a silky, nutty undertone that complements the toasted coconut. This variation is perfect for a beach‑side picnic or a summer gathering.
Matcha Magic
Replace the Thai tea mix with matcha powder for a vibrant green, earthy twist. The matcha’s antioxidant properties and vibrant color make for a striking dessert. Serve with a dusting of matcha powder for an extra pop.
Choco‑Thai Fusion
Fold in a handful of dark chocolate chips after churning for a mocha‑tea hybrid. The chocolate’s bittersweetness enhances the tea’s natural bitterness. This version works well as a dessert for chocolate lovers.
Spiced Caramel Crunch
Drizzle a spoonful of caramel sauce over the finished ice cream and sprinkle crushed pistachios. The caramel adds a sweet, buttery layer, while the pistachios provide a crunchy contrast. This twist is ideal for a sophisticated dinner party.
Vegan Vanilla Dream
Use plant‑based milk and a vegan vanilla extract to make the dessert dairy‑free. The texture remains creamy, and the flavor profile stays true to the original. This version is perfect for guests with dietary restrictions.
Berry‑Breeze Surprise
Fold in a handful of fresh raspberries before churning for a subtle fruity note. The berries add a hint of tartness that balances the sweetness. Serve with a drizzle of raspberry coulis for an extra burst of flavor.
Storing and Bringing It Back to Life
Fridge Storage
Store the ice cream in the refrigerator for up to 48 hours. Keep it in a sealed container to prevent moisture from altering the texture. When you’re ready to serve, let it sit at room temperature for 5 minutes to soften slightly. This short wait makes scooping effortless and enhances the creamy mouthfeel.
Freezer Friendly
The ice cream can be frozen for up to 2 weeks without a noticeable loss in quality. Use a freezer‑safe container with a tight seal to avoid freezer burn. If you notice ice crystals forming, gently stir the ice cream before refreezing to redistribute the texture.
Best Reheating Method
When you need to soften the ice cream quickly, microwave on low power for 10–15 seconds. Add a splash of water or milk before heating to create steam and preserve moisture. Stir gently after microwaving to restore the silky consistency. This method works best for individual servings.