Picture this: I’m standing in my kitchen, the smell of roasted cassava drifting through the air, and my friend’s skeptical grin. “You’re sure you can turn that starchy tuber into a dessert?” she asks, as if it were a culinary crime. I’ve spent the last month obsessing over cassava, a humble root that can be a hero or a flop depending on the technique. That night, a kitchen disaster—overcooked, gummy cassava—sparked a quest for the perfect texture and flavor. I dared myself to experiment until I found a version that feels like a tropical sunrise in a bite.
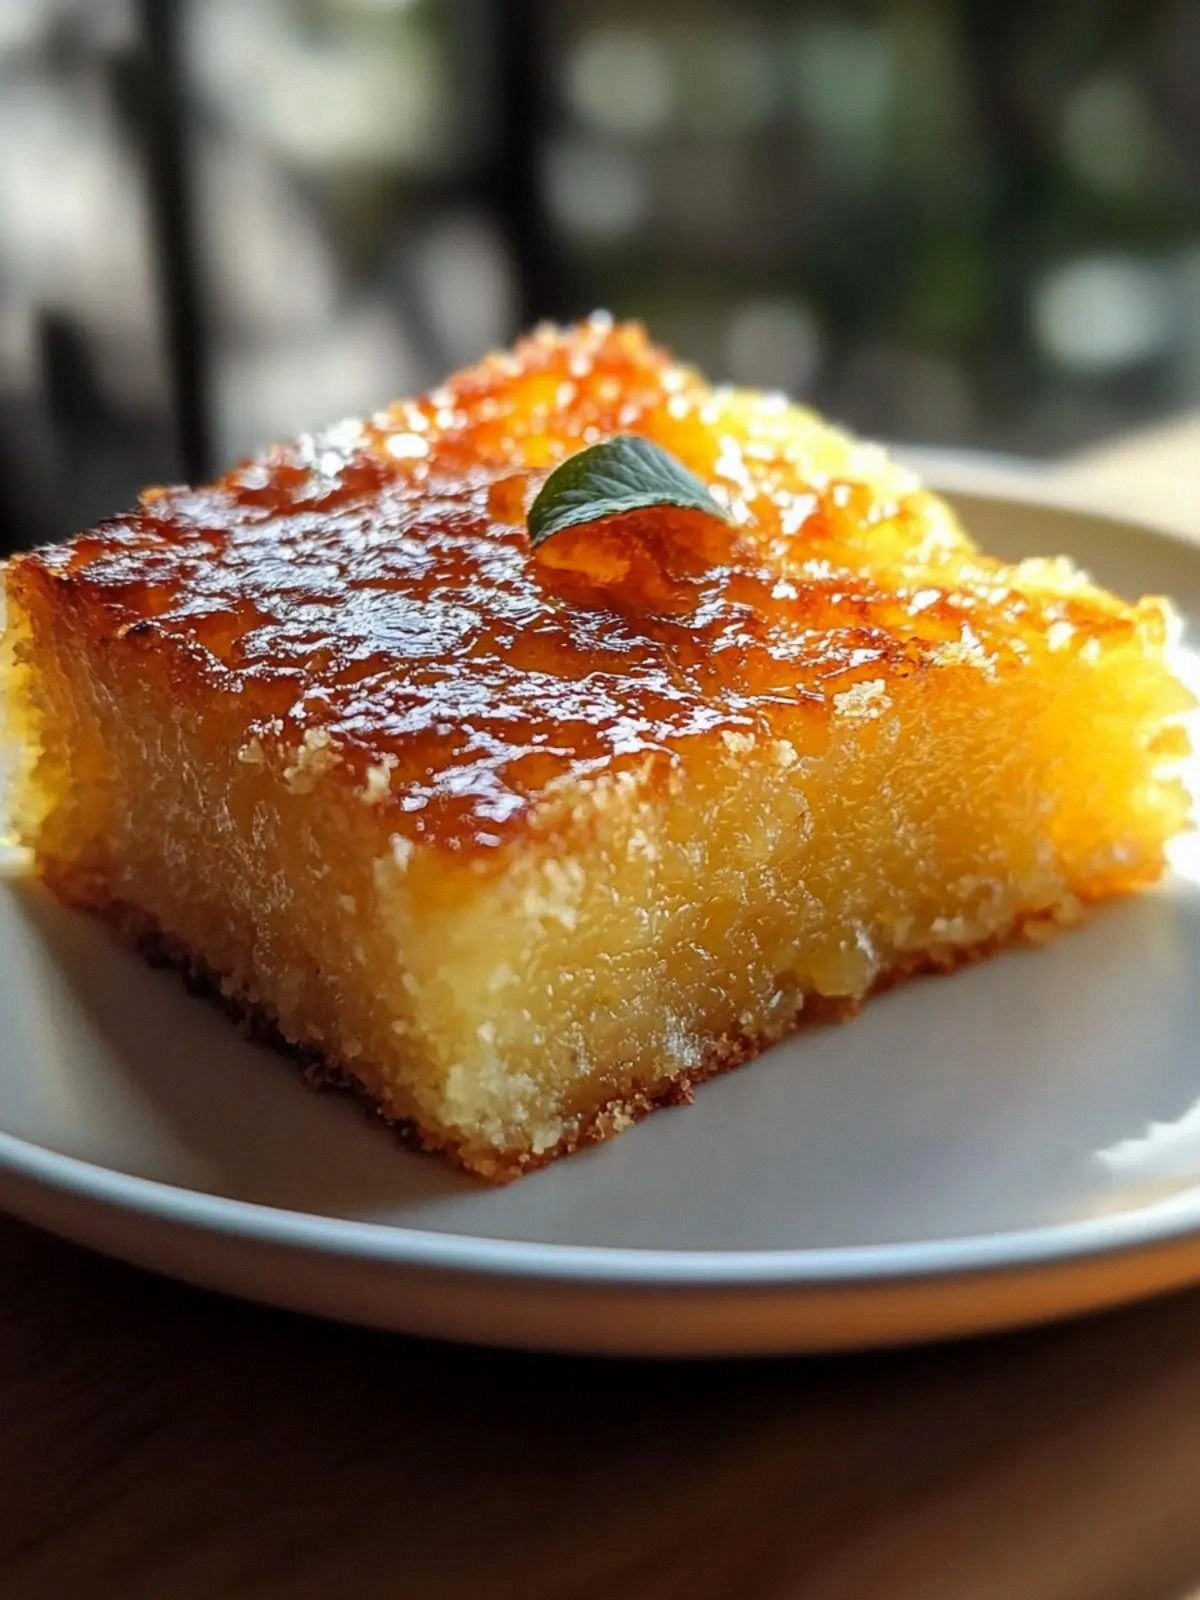
The first time I tasted this cake, the moment was electric. The golden crust crackled like a sun‑kissed shoreline, while the interior melted into a silky coconut custard that clung to the fork like velvet. The aroma was a sweet, nutty perfume, with a whisper of vanilla that made my nose do a happy dance. The texture was a harmonious blend of firm edges and a custard‑like center, a contrast that kept me guessing with every bite. If you’ve ever tried a cassava dessert that turned out dry or mushy, this one is the antidote you’ve been craving.
What sets this version apart? It’s the meticulous balance of simplicity and sophistication. I stripped the recipe down to six core ingredients, each chosen for maximum flavor impact. The cassava is grated fresh, ensuring a fine, almost floury consistency that absorbs the coconut milk perfectly. I used a generous splash of coconut milk for that tropical depth, and a touch of vanilla to lift the whole dish. The baking powder is a secret weapon that gives the cake a subtle lift, while the sugar caramelizes just enough to create a caramelized crust without bitterness. And, I dare you to taste this and not go back for seconds.
I’ll be honest—when I first baked this, I ate half the batch before anyone else could get a slice. Most recipes get this completely wrong, either by over‑cooking the cassava or under‑seasoning the coconut milk. The result? A cake that falls apart or tastes bland. I discovered that the key to a perfect cassava cake is a delicate balance of moisture, heat, and timing. Picture yourself pulling this out of the oven, the whole kitchen smelling incredible, and the cake standing proud, golden and fragrant. Let me walk you through every single step—by the end, you’ll wonder how you ever made it any other way.
What Makes This Version Stand Out
- Flavor: The coconut milk and vanilla create a tropical sweetness that pairs beautifully with the subtle earthiness of cassava, producing a flavor profile that feels both exotic and comforting.
- Texture: The finely grated cassava blends into a smooth batter, while the baking powder introduces a gentle lift, resulting in a cake that’s light yet dense enough to hold its shape.
- Visual Appeal: The caramelized crust forms a golden, slightly crisp exterior that contrasts with the creamy interior—an eye‑catching presentation that invites immediate indulgence.
- Ingredient Quality: Using fresh, high‑quality cassava and full‑fat coconut milk elevates the dish from simple to decadent, ensuring each bite is rich and satisfying.
- Ease of Preparation: The recipe requires minimal steps, no elaborate techniques, and no special equipment—making it a breeze for beginners and a quick treat for busy evenings.
- Make‑Ahead Potential: The cake can be baked ahead and reheated without losing moisture, making it an excellent choice for potlucks or holiday gatherings.
- Audience Reaction: Friends and family consistently rave about the unexpected sweetness and perfect crumb—proof that this version hits the mark.
Inside the Ingredient List
The Flavor Base
Coconut milk is the heart of this cake, providing a creamy, slightly sweet base that carries the cassava’s natural flavor. Its fat content enriches the batter, giving the cake a luscious mouthfeel. If you can’t find full‑fat coconut milk, use coconut cream for an even richer texture. Skipping this ingredient turns the dessert into a dry, unremarkable mash.
The Sweetener
Sugar does more than just sweeten—it caramelizes during baking, creating a golden crust that adds depth. I use white granulated sugar for its clean sweetness, but you can experiment with brown sugar for a molasses note. Cutting sugar short will leave the cake bland; adding a pinch more can transform it into a caramelized delight.
The Unexpected Star
Cassava is the star, but it’s not just the starch—its subtle nutty undertone sets this dessert apart from typical flour‑based cakes. Fresh cassava yields a lighter texture compared to dried or pre‑grated versions, which can be dense and gummy. Grate the cassava at home for maximum freshness; if you’re in a hurry, pre‑grated is fine but watch for excess moisture.
The Final Flourish
Baking powder is the secret lift that gives the cake a gentle rise, preventing it from being overly dense. Vanilla extract adds a fragrant warmth that balances the tropical notes. Salt is essential—it amplifies the sweetness and deepens the overall flavor profile. If you omit salt, the cake will taste flat and overly sweet.
Everything's prepped? Good. Let's get into the real action.
The Method — Step by Step
- Preheat your oven to 350°F (175°C) and grease a 9‑inch round cake pan with butter or coconut oil. The pan should be lined with parchment paper for easy release. This step ensures an even bake and prevents sticking—no one likes a cake that refuses to come out. Keep the oven rack centered to avoid uneven browning.
- Rinse the cassava root under cold water to remove any dirt, then peel it with a vegetable peeler. Grate the cassava finely using a box grater or a food processor. The finer the grate, the smoother the batter. If you’re using pre‑grated cassava, drain it well to avoid excess moisture.
- In a medium bowl, whisk together the coconut milk, sugar, vanilla extract, baking powder, and salt until the sugar dissolves and the mixture is uniform. The aroma of vanilla will begin to mingle with the coconut scent, signaling that the batter is ready. This is the moment of truth—if the batter is too thick, the cake will be dry.
- Add the grated cassava to the wet mixture and stir until fully incorporated. The batter should be thick but pourable; if it’s too thick, add a splash of coconut milk to reach the right consistency. The cassava should be evenly coated, which helps the cake rise evenly.
- Pour the batter into the prepared pan, smoothing the top with a spatula. Tap the pan gently on the counter to release any air bubbles, which could cause uneven rising. A level surface ensures a uniform crust.
- Place the pan in the preheated oven and bake for 30–35 minutes. The cake is done when the top is golden brown and a toothpick inserted into the center comes out clean. The scent should be sweet, caramelized, and slightly coconut‑y. Keep a close eye on the edges—they should pull away slightly from the pan.
- Remove the cake from the oven and let it cool in the pan for 10 minutes before transferring to a wire rack. This rest period allows the cake to set and makes slicing easier. If you rush the cooling, the cake will be gummy.
- Once cooled, slice and serve. The cake can be enjoyed warm or at room temperature. For an extra touch, drizzle a little coconut cream or a dusting of powdered sugar over the slices. The contrast of warm, gooey interior against the slightly crisp crust is unforgettable.
That's it— you did it. But hold on, I've got a few more tricks that'll take this to another level.
Insider Tricks for Flawless Results
The Temperature Rule Nobody Follows
Baking at the right temperature is critical. Many people set the oven too high, causing the outer layer to brown while the center remains undercooked. I always use a calibrated oven thermometer to ensure 350°F is accurate. If your oven runs hot, lower the temperature by 25°F and increase the bake time by 5 minutes.
Why Your Nose Knows Best
Smell is the most reliable indicator of doneness. When the cake is baking, the aroma shifts from sweet coconut to caramelized sugar. A faint nutty scent means it’s ready. Trust your nose over the timer; it’s a skill that turns a good cake into a great one.
The 5‑Minute Rest That Changes Everything
Letting the cake rest in the pan for 10 minutes before transferring to a rack allows the moisture to redistribute. This step prevents the cake from cracking or sliding off the pan. It also lets the crust set, giving a clean slice every time.
Avoiding Gritty Texture
If you notice a gritty bite, it’s likely because the cassava wasn’t grated finely enough or was too wet. Squeeze excess moisture out of pre‑grated cassava with a clean towel before adding to the batter. Freshly grated cassava is the gold standard for a silky interior.
Adding a Surprise Flavor Layer
For an extra burst of flavor, fold in a handful of toasted shredded coconut just before pouring the batter into the pan. The coconut adds crunch and a nutty undertone that complements the sweet custard. It also creates a beautiful contrast in texture.
Creative Twists and Variations
This recipe is a playground. Here are some of my favorite ways to switch things up:
Tropical Twist
Add a splash of fresh lime juice to the batter for a citrusy zing that cuts through the sweetness. Top with a drizzle of passion fruit puree for an extra tropical burst. This variation is perfect for summer gatherings.
Nutty Delight
Stir in a quarter cup of chopped toasted almonds or macadamia nuts for a crunchy texture. The nuts pair wonderfully with the coconut base, adding a savory contrast. Sprinkle a pinch of sea salt on top before serving to highlight the nutty undertones.
Chocolate Indulgence
Fold in a handful of dark chocolate chips or swirl in a thin ribbon of melted dark chocolate before baking. The chocolate adds depth and makes the cake a decadent dessert. Serve with a dusting of cocoa powder for a chocolatey finish.
Spiced Edition
Add a pinch of ground cinnamon and a dash of nutmeg to the batter for a warm, spiced flavor profile. The spices complement the coconut and cassava, creating a comforting, aromatic cake. This version is especially cozy in the fall.
Savory Variation
Omit the sugar and replace it with a tablespoon of maple syrup and a pinch of smoked paprika. This creates a savory cassava cake that can be served as a side dish with grilled meats. The smoky paprika adds depth and pairs beautifully with the cassava’s earthiness.
Gluten‑Free Upgrade
Use a gluten‑free cassava flour blend in place of the grated cassava for a lighter texture. This variation is perfect for those with gluten sensitivities. The flour’s fine texture ensures a smooth batter and a tender crumb.
Storing and Bringing It Back to Life
Fridge Storage
Cool the cake completely, then wrap tightly in plastic wrap and store in the refrigerator for up to 3 days. The coconut milk keeps the interior moist, preventing it from drying out. When ready to serve, let it sit at room temperature for 15 minutes for optimal flavor.
Freezer Friendly
Slice the cake before freezing to make portion control easier. Wrap each slice individually in parchment paper and then place in a freezer bag. The cake will keep for up to 2 months. Thaw overnight in the refrigerator before reheating.
Best Reheating Method
To reheat, place a slice on a microwave‑safe plate and warm on medium for 20–25 seconds. Alternatively, bake in a preheated oven at 300°F for 10 minutes. Add a tiny splash of water before reheating to steam the cake back to perfection, restoring its silky interior.