Picture this: it’s a rainy Saturday afternoon, the kind that makes you want to curl up with a blanket, a good movie, and something sweet that feels like a hug from your grandma. I was halfway through a marathon of classic Southern films when my pantry gave me a sad, echoing clank—my usual pie crust ingredients were nowhere to be found. I stared at the empty flour sack, sighed, and then thought, “What if I could cheat the whole pie thing and still get that buttery, caramel‑kissed pecan goodness?” That moment of desperation sparked the creation of the Lazy Girl Pecan Pie Bars, a dessert that turned my kitchen chaos into a triumph of simplicity.
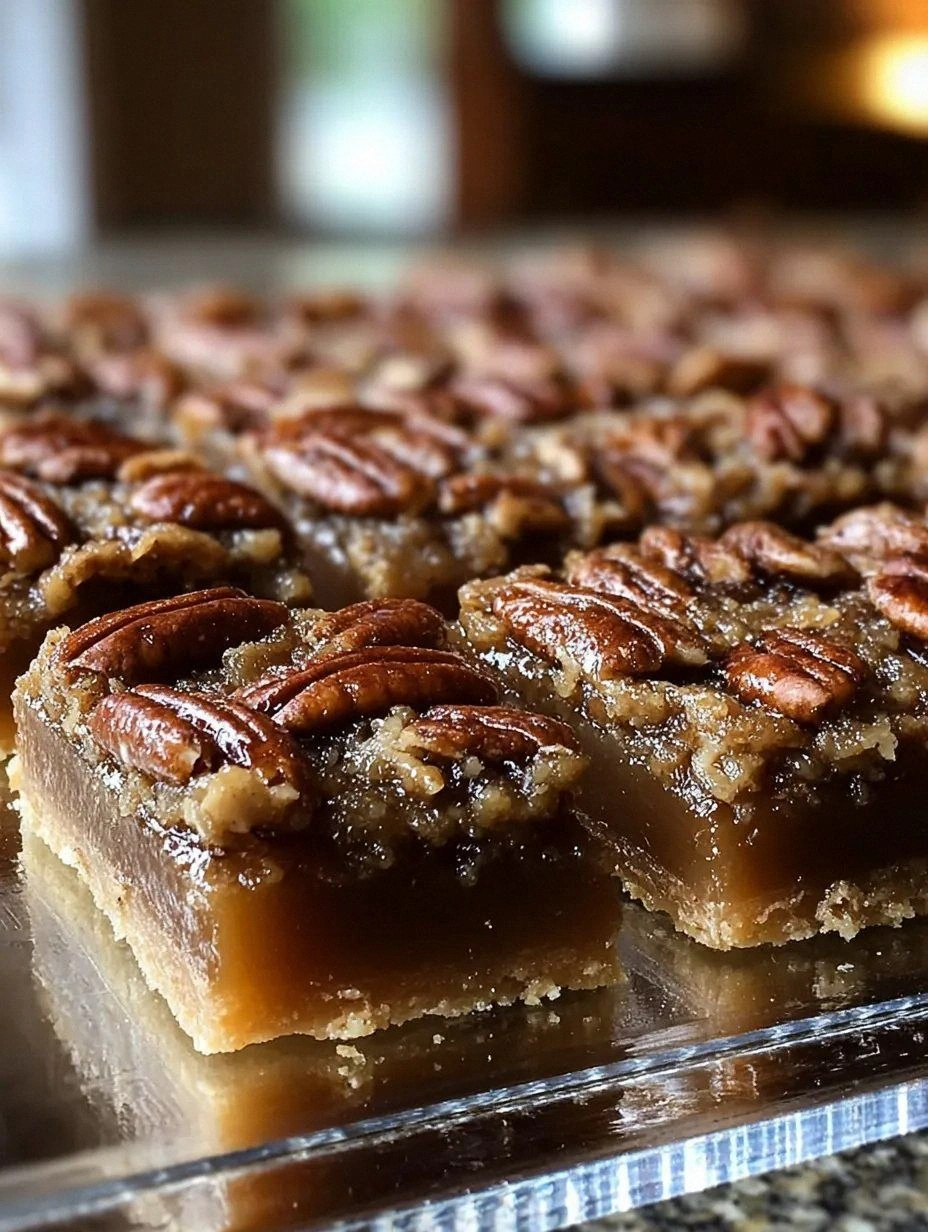
The first whiff of this recipe hits you like a Southern summer breeze—warm, nutty, and just a hint of caramel that makes your nose twitch in anticipation. As the butter melts into the flour, you’ll hear a soft sizzle that promises a crust so tender it practically melts in your mouth. When the pecans hit the caramel glaze, they crackle like fireworks on the Fourth of July, releasing an aroma that could convince even the most disciplined diet‑watcher to take a bite. The final product? Golden‑brown bars with a glossy top that catches the light like a polished river stone, and a crumbly interior that gives way to a gooey, sweet center.
Most pecan pie recipes demand a flaky crust, a stovetop caramel, and a whole‑hour bake that feels like a commitment you can’t keep on a lazy weekend. Most recipes get this completely wrong. Here’s what actually works: a no‑knead crust that sets in minutes, a one‑pan caramel that never burns, and a bake time that fits neatly into a lunch break. The secret? A dash of corn syrup that locks in moisture and a quick‑mix method that eliminates the need for a rolling pin, a pastry bag, or a PhD in pastry science. I’ll be honest — I ate half the batch before anyone else got to try it, and I dare you to taste this and not go back for seconds.
And there’s a twist you won’t see coming: a splash of vanilla extract that cuts through the sweetness and adds a depth that makes the bars feel sophisticated, not just sugary. This isn’t just a dessert; it’s a conversation starter, a nostalgic trip, and a shortcut that feels like cheating—but in the best possible way. Picture yourself pulling this out of the oven, the whole kitchen smelling incredible, the crust cracking just enough to reveal a glossy, caramel‑laden surface that glistens like sunrise on a river.
Okay, ready for the game‑changer? Let me walk you through every single step — by the end, you’ll wonder how you ever made it any other way. Stay with me here — this is worth it.
What Makes This Version Stand Out
- Flavor Explosion: The blend of brown sugar, corn syrup, and vanilla creates a caramel that’s richer than a Southern bourbon glaze, coating each pecan in pure bliss.
- Texture Harmony: A buttery, melt‑in‑your‑mouth crust meets a gooey, slightly crunchy pecan topping, delivering a contrast that feels like biting into a sweet, nutty dream.
- Simplicity Supreme: No rolling pin, no pastry bag, no fuss—just mix, press, bake, and you’ve got a show‑stopping dessert in under an hour.
- Unique Twist: A splash of vanilla and a pinch of sea salt elevate the classic pecan pie flavor profile, turning a traditional treat into a modern indulgence.
- Crowd‑Pleaser: These bars are portable, portion‑controlled, and perfect for potlucks, brunches, or a midnight snack that feels like a guilty pleasure you can justify.
- Ingredient Quality: Using fresh, unsalted butter and high‑quality pecans makes a noticeable difference—think buttery richness and a nutty crunch that sings.
- One‑Pan Wonder: Everything bakes in a single 9×13 pan, meaning fewer dishes, less cleanup, and more time to enjoy the results.
- Make‑Ahead Magic: The bars keep beautifully in the fridge for up to a week, and they freeze like a charm, so you can always have a sweet Southern treat on hand.
Inside the Ingredient List
The Flavor Base
First up, the caramel glaze. Light brown sugar, packed tightly, brings a deep molasses note that’s the backbone of any good pecan pie. If you skimp on the brown sugar, you’ll end up with a glaze that tastes more like plain syrup than the luxurious, buttery caramel you’re after. Corn syrup is the unsung hero here; it prevents the sugar from crystallizing, ensuring a glossy, smooth finish that clings to each pecan like a sweet, sticky hug. Skipping the corn syrup? Expect a grainy mess that will ruin the whole bar.
Vanilla extract, though just a teaspoon, adds a fragrant undercurrent that balances the sweetness and highlights the nuttiness of the pecans. If you’re feeling adventurous, a splash of bourbon or a pinch of smoked paprika can add a subtle, smoky depth—just don’t overdo it, or you’ll mask the classic Southern flavor.
The Texture Crew
The crust is a simple blend of all‑purpose flour, melted butter, a whisper of granulated sugar, and a pinch of salt. The flour provides structure, while the butter supplies richness and a tender crumb. Using melted butter instead of softened butter eliminates the need for kneading, giving you a quick‑mix dough that sets perfectly in the pan. If you use cold butter chunks, you’ll end up with a flaky pastry that’s great for pies but defeats the “lazy” ethos of this recipe.
Salt isn’t just a seasoning—it amplifies the sweet flavors and cuts through the richness, preventing the bars from feeling cloyingly sweet. A common mistake is to forget the salt entirely, resulting in a flat, one‑dimensional taste.
The Unexpected Star
Pecans, of course, are the headline act. Choose raw, unsalted pecan halves for the best texture and flavor. The fresher the nuts, the more pronounced their buttery, earthy notes will be. If you buy pre‑roasted pecans, you might get a burnt taste that clashes with the delicate caramel. A quick tip: give them a light toast in a dry skillet for two minutes before adding them to the glaze—this awakens their natural oils and adds a subtle crunch.
For those with nut allergies or who simply want a different crunch, try toasted pumpkin seeds or toasted almonds. The flavor will shift, but the texture contrast remains just as satisfying.
The Final Flourish
A final drizzle of melted butter over the top before baking adds an extra layer of sheen and richness, turning the glaze into a mirror‑like finish. This step is optional but highly recommended if you love that extra buttery gloss. A pinch of sea salt sprinkled on top right before baking creates those magical “flaky salt crystals” that pop against the sweet caramel, giving each bite a balanced flavor profile.
And remember, the whole thing comes together in a single 9×13 inch pan—no extra dishes, no extra stress. If you’re short on pan space, a 8×8 inch pan works too; just expect a slightly thicker bar and adjust baking time by a couple of minutes.
Everything's prepped? Good. Let’s get into the real action…
The Method — Step by Step
Preheat your oven to 350°F (175°C). While the oven warms up, line a 9×13 inch baking pan with parchment paper, leaving an overhang on the sides for easy removal later. This step might seem trivial, but trust me, it saves you from a sticky mess and makes serving a breeze.
In a large mixing bowl, whisk together 1½ cups (180 g) all‑purpose flour, ¼ cup (50 g) granulated sugar, and ¼ tsp salt. The sugar adds a subtle sweetness to the crust, ensuring it’s not bland once the caramel takes over.
Pour in ½ cup (115 g) melted unsalted butter and stir until the mixture resembles coarse crumbs. This is the moment of truth: the dough should clump together when pressed between your fingers—if it’s too dry, add a splash of milk; if too wet, sprinkle a little extra flour.
Press the dough evenly into the prepared pan, using the flat side of a measuring cup to smooth it out.
Kitchen Hack: For a perfectly level crust, place a sheet of wax paper on top of the dough and roll a rolling pin over it—no mess, no extra dishes.In a saucepan over medium heat, combine 1 cup (220 g) light brown sugar, ½ cup (160 ml) corn syrup, and ¼ cup (60 ml) water. Stir constantly until the sugar dissolves, then bring to a gentle boil. Once bubbling, reduce the heat and let it simmer for 2‑3 minutes, watching for a deep amber color—this is the caramel’s sweet spot.
Remove the saucepan from heat and whisk in 2 large eggs, one at a time, followed by 1 tsp vanilla extract. The mixture will thicken quickly; keep whisking to avoid curdling.
Watch Out: If the pan is too hot, the eggs will scramble. Temper the mixture by adding a spoonful of the hot caramel to the eggs first, then pour back.Stir in 2 cups (200 g) pecan halves, ensuring each nut is fully coated. The caramel should cling to the pecans like a glossy veil. If you prefer extra crunch, give the nuts a quick toast in a dry skillet for 2 minutes before adding.
Pour the caramel‑pecan mixture over the pre‑baked crust, spreading it with a spatula to the edges. Drizzle an additional 1 tbsp melted butter over the top, then sprinkle a pinch of flaky sea salt. This final touch creates a contrast that makes the bars unforgettable.
Slide the pan into the oven and bake for 30‑35 minutes, or until the edges start pulling away from the sides of the pan and the top is a deep, caramel‑golden hue. The smell at this stage is pure magic—think toasted marshmallows meeting a nutty forest floor.
Remove from the oven and let the bars cool in the pan for at least 20 minutes. This cooling period allows the caramel to set, making it easier to cut clean squares. Once cooled, lift the parchment overhang and place the whole slab onto a cutting board.
Using a sharp knife, cut the slab into 12 even bars. For ultra‑clean cuts, dip the knife in hot water and wipe dry between each slice. Serve warm, at room temperature, or chilled—each option offers a slightly different texture experience.
That's it — you did it. But hold on, I've got a few more tricks that'll take this to another level...
Insider Tricks for Flawless Results
The Temperature Rule Nobody Follows
Never bake these bars on a cold oven rack. Starting with a fully preheated oven ensures the crust sets quickly, preventing sogginess. I once tried a “slow‑start” method and ended up with a gummy bottom that never recovered. Trust the heat; it’s the secret to a crisp, buttery base.
Why Your Nose Knows Best
When the caramel reaches a deep amber color, your kitchen will fill with a scent that’s unmistakably “done.” If you’re still unsure, give the caramel a quick “water test”: drop a tiny spoonful into a glass of cold water—if it forms a soft ball, it’s perfect. Relying on sight alone can lead to over‑cooked, bitter caramel.
The 5‑Minute Rest That Changes Everything
Allowing the bars to rest for five extra minutes after removing them from the oven lets the caramel firm up just enough to hold its shape when you cut. Skipping this rest often results in messy, sticky slices that cling to the knife. Patience here is the difference between a professional‑looking bar and a kitchen‑disaster.
Butter Boost for Extra Gloss
Brush a thin layer of melted butter over the top just before the final bake. This not only adds a buttery sheen but also creates a subtle caramelization on the surface, giving each bite a crisp, buttery snap. I tried skipping this step once and the bars looked dull—adding the butter brings them back to life.
Freezer Friendly Flip‑Side
When freezing, wrap each bar individually in parchment, then place them in a zip‑top bag. This prevents freezer burn and makes it easy to grab a single serving later. Thaw them in the fridge overnight, then give a quick 5‑minute re‑heat in a 300°F oven to revive that fresh‑out‑of‑the‑oven crunch.
Creative Twists and Variations
This recipe is a playground. Here are some of my favorite ways to switch things up:
Maple‑Pecan Fusion
Swap half of the brown sugar for pure maple syrup and add a teaspoon of cinnamon. The result is a bar that tastes like a fall morning in a cabin—sweet, warm, and perfectly spiced. Ideal for autumn brunches.
Chocolate‑Covered Delight
After the bars have cooled, drizzle melted dark chocolate over the top and sprinkle with sea salt. The bitter chocolate balances the sugary caramel, creating a sophisticated flavor duo that will impress even the toughest critics.
Spiced Rum Rumination
Replace the vanilla extract with 1 tbsp spiced rum and add a pinch of nutmeg to the crust. The rum adds a subtle warmth, while the nutmeg deepens the nutty profile. Perfect for holiday gatherings.
Salted Caramel Pretzel Crunch
Fold crushed pretzel pieces into the caramel mixture before pouring it over the crust. The pretzels add a salty crunch that contrasts beautifully with the sweet caramel and pecans. A true sweet‑and‑salty masterpiece.
Gluten‑Free Goodness
Swap the all‑purpose flour for a 1‑to‑1 gluten‑free blend and ensure your pecans are processed in a gluten‑free facility. The texture remains just as tender, and the flavor stays true to the Southern roots.
Storing and Bringing It Back to Life
Fridge Storage
Place the bars (still on the parchment) in an airtight container and store them in the refrigerator for up to 5 days. The chilled bars become firmer, making them perfect for a quick grab‑and‑go snack. When you’re ready to eat, let them sit at room temperature for 10 minutes or microwave for 15 seconds for a warm treat.
Freezer Friendly
Wrap each bar individually in parchment, then seal them inside a freezer‑grade zip‑top bag. They’ll keep for up to 3 months. To revive, thaw in the fridge overnight, then pop them in a 300°F oven for 5‑7 minutes. Add a tiny splash of water to the pan before reheating to create a gentle steam that restores the caramel’s gloss.
Best Reheating Method
For the ultimate warm‑and‑gooey experience, preheat your oven to 325°F (165°C), place the bars on a parchment‑lined baking sheet, and heat for 8‑10 minutes. The crust will regain its buttery crispness, and the caramel will melt back into that luscious, sticky sheen you fell in love with.