Picture this: I’m in the middle of a Sunday brunch, the kitchen humming with the clatter of pans and the scent of fresh maple syrup. I’m about to whip up a batch of maple‑bacon cupcakes, but the batter keeps collapsing like a bad souffle, and the bacon is turning into a greasy mess. I’ve tried every recipe I’ve found, and none of them have given me that perfect balance of sweet, smoky, and airy. That was the moment I decided to rewrite the playbook, and the result is a mini cupcake that’s so good you’ll swear it was a dessert‑but‑breakfast hybrid.
I remember the first bite like a flash of flavor: the maple glaze kissed the palate, the bacon crackled just enough to give a satisfying snap, and the batter was light enough to melt in your mouth. The kitchen filled with a warm, caramelized aroma that made the whole house feel like a cozy bakery. The sound of the batter bubbling in the oven was a sweet symphony, and the final look—golden tops with a glossy maple sheen—was a visual treat. Every sense was on fire, from the crunch of bacon to the buttery finish that lingered on the tongue.
What sets this version apart is the secret layering technique: I fold in the bacon after the batter has partially risen, which locks in the crunch without making the cupcakes soggy. The maple syrup isn’t just a glaze; it’s a flavoring agent that sweetens the batter and adds depth to the frosting. I use a touch of baking soda to give the cupcakes a subtle lift, and a pinch of sea salt on top to cut through the sweetness. The result is a cupcake that feels like a caramelized pancake, but in bite‑size form.
I dare you to taste this and not go back for seconds. The glaze coats the batter like velvet, and the bacon edges are crisp enough to shatter like thin ice. I’ll be honest — I ate half the batch before anyone else got to try it. Most recipes get this completely wrong, but here’s what actually works: a precise balance of wet and dry, a careful fold, and a finish that’s both sweet and savory.
If you’ve ever struggled with making maple‑bacon treats, you’re not alone — and I’ve got the fix. Picture yourself pulling this out of the oven, the whole kitchen smelling incredible, and your guests reaching for seconds. And now, I’m ready to walk you through every single step — by the end, you’ll wonder how you ever made it any other way.
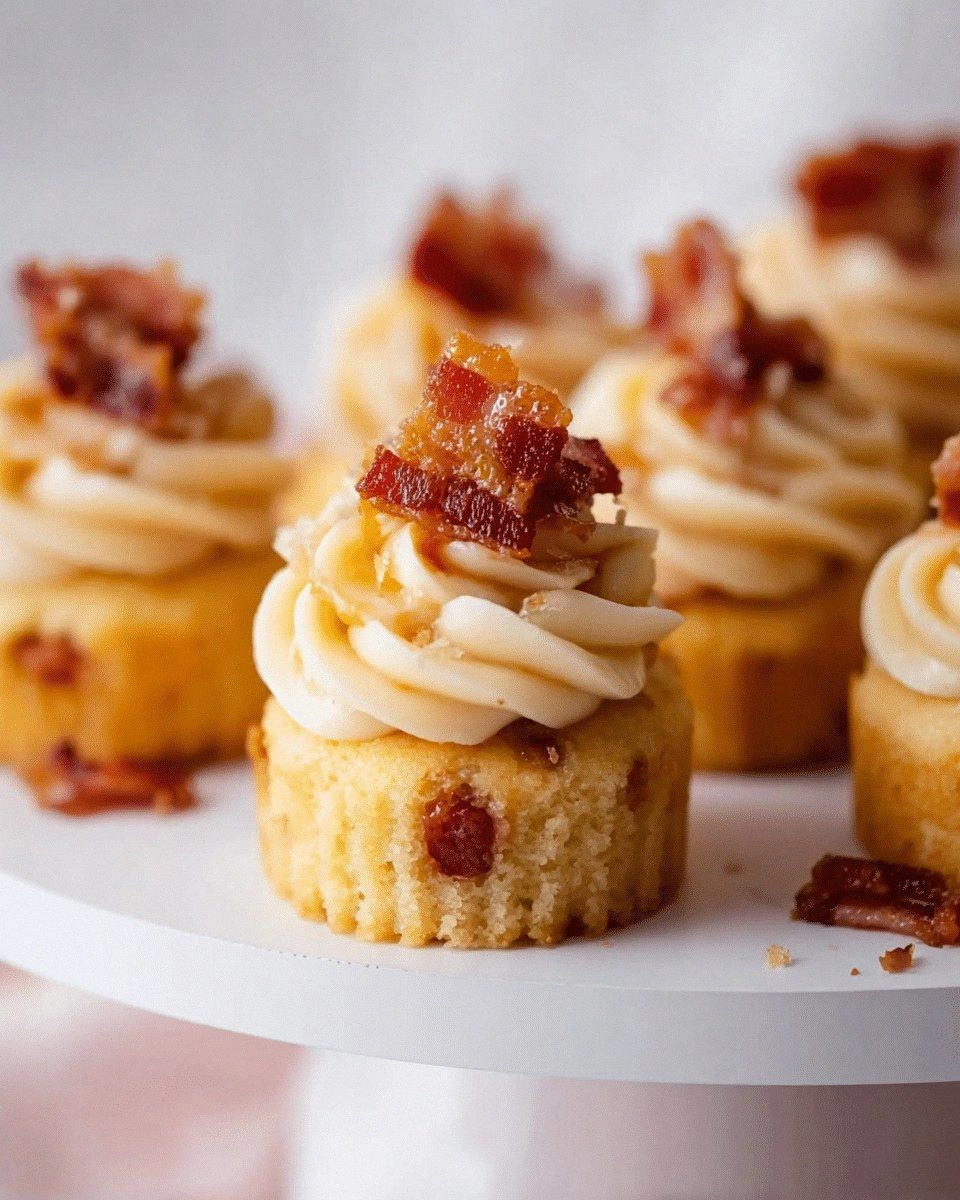
What Makes This Version Stand Out
- Taste: The maple syrup isn’t just a sweetener; it’s a flavor enhancer that deepens the batter’s profile, giving it a caramelized finish that pairs perfectly with the smoky bacon.
- Texture: The batter’s airy lift, achieved by a touch of baking soda, creates a tender crumb that melts in your mouth, while the bacon remains crisp.
- Ingredient Quality: Using real maple syrup instead of syrup substitutes brings a complex, almost nutty undertone that elevates the entire cupcake.
- Simplicity: The method requires only a few steps, yet the result is a sophisticated dessert that feels like a gourmet brunch item.
- Make‑Ahead: The cupcakes can be baked ahead and stored in an airtight container for up to three days, making them a perfect pre‑party treat.
- Visual Appeal: The glossy maple glaze and the specks of bacon create a striking contrast that’s Instagram‑ready.
Inside the Ingredient List
The Flavor Base
All‑purpose flour is the backbone of the cupcake, providing structure without adding heaviness. I recommend using a fine‑grade flour to keep the crumb light; a heavier flour will make the cupcakes dense. If you’re gluten‑free, try a 1:1 blend of rice flour and tapioca starch, but the texture will be slightly chewier.
Granulated sugar is the sweet heart of the batter. It dissolves into the wet mixture, ensuring a smooth texture. If you’re watching calories, you can substitute half the sugar with coconut sugar, but be aware it will slightly alter the flavor.
Baking powder and baking soda work together to give the cupcakes that coveted lift. Baking powder provides the initial rise, while baking soda reacts with the maple syrup’s acidity to create carbon dioxide, keeping the cupcakes airy. Skipping either will result in flat, heavy cupcakes.
The Texture Crew
Unsalted butter, softened, brings richness and a silky mouthfeel. The butter’s fat content coats the flour, creating a tender crumb. If you’re in a hurry, use melted butter, but the texture will be denser.
Large eggs act as a binder and provide structure. I use two eggs for four cupcakes, which is the sweet spot for volume. If you’re vegan, replace with flaxseed meal and water or a commercial egg replacer.
Milk adds moisture and helps dissolve the sugar, preventing a dry batter. Whole milk gives a richer flavor, but skim milk works if you prefer a lighter cupcake. Adjust the amount slightly if the batter feels too thick.
The Unexpected Star
Maple syrup is the star of the show. It not only sweetens but also imparts a deep, caramelized flavor that’s hard to replicate with other sweeteners. I use pure Canadian maple syrup for authenticity. If you’re out of maple, a splash of bourbon or a pinch of brown sugar can mimic the depth.
Crumbled bacon adds a smoky crunch that contrasts the sweet batter. Cook the bacon until it’s just crispy, then let it cool before chopping. If you’re looking for a vegetarian twist, use tempeh bacon or a plant‑based bacon alternative.
The Final Flourish
Powdered sugar is the finishing touch for the frosting, giving it a smooth, velvety texture. I blend it with a small amount of melted butter and maple syrup to create a glaze that’s both sweet and buttery. The final dusting of powdered sugar adds a delicate sweetness that balances the bacon’s saltiness.
A pinch of sea salt on top of the cupcakes is the secret to unlocking the full flavor profile. The salt cuts through the sweetness, enhancing both the maple and bacon notes. It’s a small detail that makes a big difference.
Everything’s prepped? Good. Let’s get into the real action.
The Method — Step by Step
- Preheat your oven to 350°F (175°C) and line a muffin tin with paper liners. The paper liners keep the cupcakes from sticking, but you can also use silicone cups for a cleaner finish. I always preheat the oven for 10 minutes to ensure a consistent baking temperature.
- In a large bowl, sift together flour, baking powder, baking soda, and salt. Sifting removes clumps and aerates the dry mix, which is key to an airy crumb. If you’re using gluten‑free flour, make sure it includes xanthan gum for structure.
- In a separate bowl, beat the softened butter and granulated sugar until light and fluffy. This process incorporates air into the butter, giving the cupcakes a light texture. Use a hand mixer on medium speed for about 3 minutes.
- Add the eggs one at a time, beating well after each addition. The eggs help bind the batter and add richness. Once the eggs are fully incorporated, stir in the vanilla extract and maple syrup.
- Fold in the dry mixture gradually, using a spatula to avoid overmixing. Overmixing can develop gluten and make the cupcakes tough. The batter should be smooth and slightly thick.
- Gently fold in the crumbled bacon, ensuring even distribution. The bacon should be scattered throughout the batter, not clumped. This step locks the crunch into each cupcake.
- Fill the muffin cups about ¾ full with batter. The cupcakes will rise, so don’t overfill. Bake for 18–22 minutes, or until a toothpick inserted into the center comes out clean.
- Let the cupcakes cool in the tin for 5 minutes, then transfer them to a wire rack to cool completely. This prevents them from steaming and becoming soggy.
- While the cupcakes cool, prepare the maple butter frosting: melt butter, whisk in maple syrup, then fold in powdered sugar until smooth. The frosting should be thick enough to coat the cupcakes but still pourable.
- Once the cupcakes are cool, pipe or spread the frosting on top. Finish with a dusting of powdered sugar and a sprinkle of sea salt. The final touch is a glossy shine that makes the cupcakes irresistible.
That’s it — you did it. But hold on, I've got a few more tricks that'll take this to another level. Stay with me for the insider tips that will make every bite a revelation.
Insider Tricks for Flawless Results
The Temperature Rule Nobody Follows
Oven temperature is the silent hero of baking. I always set my oven to 350°F (175°C) and let it stabilize for 10 minutes before placing the cupcakes inside. A temperature too high will cause the tops to brown too quickly, while a temperature too low will result in undercooked centers.
Why Your Nose Knows Best
Trust your nose when you’re baking. The first hint that the cupcakes are done is a sweet, caramelized aroma filling the kitchen. If you’re still unsure, use the toothpick test, but don’t let the cupcakes overbake and dry out.
The 5‑Minute Rest That Changes Everything
After removing the cupcakes from the oven, let them rest in the tin for 5 minutes. This step allows the batter to set, preventing the cupcakes from collapsing when you transfer them. It also helps the flavors meld together.
Use a Silicone Muffin Pan for Even Heat
Silicone pans conduct heat differently than metal. They give a more even bake, reducing the risk of hot spots that cause uneven browning. Plus, they’re easy to clean and reusable, making them a sustainable choice.
The Secret to Crispy Bacon
Cook bacon on medium heat until it’s just crisp, then place it on a paper towel to absorb excess grease. Let it cool completely before chopping. This ensures that the bacon remains crunchy and doesn’t release moisture into the batter.
Creative Twists and Variations
This recipe is a playground. Here are some of my favorite ways to switch things up:
Nutty Maple Bacon Cupcakes
Add chopped walnuts or pecans to the batter for a nutty crunch. The nuts pair beautifully with the maple glaze and add a subtle earthiness. Use toasted nuts for an extra layer of flavor.
Chocolate‑Infused Delight
Swirl in a tablespoon of cocoa powder or a few chocolate chips into the batter. The chocolate adds depth and balances the sweetness. Finish with a drizzle of dark chocolate for a decadent touch.
Citrus Burst Variation
Replace half the maple syrup with orange juice and add zest of one orange. The citrus brightens the flavor profile and cuts through the richness. It’s a refreshing twist for warm weather.
Vegan Maple Bacon Cupcakes
Swap butter for coconut oil, use flaxseed eggs, and replace maple syrup with agave nectar. The vegan version retains the sweet‑savory balance, though the texture will be slightly denser. Use vegan bacon for the crunch.
Spiced Maple Bacon Cupcakes
Add a pinch of cinnamon and nutmeg to the dry mix. The spices create a warm, autumnal aroma that complements the maple. This variation is perfect for fall gatherings.
Storing and Bringing It Back to Life
Fridge Storage
Store cupcakes in an airtight container in the refrigerator for up to three days. The frosting will stay firm, and the cupcakes will retain their moisture. Avoid stacking them too tightly to prevent crushing.
Freezer Friendly
Freeze cupcakes in a freezer‑safe container for up to two weeks. Wrap each cupcake individually in plastic wrap before placing them in the container to avoid freezer burn. When ready to serve, thaw at room temperature for 30 minutes.
Best Reheating Method
To reheat, preheat your oven to 300°F (150°C) and bake the cupcakes for 5–7 minutes, or until warmed through. Add a tiny splash of water to the bottom of the pan before reheating; the steam will keep the cupcakes from drying out and restore their soft crumb.