I was staring at my kitchen counter, a melted butter mess on the stove, and a bowl of brown sugar that looked more like a sticky trap than a sweet ingredient. My friend dared me to whip up a quick dessert that would still feel indulgent, and I knew I had to pull something out of thin air. The idea hit me like a thunderclap: no-bake butterscotch cookies that would melt on the tongue, not in the oven. I was already halfway to a kitchen catastrophe when that spark lit up my culinary imagination. If you’ve ever felt the panic of a last‑minute dessert, you’ll get a kick from the way this recipe turns a potential disaster into a sweet triumph.
The first thing you notice is the aroma—rich, buttery, and unmistakably caramelized, even before the sugar even hits the pan. The sound is a gentle hiss as the butter and sugar mingle, the faint crackle of sugar dissolving into a glossy syrup. The texture of the mixture, once it starts to thicken, feels like velvet against the back of your hand—smooth, slightly tacky, but not cloying. The taste that follows is a deep, buttery sweetness that’s balanced by a hint of toasted milk, a flavor profile that lingers long after the cookie’s gone. And the feel? It’s the kind of warm, comforting hug that you can taste with your eyes closed.
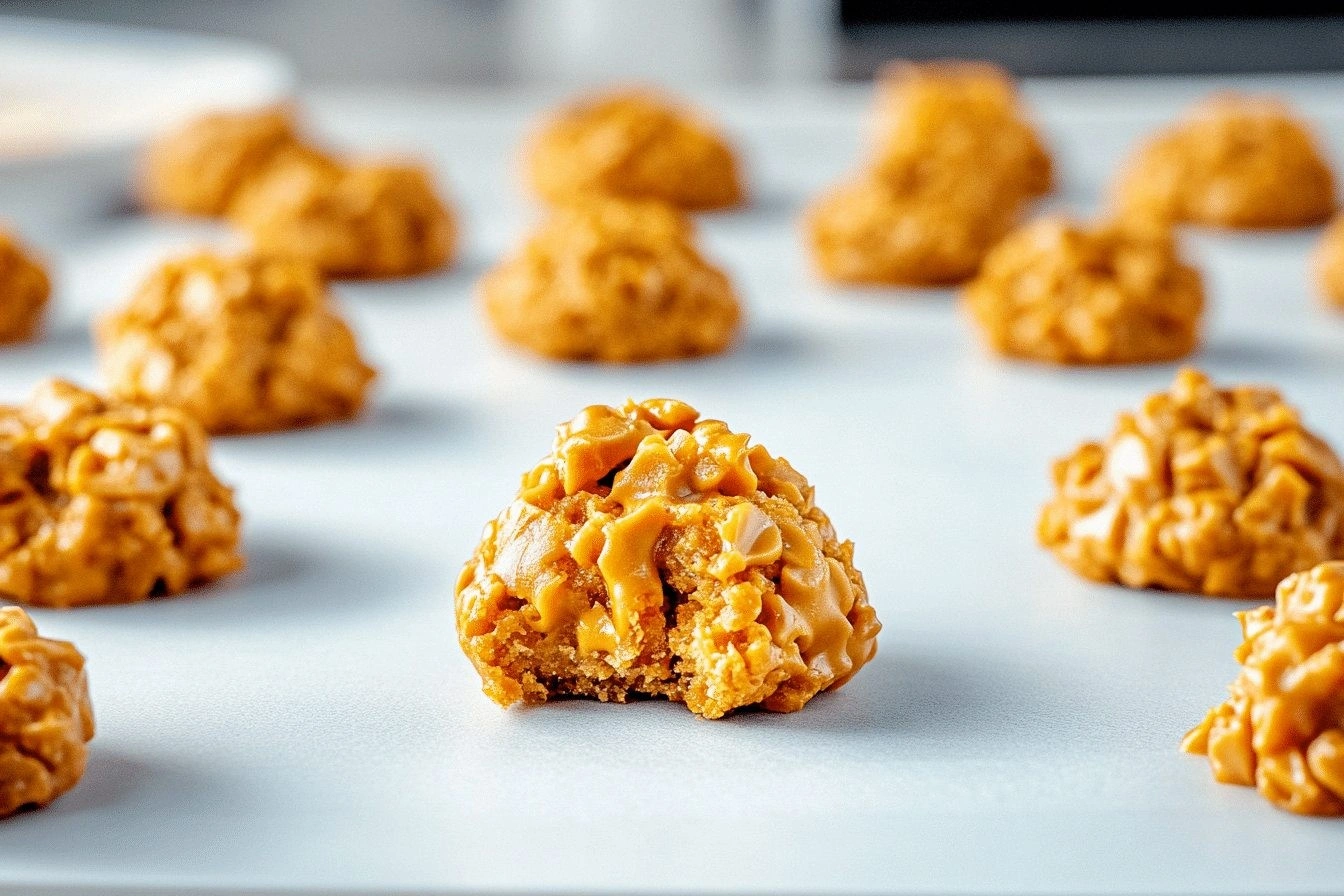
What makes this version stand out is that it doesn’t rely on any fancy equipment or a professional oven. The entire process happens on the stovetop, in a single pan, and the result is a cookie that’s chewy on the inside with a crisp, caramelized edge that snaps like thin ice. I dare you to taste this and not go back for seconds—once you try it, you’ll know the difference between a cookie that’s just sweet and one that’s an edible experience. The simplicity of the technique is a bold claim that I back up with every step: no mixing bowls, no whisking, just a pot and a spoon. And the best part? The cookies are ready in less than 30 minutes, so you can have something sweet on the table while your guests finish their meal.
I’ll be honest—half of the batch disappeared before the first guest even got a chance to see it. That’s the power of a recipe that’s so irresistible it practically sells itself. Most recipes get this completely wrong by overbaking or using too much sugar, but here we keep the sweetness just right. Picture yourself pulling these out of the pot, the whole kitchen smelling incredible, and watching the first bite melt in someone’s mouth. This is hands down the best version you’ll ever make at home, and I’m going to walk you through every single step—by the end, you’ll wonder how you ever made it any other way.
Alright, let’s dive into the details that make this cookie a standout. From the precise ratio of butter to sugar to the unexpected use of quick oats, each element is carefully chosen to create a cookie that’s both comforting and unforgettable. The next section will break down the ingredients and why each one is essential. I promise, you’ll see why this recipe is more than just a sweet treat—it’s a culinary revelation.
What Makes This Version Stand Out
- Flavor: The combination of butter and brown sugar creates a caramelized base that’s deeper than typical sweet cookies. The subtle nuttiness of the brown sugar adds a layer of complexity that pairs beautifully with the butterscotch chips.
- Texture: Quick oats give the cookies a chewy, hearty bite that contrasts with the glossy, melt-in-your-mouth coating. The oats absorb the syrup, resulting in a cookie that stays firm yet soft.
- Convenience: No oven required—everything is cooked on the stovetop, making it ideal for busy evenings or when you want a dessert that’s almost instant.
- Versatility: The base can be tweaked with different nuts, dried fruit, or even a splash of espresso for a mocha twist. It’s a blank canvas for creative variations.
- Make‑ahead Potential: These cookies hold up well in the refrigerator for up to a week, and they freeze beautifully for longer storage.
- Visual Appeal: The glossy, caramelized surface glistens like liquid gold, making them a feast for the eyes as well as the palate.
Inside the Ingredient List
The Flavor Base
Butter is the cornerstone of this recipe, providing a rich, creamy foundation that binds the mixture together. When melted, butter releases a subtle nutty flavor that elevates the caramel notes from the brown sugar. If you skip butter, the cookies will be dry and lack that silky mouthfeel. For those with dietary concerns, you can use a plant‑based butter alternative, but be sure it’s unsweetened to keep the flavor profile intact.
Brown sugar is more than just sweetness; it’s the agent that creates the deep, caramelized base. Its molasses content gives the cookies a slightly tart undertone, which balances the buttery richness. If you substitute with white sugar, the cookies will taste flatter and less complex. Choosing a medium or dark brown sugar will intensify the flavor and give a darker color to the final product.
The Texture Crew
Quick oats are the secret to that chewy bite that makes these cookies stand out. They absorb the syrup, creating a firm yet tender interior. If you use rolled oats instead, the cookies will be denser and take longer to set. For a gluten‑free option, look for certified gluten‑free quick oats to keep the texture consistent.
Milk acts as the liquid that helps dissolve the sugar and creates the syrupy consistency. Whole milk gives a richer flavor, but any milk—skim, almond, oat—will work. If you’re avoiding dairy, a dairy‑free milk will keep the cookie moist, but be aware that the flavor will shift slightly toward the milk’s own profile.
The Unexpected Star
Butterscotch chips are the star that gives the cookies their signature taste. They melt into a silky, buttery glaze that coats each oat cluster. Using chips instead of chunks ensures an even distribution of flavor. If you prefer a crunch, add a handful of chopped butterscotch to the mixture after it’s set.
Vanilla extract is the finishing touch that lifts the entire flavor profile. A teaspoon of pure vanilla brings out the sweetness without overpowering the caramel notes. If you’re experimenting with flavors, try a splash of almond or coconut extract for a subtle twist.
The Final Flourish
Together, these ingredients create a cookie that’s both indulgent and comforting. Each bite delivers a burst of caramelized sweetness, a chewy oat center, and a buttery finish that lingers. If you’re looking for a dessert that’s quick, easy, and unforgettable, this is the recipe that will keep you coming back for more.
Everything’s prepped? Good. Let’s get into the real action.
The Method — Step by Step
- Grab a medium‑sized saucepan and add 1/2 cup of butter. Let it melt over medium heat, stirring occasionally so it doesn’t brown. The butter should be fully liquid and lightly fragrant—this is the foundation of the flavor. Keep an eye on the temperature; you want it to stay below a gentle simmer.
- Stir in 1 cup of brown sugar, mixing until the sugar is fully dissolved and the mixture becomes a silky syrup. You’ll hear a subtle crackle as the sugar dissolves, a sign that it’s ready. Let the mixture cook for about 1–2 minutes to allow the flavors to meld.
- Add 1 cup of milk and bring the mixture to a gentle boil. Once it boils, let it simmer for 5 minutes; this is the moment of truth. The mixture should thicken slightly and emit a rich, caramel aroma. Watch closely—once it starts to bubble, it’s ready to move to the next step.
- Remove the pan from heat and stir in 2 cups of butterscotch chips until they melt completely. The mixture should be smooth and glossy, like melted chocolate. Don’t rush—mixing too quickly can cause the chips to clump. The result is a buttery, caramelized coating that’s ready to embrace the oats.
- Fold in 3 cups of quick oats and 1 tsp vanilla extract. The oats should be evenly coated, each cluster enveloped in the glossy syrup. This is where the cookie’s chewy texture forms. Stir gently to keep the mixture from clumping.
- Drop spoonfuls of the mixture onto a parchment‑lined baking sheet. The size can vary, but aim for 1–2 tablespoons per cookie for even cooking. Let them sit at room temperature for 10 minutes, then refrigerate for at least 30 minutes to set fully. The cookies will firm up, creating that satisfying bite.
- Serve chilled or at room temperature. If you want a warm treat, place the cookies in a 350°F oven for 3–4 minutes; they’ll become slightly crisp on the edges. Store any leftovers in an airtight container; they’ll stay fresh for up to a week.
That’s it—you did it. But hold on, I’ve got a few more tricks that will elevate these cookies from great to unforgettable. These small adjustments will give you a professional finish, a deeper flavor, and a texture that’s truly irresistible.
Insider Tricks for Flawless Results
The Temperature Rule Nobody Follows
Many bakers assume that a higher heat always results in a better caramelization, but that’s a myth. The key is to keep the mixture at a gentle boil; this allows the sugar to dissolve fully without scorching. I’ve tried a few times with a higher flame, and the result was a bitter aftertaste that ruined the cookie’s sweetness.
Why Your Nose Knows Best
Before you even taste the cookie, let your nose do the work. A rich, caramel aroma is a sign that the sugar has melted properly. If the smell is faint or metallic, give it another minute on the heat. Trusting your senses will save you from a batch of bland cookies.
The 5-Minute Rest That Changes Everything
After you stir in the oats, let the mixture rest for 5 minutes before scooping. This pause allows the oats to absorb the syrup fully, giving the cookie a chewy core. Skipping this step often results in a dry, crumbly texture that feels more like a cookie than a treat.
The Secret of a Smooth Finish
A quick whisk after adding the butterscotch chips prevents clumps. The chips can settle at the bottom of the pan, creating uneven sweetness. Whisking ensures a uniform coating and a consistent bite across every cookie.
The Quick Cooling Trick
Place the baking sheet on a cooling rack after you drop the cookies. This allows air to circulate around each cookie, preventing condensation that can make them soggy. The result is a crisp edge that balances the chewy center perfectly.
The Final Touch of Vanilla
Add vanilla extract at the end of the cooking process to preserve its aromatic oils. Adding it too early can cause the flavor to dissipate during the simmering stage. A teaspoon is enough to lift the entire flavor profile without overpowering the caramel base.
Creative Twists and Variations
Nutty Crunch
Add 1 cup of toasted pecans or almonds to the oat mixture before scooping. The nuts provide a satisfying crunch that contrasts with the chewy center. This version is perfect for guests who love a bit of texture in their desserts.
Chocolate‑Butterscotch Fusion
Swap half of the butterscotch chips for dark chocolate chips. The chocolate adds depth and a slight bitterness that balances the sweetness. The result is a cookie that feels like a dessert and a candy bar in one.
Citrus Burst
Incorporate 2 tbsp of orange zest into the oat mixture. The citrus brightens the flavor profile, giving the cookie a fresh, lively note. This variation is ideal for spring or summer gatherings.
Spiced Delight
Add a pinch of cinnamon and a dash of nutmeg to the syrup before adding the oats. The spices introduce warmth and complexity, turning the cookie into a cozy treat. It’s especially good during the cooler months.
Vegan Version
Use coconut oil instead of butter, a plant‑based milk, and vegan butterscotch chips. The texture will be slightly different—chewier and less buttery—but the flavor remains delicious. This version is a great option for guests with dietary restrictions.
Mini Cookie Bites
Reduce the oat portion to 1 cup and drop smaller spoonfuls onto the baking sheet. These bite‑size cookies are perfect for parties or for a sweet snack with a cup of coffee. They also freeze well for later enjoyment.
Storing and Bringing It Back to Life
Fridge Storage
Place the cookies in an airtight container and store them in the refrigerator for up to one week. The cold environment keeps the butter from melting, preserving the chewy texture. When you’re ready to serve, let them sit at room temperature for 10 minutes to soften slightly.
Freezer Friendly
Wrap each cookie individually in plastic wrap before placing them in a freezer bag. They’ll stay fresh for up to three months. When you want a cookie, pop one out and let it thaw for a few minutes; the texture will remain intact.
Best Reheating Method
To revive the cookies, place them on a parchment‑lined baking sheet and bake at 350°F for 3–4 minutes. The heat will restore the buttery sheen and give the edges a gentle crispness. If you’re in a hurry, a quick dip in a microwave for 10–12 seconds works, but watch the time closely to avoid melting the butter.