I still remember the day I accidentally created the most addictive dessert of my life. It was supposed to be a simple cookie-crumb crust for a cheesecake, but in my half-asleep, Saturday-morning state, I dumped an entire package of Nutter Butters into the food processor with cream cheese instead of butter. The resulting paste looked like something you'd feed to a toddler, but one taste and I was done for. I stood there in my pajamas, eating this peanut-buttery mess straight from the bowl, while my coffee got cold and my dog stared at me like I'd lost my mind.
That happy disaster led to months of obsessive testing, tweaking, and yes, consuming alarming quantities of what would eventually become these Nutter Butter Truffles. I tried every ratio, every coating, every temperature variation until I landed on the version that makes grown adults close their eyes when they bite into it. These aren't just another peanut butter ball recipe — they're little planets of pure comfort with a secret texture hack that makes the filling shatter and melt at the same time. The first time I brought them to my office, two people actually fought over the last one. Like, real-life elbow-throwing over a one-inch sphere of cookie and cream cheese.
Here's what sets these apart from every other peanut butter truffle you've tried: the filling contains a whisper of honey that amplifies the peanut flavor like turning up the contrast on a photo, while a tiny pinch of flaky salt makes the sweetness sing instead of just sitting there. Most recipes get this completely wrong by adding more sugar, which just makes them cloying. Instead, we let the Nutter Butters do what they do best — taste like childhood — and we just make them a little more sophisticated without losing that nostalgic punch. The coating is a custom blend of white and dark chocolate that sets with a snap but melts the second it hits your tongue.
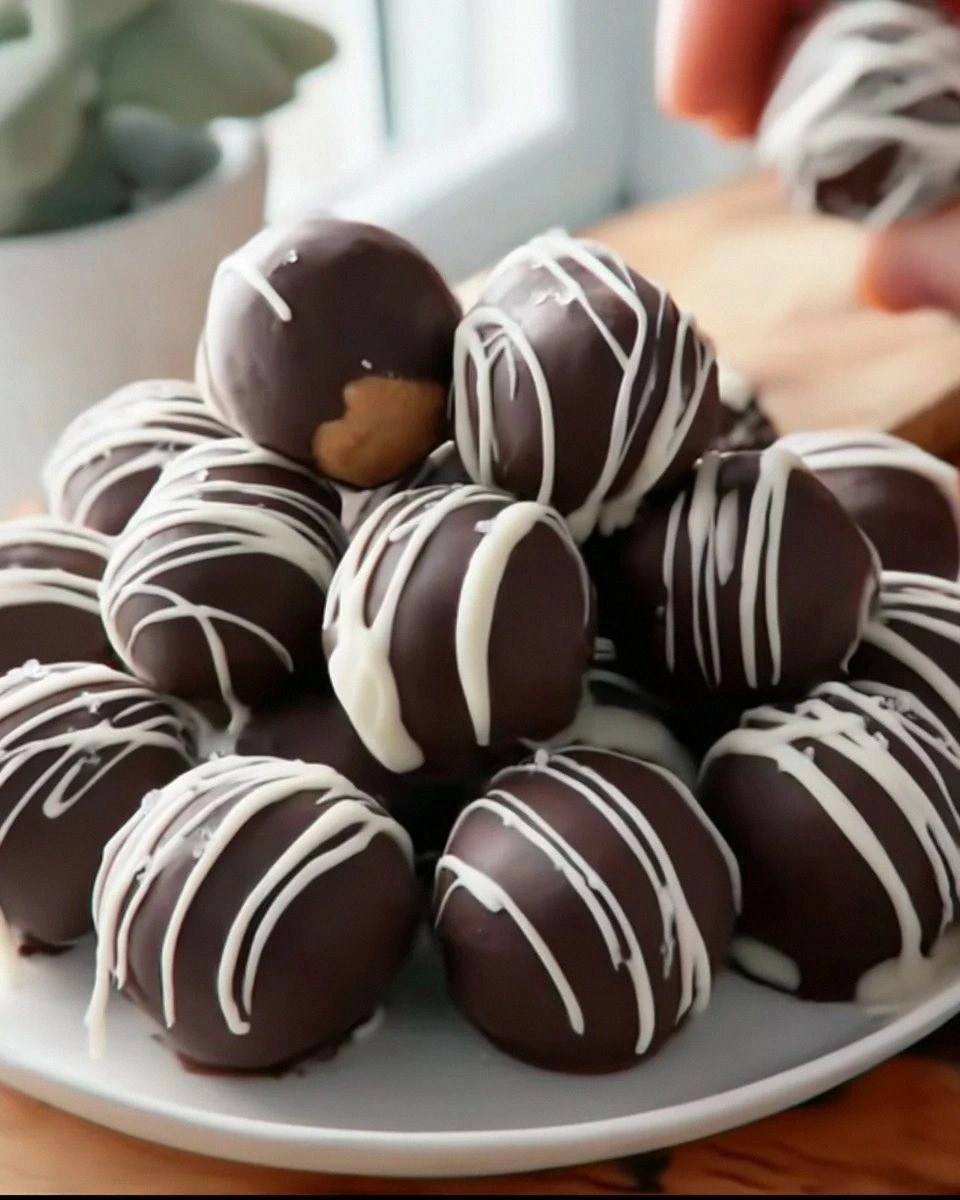
Picture yourself pulling these out of the fridge, the chocolate coating just beginning to sweat in the warm kitchen, the peanut aroma hitting you before you even bite in. That first bite gives you a crisp shell that shatters like thin ice, revealing a center that's creamy, chunky, and somehow both dense and airy at once. I dare you to taste this and not go back for seconds — actually, I dare you to stop at four. Let me walk you through every single step — by the end, you'll wonder how you ever made it any other way.
What Makes This Version Stand Out
Peanut-Forward: Unlike those bland, sugar-bomb truffles you've had at office parties, these actually taste like peanuts first, sweet second. The Nutter Butter cookies bring real roasted peanut flavor that cheap peanut butter chips just can't fake. It's like the difference between real vanilla and the imitation stuff — once you taste the real deal, there's no going back.
Texture Symphony: Most truffles are either gritty from undissolved sugar or gummy from too much cream cheese. These hit that magical middle ground where the cookie crumbs stay slightly crisp inside the creamy base, giving you tiny pockets of crunch that keep things interesting. Think of it like finding the marshmallow bits in your breakfast cereal — those surprise crunches make each bite addictive.
Two-Chocolate Magic: The coating isn't just melted chocolate chips lazily spooned over. We blend white chocolate's sweetness with dark chocolate's depth, creating a shell that complements rather than competes with the filling. It's like having your cake and eating it too, except it's better because it's actually chocolate.
Make-Ahead Champion: These beauties freeze like champions for up to three months, which means you can hide a batch in the back of your freezer and forget about them until you need emergency dessert. They'll taste exactly the same as day one, unlike those sad truffles that weep oil and get that weird white film. Future you will thank present you for this foresight.
Crowd Control: I once made these for a party where people were supposed to be mingling — instead they formed a protective circle around the dessert table like penguins huddling for warmth. They disappeared in under ten minutes, and three people asked me to marry them. Not saying these truffles are responsible for proposals, but I'm not not saying it either.
Kitchen Confidence: Even if you've never made candy before, this recipe has your back. No thermometers, no tempering chocolate to specific crystals, no praying to the dessert gods. Just honest-to-goodness foolproof techniques that work every single time. If you can stir and roll dough into balls, you're already overqualified.
Alright, let's break down exactly what goes into this masterpiece...
Inside the Ingredient List
The Flavor Foundation
Nutter Butter cookies are obviously the star here, but not all packages are created equal. Look for the ones with the darkest, most evenly toasted cookies — they have deeper peanut flavor than the pale, underbaked ones. One standard 16-ounce package gives you exactly the right amount after you inevitably snack on three or four while working. Don't even pretend you won't. The cookies do double duty: their peanut butter creme filling adds sweetness and binding power, while the cookie shells provide structure and that nostalgic flavor you can't replicate with plain peanut butter.
Cream cheese might seem like an odd partner for peanut butter cookies, but it works like the best odd couple sitcom — they're different but bring out each other's best qualities. Use the full-fat brick kind, not the whipped tub stuff that contains stabilizers that'll make your truffles weep. Let it come to room temperature so it blends seamlessly without little cold pockets that taste like cheesecake mistakes. Philadelphia brand has the cleanest flavor, but store brands work fine — just avoid anything labeled "cream cheese product" because that's not actually cream cheese.
The Texture Crew
Powdered sugar does more than sweeten here — it's your insurance policy against a greasy, separated filling. The cornstarch in powdered sugar absorbs excess oil from the peanut butter creme and keeps everything stable. Don't even think about subbing granulated sugar unless you enjoy the sensation of eating sandy truffles. If you're out of powdered sugar, you can blitz regular sugar with a teaspoon of cornstarch in your blender, but honestly, just buy the bag — you'll use it for frosting eventually.
Butter might seem redundant when you've got cream cheese, but it adds richness that makes these taste like they came from an expensive chocolate shop. Use unsalted so you can control the salt level — peanut butter cookies are already fairly salty, and you want balance, not a salt lick. European-style butter with higher fat content makes even more luxurious truffles, but regular grocery store butter works perfectly fine. Melt it and let it cool slightly so it doesn't seize up when it hits the cold cream cheese.
The Unexpected Star
Honey is my secret weapon that takes these from good to "why can't I stop eating these?" Just a teaspoon amplifies the peanut flavor in a way that sugar can't. It's like adding vanilla to chocolate cake — you might not identify it, but you'd miss it if it disappeared. Clover honey works best because it's mild and won't compete with the peanut butter. Skip the fancy dark honey here; save that for your tea.
Vanilla extract might seem basic, but please use the real stuff, not the imitation that tastes like a candle factory. You only need half a teaspoon, but it bridges the gap between the peanut butter and chocolate flavors like a diplomatic translator. Madagascar vanilla has the most complex flavor, but any real vanilla extract beats the fake stuff. If you're feeling fancy, vanilla bean paste gives you those gorgeous little black specks that make people think you're a professional.
The Final Flourish
Chocolate for coating needs to be something you'd happily eat on its own. I use a 60-40 blend of good white chocolate and bittersweet chocolate — the white chocolate adds sweetness and smooth melting, while the bittersweet keeps things from getting cloying. Ghirardelli or Guittard both melt beautifully without requiring tempering. Avoid those "melting wafers" that contain more wax than chocolate — they set shiny and pretty but taste like birthday candles. If you're going to spend money on one ingredient, make it the chocolate, because that's what hits your tongue first.
Coconut oil is the magic ingredient that makes your chocolate coating shiny and snappy without requiring fancy tempering techniques. Just a teaspoon per cup of chocolate thins it slightly and helps it set with that professional-looking gloss. Use refined coconut oil so it doesn't add coconut flavor — unless you want to lean into that tropical peanut thing, which honestly sounds weird but could work. In a pinch, you can skip it, but your coating will be thicker and more prone to that dull, bloomed look.
Everything's prepped? Good. Let's get into the real action...
The Method — Step by Step
- Start by freezing your Nutter Butters for exactly 20 minutes — set a timer because this isn't a suggestion, it's science. Frozen cookies break down into uniform crumbs instead of warm, oily paste that'll make your truffles greasy. While they're chilling, line a baking sheet with parchment paper and clear space in your freezer for the finished truffles. This is also when I like to put on good music and pour myself coffee because we're about to enter the zone.
- Dump those now-frozen cookies into your food processor and pulse in one-second bursts until you have mostly fine crumbs with some pea-sized pieces for texture. Don't go crazy here — you want some variety so every bite isn't baby food. The smell that hits you right now is pure nostalgia concentrate, and yes, it's normal to want to eat the crumbs with a spoon. Resist, because we need every bit for the filling.
- Add the cream cheese in four chunks and pulse just until the mixture starts to clump together like wet sand that holds its shape when squeezed. This should take maybe 8-10 pulses — any more and you'll overmix and the filling will be tough. The mixture should look like cookie dough that's been left out too long, which is exactly what we want. If it seems too dry, add cream cheese a teaspoon at a time; too wet, add more cookie crumbs.
- Now for the flavor enhancers: add the melted butter, honey, vanilla, and a pinch of salt. Pulse just until combined — we're talking 3-4 pulses max. The mixture should smell like peanut butter cookie dough and feel like play-dough when you squeeze it. If you've got kids, this is when they'll appear in the kitchen like magic. Give them a tiny taste and tell them to scram because these are for grown-ups.
- Scrape the mixture into a bowl and pop it in the freezer for 15 minutes to firm up. This makes rolling so much easier and prevents the truffles from turning into sticky blobs that melt in your hands. While it chills, wash your food processor because dried cookie paste is harder to remove than dried paint. Use this time to mentally prepare for the rolling phase, which is where most people give up and just eat the filling with a spoon.
- Use a tablespoon or small cookie scoop to portion out the filling, then roll between your palms into smooth balls. Work quickly because your hands are warm and will start melting the filling. If it gets too soft, pop the bowl back in the freezer for five minutes. The balls should be about the size of a large marble — any bigger and they're overwhelming, any smaller and people feel cheated. Place them on the parchment-lined sheet as you go.
- Once all the truffles are rolled, freeze them for at least 30 minutes. This is crucial — warm truffles will fall apart when you dip them in chocolate, creating a mess that'll make you question your life choices. While they chill, set up your chocolate coating station: chop your chocolate into small, even pieces so it melts smoothly. Don't skip the chopping — big chunks won't melt evenly and you'll end up with seized, grainy chocolate that tastes like disappointment.
- Melt two-thirds of your chocolate with the coconut oil in the microwave in 30-second bursts, stirring between each burst. When it's mostly melted but still has some chunks, stop heating and stir until smooth — the residual heat will finish melting it without scorching. Then stir in the remaining chocolate until melted — this is a cheat's way of tempering that gives you shiny, snappy results without the fuss. The chocolate should be fluid and glossy like melted ice cream.
- Remove the frozen truffles from the freezer and working with one at a time, drop them into the chocolate, roll to coat with a fork, then lift out and let excess drip off. Tap the fork gently on the bowl's edge — the chocolate should coat in a thin, even layer. Place back on the parchment and repeat. If the chocolate starts to thicken, microwave for 5 seconds and stir. Work quickly but don't rush — these aren't going anywhere.
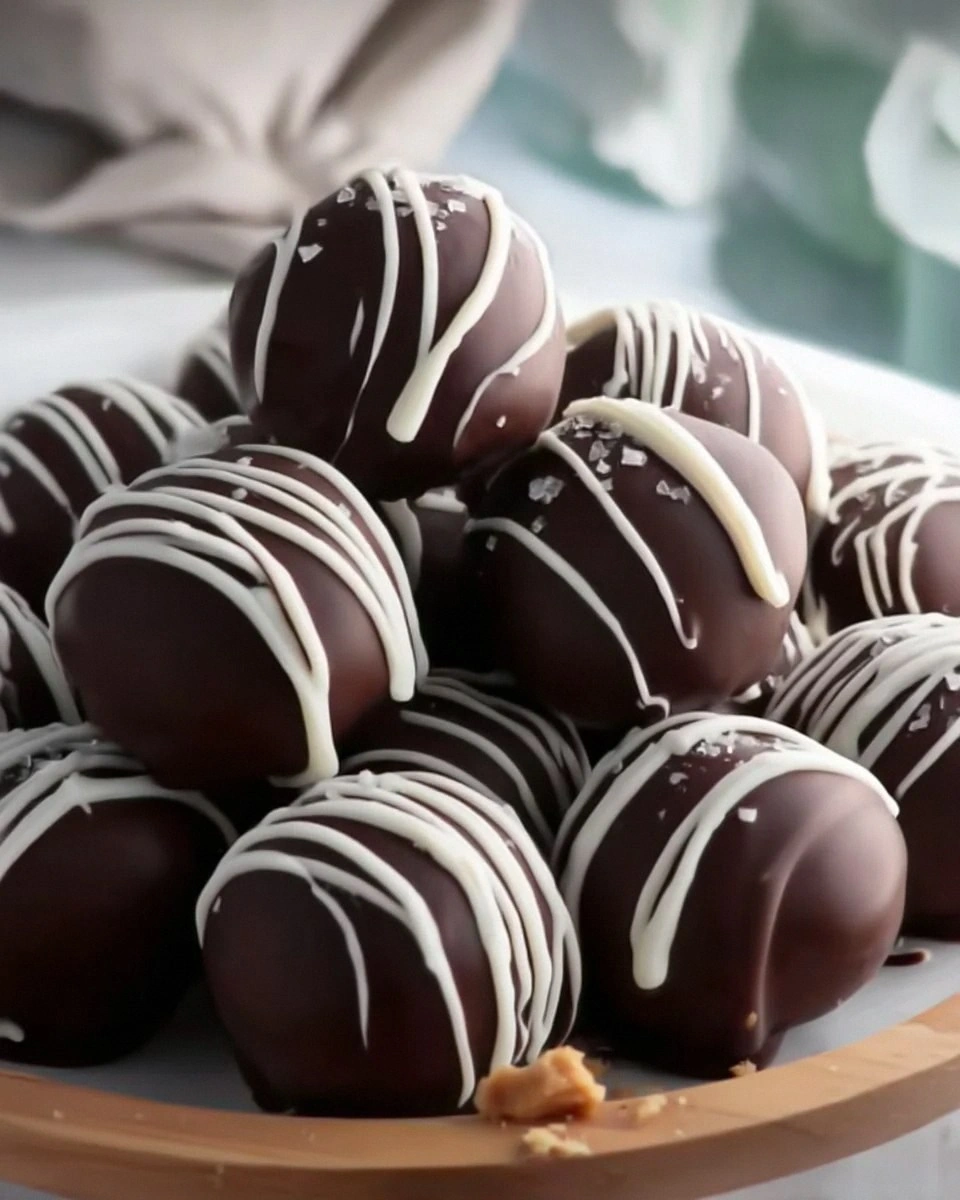
- Before the coating sets, sprinkle with your choice of toppings: chopped peanuts, cookie crumbs, flaky salt, or leave them plain and elegant. The chocolate will set in about 10 minutes at room temperature, or speed things up in the fridge for 5 minutes. Once set, they're ready to devour. Store in an airtight container in the fridge for up to a week, though I guarantee they won't last that long.
That's it — you did it. But hold on, I've got a few more tricks that'll take this to another level...
Insider Tricks for Flawless Results
The Temperature Rule Nobody Follows
Room temperature ingredients aren't just baker's fussiness — they're the difference between smooth, creamy filling and a lumpy mess that separates. Take your cream cheese out at least an hour before you start, and let your butter cool after melting so it's warm, not hot. Hot butter will seize up when it hits cold cream cheese, creating little grainy bits that ruin the texture. If you're impatient (and I usually am), cube the cream cheese and microwave it for 10-second bursts until it's soft but not melted. Your future self will thank you when you're rolling perfect spheres instead of trying to work around cold lumps.
Why Your Nose Knows Best
The chocolate is ready for dipping when it smells like chocolate instead of just looking melted. Raw chocolate has a sharper, almost bitter smell that mellows as it reaches the right temperature. When the aroma becomes rich and inviting, you're in the sweet spot. This usually happens right after you've stirred in the remaining chocolate and it's all melted smooth. A friend tried skipping this step once — let's just say her coating tasted like chocolate-scented wax. Trust your nose; it's smarter than you think.
The 5-Minute Rest That Changes Everything
After you've rolled all your truffles but before you dip them, let them sit at room temperature for exactly five minutes. This takes the edge off the deep freeze so they don't crack the chocolate coating when they expand slightly. It's like letting a steak rest after cooking — the temperature equalizes and you get better results. Too long and they get soft and difficult to handle, too short and you get hairline cracks in your beautiful coating. Set a timer and use this time to double-check your chocolate temperature.
The Double-Dip Secret
For truffles that look like they came from a professional chocolatier, dip them twice. The first coat seals in the filling and gives you a smooth base. Let it set completely, then give them a quick second dip for that glossy, thick coating that snaps when you bite into it. The second coat also hides any fingerprints or imperfections from the first dip. Yes, it takes twice as long, but the results are restaurant-quality stunning. Plus, you get to eat all the "imperfect" ones from the first batch — chef's privilege.
The Flaky Salt Timing
If you're using flaky salt as a garnish (and you absolutely should), sprinkle it on when the chocolate is about 80% set — still soft enough for the salt to stick, but firm enough that it won't dissolve and disappear. This usually happens about 30 seconds after you've placed the dipped truffle on the parchment. Too early and the salt sinks in and disappears, too late and it won't adhere. The salt should hit your tongue first, making the sweet peanut flavor explode in contrast. It's like turning up the saturation on a photo — everything becomes more vivid.
Creative Twists and Variations
This recipe is a playground. Here are some of my favorite ways to switch things up:
Salted Caramel Pretzel
Mix in 2 tablespoons of crushed pretzels and substitute caramel sauce for the honey. The pretzels add crunch and the caramel brings butterscotch notes that play beautifully with peanut butter. Top with a tiny drizzle of caramel and a few pretzel pieces for garnish. These disappear faster than the original version at my house, which I didn't think was possible.
Dark Chocolate Orange
Add 1 teaspoon of orange zest to the filling and dip in dark chocolate only. The citrus cuts through the richness and makes these taste like sophisticated candy you'd find in a European chocolate shop. Garnish with a few strips of candied orange peel if you're feeling fancy. These are especially good with coffee after dinner.
White Chocolate Raspberry
Substitute freeze-dried raspberry powder for half the powdered sugar and coat in white chocolate. The tart berries balance the sweet white chocolate and peanut butter in a way that's completely addictive. The pink color makes them perfect for baby showers or Valentine's Day, but don't let that stop you from making them for yourself on a Tuesday.
Spicy Mexican Hot Chocolate
Add 1/4 teaspoon of cayenne and 1/2 teaspoon of cinnamon to the filling, then dip in chocolate mixed with a pinch of chili powder. The heat builds slowly and pairs incredibly with the peanut butter. These are dangerous — the spice makes you reach for another to cool your mouth, which just repeats the cycle. My husband calls them "the ones that keep you coming back like a slot machine."
Crunchy PB&J
Mix in 2 tablespoons of your favorite jam into the filling and roll in crushed peanuts for coating instead of chocolate. These taste like the world's most luxurious peanut butter and jelly sandwich. Use grape jelly for nostalgic flavor or raspberry for something more grown-up. Kids go crazy for these, but they're sophisticated enough for adults.
Coffee Toffee
Dissolve 1 teaspoon of instant espresso powder in the vanilla and fold in 2 tablespoons of toffee bits. Dip in milk chocolate and sprinkle with more toffee. The coffee flavor enhances the peanut butter in a way that's subtle but noticeable. These are breakfast-appropriate in my book because coffee.
Storing and Bringing It Back to Life
Fridge Storage
Store finished truffles in an airtight container in the refrigerator for up to one week. Layer them between sheets of parchment paper if you need to stack them — the chocolate coating can pick up fingerprints and smudges if they touch each other. Let them sit at room temperature for 10 minutes before serving for the best texture and flavor. Cold chocolate can taste dull, and the filling firms up so much it's hard to bite through. If they develop any white streaks or spots, that's just chocolate bloom — harmless and still delicious, just not as pretty.
Freezer Friendly
These truffles freeze beautifully for up to three months. Arrange them in a single layer on a baking sheet and freeze until solid, then transfer to a freezer bag or container. Thaw overnight in the refrigerator, then let come to room temperature for 15 minutes before serving. Don't thaw at room temperature or condensation will form on the chocolate and make it sticky. The texture stays perfect, unlike some candies that get grainy or weep oil when frozen.
Best Reheating Method
If your truffles have been in the fridge and the chocolate has developed that dull white film (bloom), you can refresh them by holding them briefly over a pot of simmering water. The steam warms the chocolate just enough to restore the shine without melting it. Hold them with tongs for about 5 seconds, then place on a cool plate. Don't get them wet or they'll spot. This trick also works if your chocolate coating has gotten fingerprints on it — it's like pressing the refresh button on your truffles.