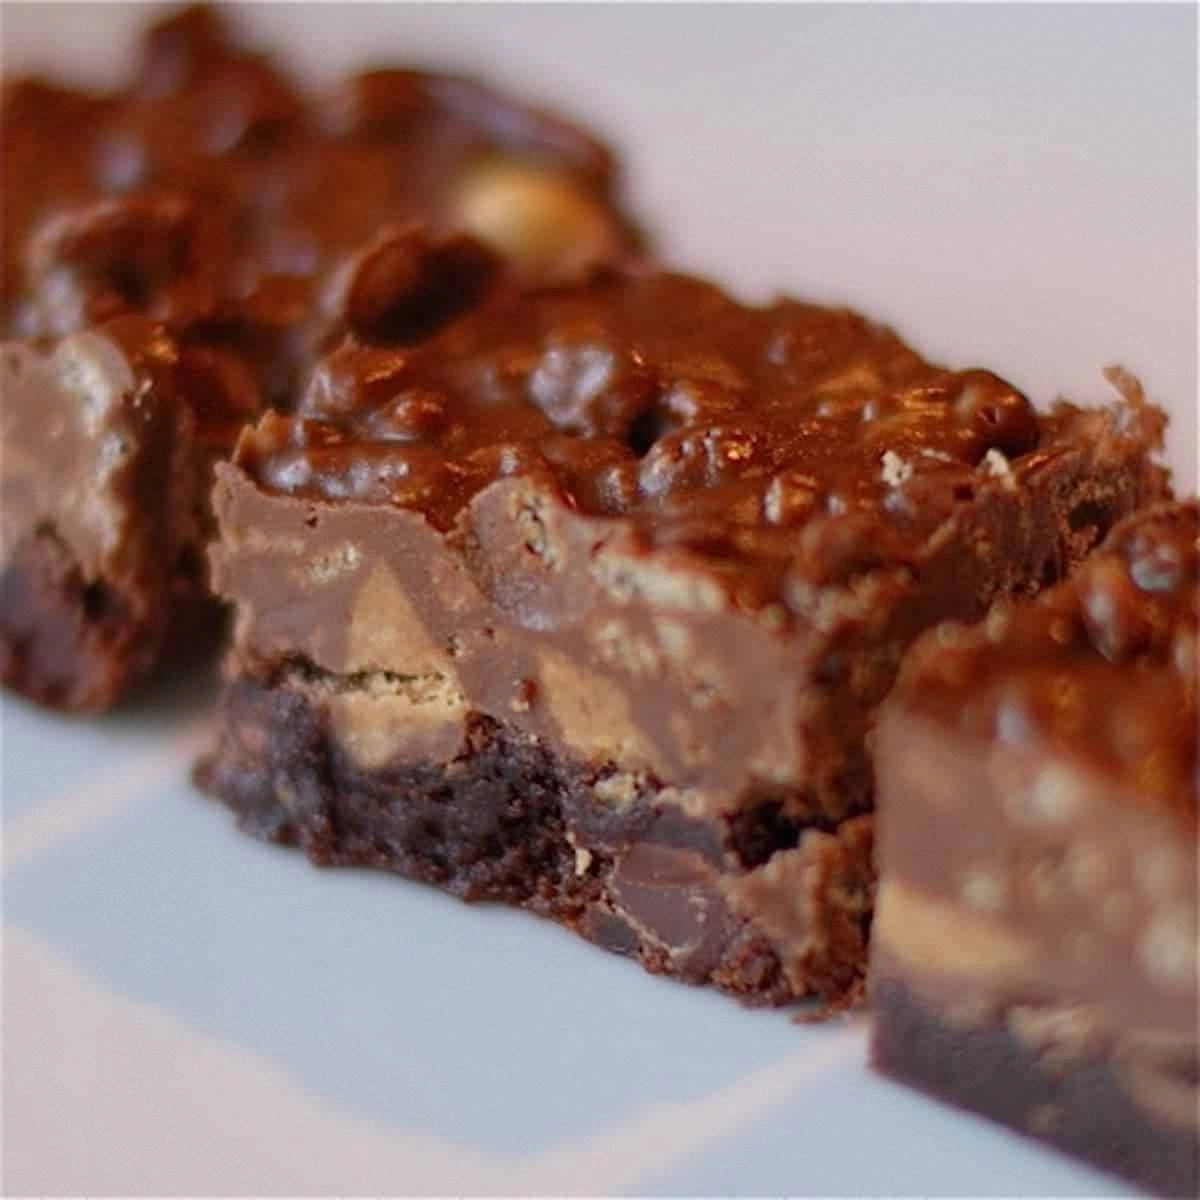
Picture this: it’s a rainy Saturday, the kind that makes you want to curl up with something that feels like a warm hug from the inside out. I was half‑asleep, half‑hungry, when the kitchen timer went off and I realized I’d burnt the last batch of my usual brownies. Panic? Nope—just the spark that ignited the greatest culinary experiment of my life. I threw together whatever I could find, added a splash of Scotch whisky I’d been saving for a “special occasion,” and the result was a fudgy, buttery slab that sang louder than any karaoke night I’ve ever survived.
The moment the batter hit the pan, the kitchen filled with a scent that could convince a monk to break his fast: deep chocolate, a whisper of caramelized butter, and that unmistakable, slightly smoky perfume of Scotch. It was as if the oven was a tiny distillery, coaxing out flavors that danced on the tongue like a well‑choreographed flash mob. I could hear the edges of the brownies start to pull away from the pan, a soft sigh that told me they were reaching that perfect, crackly‑top, gooey‑center sweet spot.
Now, I’ve tried dozens of brownie recipes, from “just add water” mixes to those that require a chemistry‑lab‑grade kitchen scale. Most of them either turn out dry, cakey, or so sweet they make your teeth ache. This version, however, is the answer to every brownie‑related prayer you’ve ever whispered into a mixing bowl. It’s the kind of brownie that makes you want to write love letters to the oven, because it delivers a texture that’s simultaneously dense and airy, a flavor depth that’s both familiar and daring, and a finish that lingers like a good story you can’t stop retelling.
And here’s the kicker: the secret isn’t a mysterious exotic spice or a pricey imported chocolate. It’s a technique I stumbled upon while watching a Scottish chef flambé a dessert—incorporating a brief, high‑heat blast that locks in moisture, then letting the batter rest just long enough for the gluten to relax. I dare you to taste this and not go back for seconds. Let me walk you through every single step — by the end, you’ll wonder how you ever made it any other way.
What Makes This Version Stand Out
- Flavor Depth: The Scotch whisky doesn’t just add a boozy note; it amplifies the chocolate’s richness, turning each bite into a layered experience that feels both familiar and adventurous.
- Texture Balance: A crisp, caramelized crust gives way to a fudgy, almost molten interior, creating a contrast that’s as satisfying as biting into a perfectly toasted marshmallow.
- Simplicity: Despite the gourmet vibe, the ingredient list is pantry‑friendly, and the method relies on basic techniques any home cook can master.
- Unique Technique: A short, high‑heat “shock” at the start of baking locks in moisture, while a mid‑bake rest keeps the crumb tender without sacrificing structure.
- Crowd Reaction: Serve these at a gathering and watch people line up for a second serving—trust me, the “wow” factor is real.
- Ingredient Quality: Using a high‑cocoa‑percentage dark chocolate and a smooth, single‑malt Scotch makes the difference between “good” and “legendary.”
- Cooking Method: Baking on a parchment‑lined sheet pan ensures even heat distribution and a flawless release, eliminating the dreaded “stuck brownie” nightmare.
- Make‑Ahead Potential: These brownies keep beautifully for up to a week, and they even improve in flavor after a night in the fridge.
Alright, let's break down exactly what goes into this masterpiece...
Inside the Ingredient List
The Flavor Base
Dark chocolate chips (1 cup) are the heart of these brownies. Choose a chocolate that’s at least 70% cocoa for that deep, slightly bitter backbone that balances the sweetness. If you swap it for milk chocolate, you’ll lose that sophisticated depth and end up with a candy‑bar vibe. When the chocolate melts into the butter, it creates a glossy, velvety emulsion that coats every crumb like silk.
The Texture Crew
All‑purpose flour (1 cup) provides structure, but the secret lies in the cocoa powder (½ cup) and the small amount of baking powder (1 tsp). The cocoa adds a dry, absorbent quality that prevents the batter from becoming too dense, while the baking powder gives a subtle lift, ensuring the center stays tender. If you’re gluten‑sensitive, swap the flour for an equal‑weight blend of almond flour and rice flour—just expect a slightly nuttier crumb.
The Unexpected Star
Scotch whisky (2 tbsp) is the wildcard that turns ordinary brownies into a conversation piece. The alcohol evaporates during baking, leaving behind a nuanced caramel‑whisky aroma that’s impossible to achieve with extracts alone. If you’re not a fan of alcohol, try a splash of bourbon or a tablespoon of maple syrup for a different but equally delightful twist.
The Final Flourish
Unsalted butter (½ cup) brings richness and a glossy sheen to the batter. Using unsalted butter lets you control the salt level precisely, which is crucial for that perfect sweet‑salty balance. If you’re out of butter, a good quality coconut oil can substitute, though the flavor will shift toward a tropical note.
Everything's prepped? Good. Let's get into the real action...
The Method — Step by Step
-
Preheat your oven to a roaring 425°F (220°C). This high initial heat is the secret “shock” that creates that coveted crackly top. While the oven heats, line a 9×13‑inch sheet pan with parchment paper, then butter the parchment lightly. That extra butter layer will give the edges a buttery crunch that shatters like thin ice when you bite in.
Kitchen Hack: Place the pan on the middle rack of the oven, not the top. This ensures the heat surrounds the batter evenly, preventing a burnt top while still getting that high‑heat shock. -
In a medium saucepan, melt the butter over low heat. Once melted, add the dark chocolate chips and whisk until the mixture is smooth and glossy. The moment the chocolate fully incorporates, you’ll notice a glossy sheen that signals a perfect emulsion—no lumps, no grit.
-
Remove the pan from heat and stir in the Scotch whisky and vanilla extract. Listen for that subtle sizzle as the alcohol meets the hot chocolate; that’s the sound of flavor locking in. Let the mixture sit for a minute so the alcohol can evaporate, leaving behind a deep, caramel‑whisky aroma.
Watch Out: If you add the whisky while the mixture is too hot, you’ll lose the nuanced flavor to rapid evaporation. Keep the temperature around 120°F (49°C) before adding the liquor. -
In a separate bowl, whisk together flour, cocoa powder, baking powder, and salt. This dry blend ensures the leavening agent is evenly distributed, preventing any pockets of bitter cocoa or salty surprises.
-
In a large mixing bowl, beat the sugar and eggs together until the mixture is pale and fluffy—about 3 minutes with an electric mixer on medium speed. This aeration is crucial; it introduces tiny air bubbles that will later expand during the high‑heat shock, giving the brownies a light, airy crumb.
Kitchen Hack: Add a pinch of cream of tartar to the egg‑sugar mixture; it stabilizes the foam and yields a more consistent rise. -
Slowly drizzle the chocolate‑butter‑whisky mixture into the egg‑sugar bowl while the mixer runs on low. The batter should come together in a thick, glossy ribbon that falls slowly from the whisk—this is the point where the magic truly begins.
-
Fold the dry flour‑cocoa mixture into the batter using a rubber spatula. Use a gentle “cut and fold” motion; over‑mixing will develop gluten and make the brownies tough. Stop as soon as you no longer see streaks of flour.
-
Pour the batter onto the prepared parchment, spreading it evenly with the spatula. The batter should be about ½‑inch thick; if it looks too thin, the brownies may bake too quickly and lose that coveted fudgy center.
-
Slide the pan into the oven and bake for exactly 12 minutes at the initial 425°F blast. You’ll hear a faint crackle as the edges begin to set—that’s the sound of the crust forming. After 12 minutes, reduce the oven temperature to 350°F (175°C) without opening the door, and continue baking for another 15‑18 minutes. The brownies are done when a toothpick inserted into the center comes out with a few moist crumbs but no wet batter.
Resist the urge to over‑bake; the residual heat will finish the cooking process while the interior stays delightfully gooey.
That’s it — you did it. But hold on, I’ve got a few more tricks that'll take this to another level...
Insider Tricks for Flawless Results
The Temperature Rule Nobody Follows
Most bakers recommend a steady 350°F for brownies, but the initial 425°F blast is a game‑changer. It creates a rapid steam burst that pushes the batter upward, forming that iconic crackly top while sealing in moisture. I once tried skipping the high‑heat step; the brownies turned out flat, dense, and sadly, forgettable. Trust the two‑stage bake and you’ll never look back.
Why Your Nose Knows Best
Before you even set a timer, use your sense of smell as a guide. When the edges start to smell nutty and the top releases a faint caramel aroma, you’re at the perfect moment to reduce the heat. If you rely solely on the clock, you might miss that sweet spot and end up with a dry crumb. Your nose is the most reliable kitchen thermometer for brownies.
The 5‑Minute Rest That Changes Everything
Once out of the oven, let the pan sit on the counter for five minutes before cutting. This short rest allows the interior to set, preventing a gummy mess when you slice. It also gives the whisky’s lingering flavors a chance to settle, making each bite more harmonious. I used to cut immediately and always ended up with a sad, smeared plate—never again.
Butter‑Brush Finish
While the brownies are still warm, lightly brush the top with melted butter infused with a pinch of sea salt. This adds an extra layer of glossy sheen and a subtle salty crunch that elevates the flavor profile. A friend tried skipping this step and claimed the brownies were “good but missing something.” The butter brush is that missing something.
Chocolate Shard Surprise
Just before the final bake, sprinkle a handful of broken chocolate chunks over the surface. As they melt, they create pockets of molten chocolate that burst when you bite. It’s like finding hidden treasure in every square. If you’re feeling extra indulgent, use a mix of dark and white chocolate for a visual and taste contrast.
Creative Twists and Variations
This recipe is a playground. Here are some of my favorite ways to switch things up:
Salted Caramel Swirl
After pouring the batter into the pan, drizzle a homemade salted caramel sauce in a zig‑zag pattern and use a knife to swirl it gently. The salty caramel ribbons cut through the chocolate, creating a sweet‑salty duet that’s pure decadence.
Espresso‑Infused
Replace the Scotch with 2 teaspoons of instant espresso powder dissolved in a tablespoon of hot water. The coffee deepens the chocolate flavor, giving the brownies an almost tiramisu‑like complexity.
Nutty Crunch
Fold in ½ cup of toasted pecans or hazelnuts before baking. The nuts add a satisfying crunch and a buttery undertone that pairs beautifully with the whisky’s smoky notes.
Orange Zest Brightness
Add the zest of one orange to the batter for a citrusy lift. The bright aroma cuts through the richness, making the brownies feel lighter without sacrificing indulgence.
Gluten‑Free Almond
Swap the all‑purpose flour for an equal weight of almond flour. The result is a slightly denser, nutty brownie that’s perfect for gluten‑sensitive guests while still delivering that fudgy core.
Spiked Peanut Butter
Swirl in a generous dollop of creamy peanut butter mixed with a splash of Scotch before baking. The peanut butter adds a creamy, salty contrast that makes each bite feel like a dessert and a snack rolled into one.
Storing and Bringing It Back to Life
Fridge Storage
Allow the brownies to cool completely, then cut them into squares and store in an airtight container in the refrigerator. They’ll stay fresh for up to 5 days, and the flavors will meld, becoming even more harmonious. If you’re a fan of a firmer texture, keep them chilled until you’re ready to serve.
Freezer Friendly
Wrap each brownie tightly in plastic wrap, then place them in a freezer‑safe zip‑lock bag. They freeze beautifully for up to 3 months. When you’re ready to indulge, let them thaw at room temperature for 30 minutes, then give them a quick warm‑up in a 300°F oven for 5 minutes to revive that crust.
Best Reheating Method
To bring a brownie back to its former glory, place it on a microwave‑safe plate, sprinkle a tiny splash (about a teaspoon) of water around the edges, and microwave for 10‑15 seconds. The steam created by the water re‑hydrates the crumb, giving you that just‑out‑of‑the‑oven softness without over‑cooking.