Picture this: a sunny Saturday morning, a half‑baked batch of cookies sitting on the counter, and a sudden craving for something sweet that feels like a hug. I was staring at the oven, the timer ticking, when my friend texted me, “Dare you to make the best strawberry crunch cookie ever?” The idea landed in my head like a bright, sugary comet, and I knew I had to turn that dare into a delicious reality. I’ve been experimenting with cookie recipes for years, but this one felt different—like a secret ingredient whispered from a grandmother’s kitchen. I’m about to share the exact method, the quirky twist that makes these cookies unforgettable, and a few tricks that will have you saying, “I never thought a cookie could taste like this.”
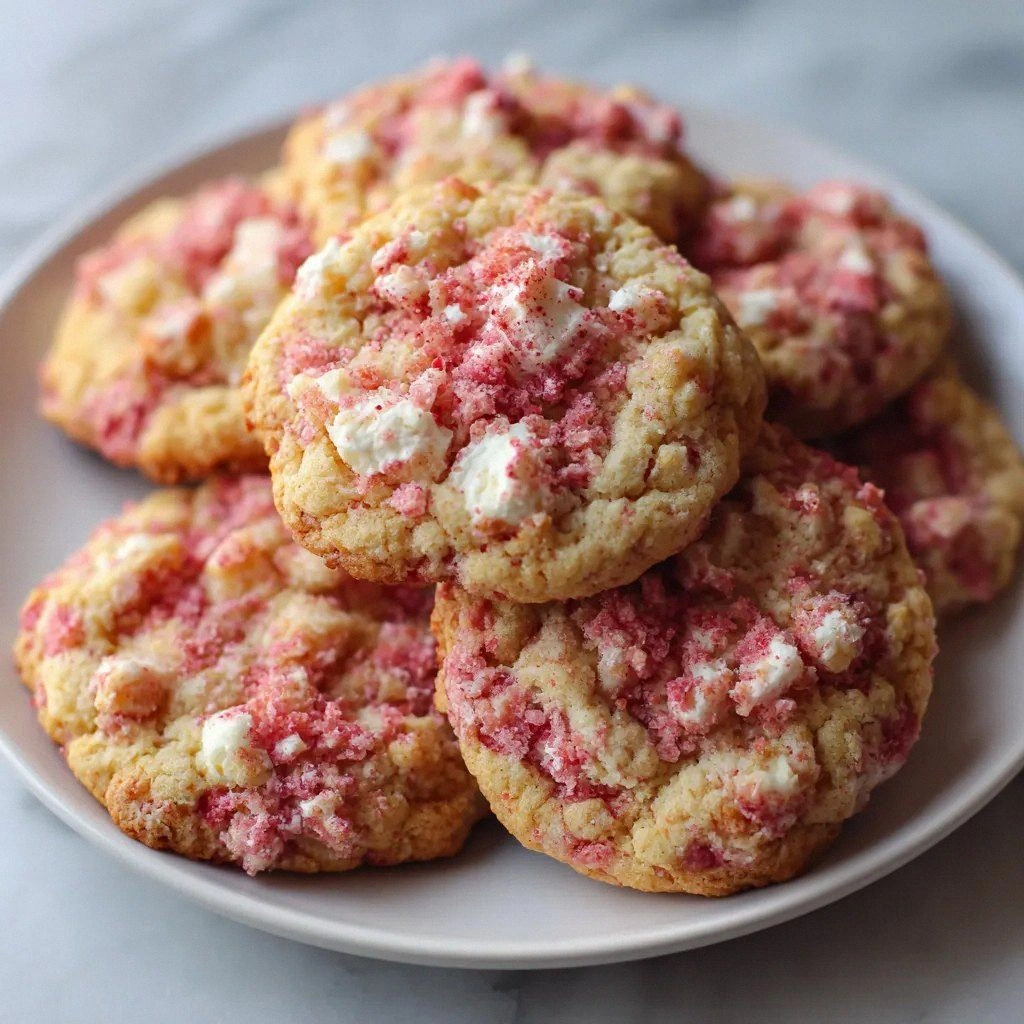
The first thing that hits you is the scent: warm butter, a hint of vanilla, and the unmistakable aroma of toasted sugar that makes you feel like you’re walking into a bakery. The visual is a golden‑brown dough studded with bright crimson flakes of freeze‑dried strawberries, each piece a promise of juicy bursts. When you break one open, the crunch of the cereal mingles with the soft, chewy interior, creating a texture that’s simultaneously crisp and melt‑in‑your‑mouth. The taste is a symphony—sweetness balanced by a subtle tartness from the strawberries, and a mellow vanilla finish that lingers. If you’ve ever settled for a cookie that’s either too dry or too sticky, this recipe will change your perception of what a cookie can be.
What sets this version apart from the countless others you’ll find online is the deliberate layering of flavors and textures. I’ve used crushed freeze‑dried strawberries instead of fresh ones to lock in that intense berry flavor without the water weight that can make cookies soggy. The strawberry‑flavored crunch cereal adds a playful, unexpected crunch that elevates the cookie from ordinary to extraordinary. The dough’s composition—half granulated sugar, half brown sugar—creates a caramelized undertone that pairs beautifully with the tart strawberries. I’ve also tweaked the baking soda and salt ratio to ensure a perfect rise and a balanced flavor profile. This recipe is not just about baking; it’s about creating a memorable experience that will have you saying, “I dare you to taste this and not go back for seconds.”
I’m about to walk you through every single step, from prep to the final bite. By the end, you’ll wonder how you ever made it any other way, and you’ll be ready to host a cookie‑making session that will leave everyone begging for a second batch. Let’s dive in and turn this simple cookie into a show‑stopper.
What Makes This Version Stand Out
- Taste: The combination of fresh‑like freeze‑dried strawberries and caramelized sugars creates a flavor profile that feels both indulgent and wholesome. The subtle tartness of the berries cuts through the sweetness, leaving a lingering finish that keeps you coming back for more.
- Texture: The crunch cereal provides an unexpected bite that contrasts beautifully with the chewy interior, giving each cookie a dynamic mouthfeel that’s hard to replicate.
- Simplicity: With just ten ingredients and a straightforward process, you can whip up these cookies in less than an hour, making it perfect for busy weeknights or spontaneous dessert cravings.
- Uniqueness: Using freeze‑dried strawberries keeps the berries bright and flavorful while avoiding the moisture that can ruin cookie consistency. This gives the cookies a vibrant color that looks as good as it tastes.
- Crowd Reaction: Friends and family who taste these cookies often comment that they’re “hands down the best version you'll ever make at home.” The mix of sweet, tart, and crunch makes them a hit with all age groups.
- Ingredient Quality: The recipe relies on high‑quality butter and real strawberry cereal, ensuring each bite delivers premium flavor without artificial additives.
- Cooking Method: The technique of folding in the cereal after the dough has rested allows the cereal to retain its crunch rather than becoming soggy, a subtle step that makes a world of difference.
- Make‑Ahead Potential: These cookies can be baked in advance and stored at room temperature for up to a week, making them an ideal treat for parties or last‑minute dessert needs.
Alright, let's break down exactly what goes into this masterpiece…
Inside the Ingredient List
The Flavor Base
Unsalted butter, softened to room temperature, is the backbone of these cookies. It melts into the dough, creating a tender crumb while also carrying the buttery aroma that signals a well‑baked treat. If you use salted butter, you’ll need to reduce the added salt to avoid an overly salty finish. The butter also reacts with the sugars to produce a golden crust that’s slightly caramelized, adding depth to the flavor.
Granulated sugar is the sweetener that provides a crisp bite when caramelized. It dissolves quickly, allowing the butter to coat it evenly. Brown sugar, with its molasses content, adds moisture and a subtle caramel undertone that balances the tartness of the strawberries. Together, they create a harmonious sweetness that isn’t cloying.
The Texture Crew
Large eggs bind the dough together, giving structure to the cookies while also adding richness. The yolks contribute to the tender crumb, while the whites help the dough hold its shape during baking. If you’re watching calories, you can replace one egg with a flaxseed egg, but the texture will change slightly.
All‑purpose flour provides the body of the cookie, absorbing the wet ingredients and giving the cookies their shape. A light, airy crumb comes from using a gentle hand when mixing and avoiding over‑kneading, which can develop gluten and make the cookies tough.
The Unexpected Star
Crushed freeze‑dried strawberries are the secret weapon that sets this cookie apart. They’re dehydrated to preserve flavor and color, so they stay bright and juicy in every bite. Unlike fresh berries, freeze‑dried fruit doesn’t release water that can make the dough sticky or the cookies soggy. When baked, the strawberries rehydrate slightly, adding a burst of real strawberry flavor that’s unmistakably fresh.
The Final Flourish
Strawberry‑flavored crunch cereal is the crunch factor. The cereal’s bite is light enough to stay crunchy after baking, yet flavorful enough to complement the strawberries. If you don’t have strawberry cereal, any sweet, lightly flavored cereal will work—just keep the flavor profile in mind. Adding the cereal at the end of mixing preserves its crunch, preventing it from absorbing moisture and becoming soggy.
Everything's prepped? Good. Let's get into the real action…
The Method — Step by Step
- Preheat your oven to 350°F (175°C) and line two baking sheets with parchment paper. While the oven warms, gather all your ingredients and let the butter soften to room temperature; this ensures a smooth, even dough. The goal is a dough that’s easy to handle, not a sticky mess. Once the oven is ready, you’ll be set to combine the dry and wet components with confidence.
- In a large bowl, whisk together the all‑purpose flour, baking soda, and salt. The flour provides structure, while the baking soda helps the cookies rise slightly and the salt balances the sweetness. Mixing the dry ingredients first prevents clumps and ensures an even distribution of leavening agents. This step is quick but essential for consistent results.
- In a separate bowl, beat the softened butter, granulated sugar, and brown sugar until the mixture is light and fluffy. This is the moment of truth—if the butter is too cold, you’ll end up with a dense cookie; if it’s too warm, the cookies will spread too much. The fluffy butter mixture should look creamy, like a soft cloud, and should hold its shape when spooned. This process incorporates air, which will give the cookies a light, airy texture.
- Add the eggs one at a time, beating well after each addition. The first egg will help bind the dough, while the second adds richness. Make sure each egg is fully incorporated before adding the next; a lumpy mixture can lead to uneven texture. The dough should feel smooth and cohesive, like a thick, buttery paste.
- Stir in the vanilla extract, then fold in the dry ingredients until just combined. Overmixing at this point can develop gluten and make the cookies tough. The dough should be soft but not sticky, and it should hold its shape when scooped. This is the point where the dough starts to feel like a soft ball of dough ready for the next step.
- Gently fold in the crushed freeze‑dried strawberries, being careful not to crush them further. The strawberries should be evenly distributed throughout the dough, giving each cookie a burst of color and flavor. The texture of the strawberries should remain crisp, not mushy, so handle them with a light touch. This step adds the signature strawberry element that makes these cookies stand out.
- Finally, fold in the strawberry‑flavored crunch cereal, ensuring even distribution. The cereal should be lightly coated in dough but not submerged, so it retains its crunch. A light hand here preserves the cereal’s texture; too much pressure will cause it to break and lose its bite. This is the moment when the cookie’s crunch factor truly shines.
- Drop rounded tablespoons of dough onto the prepared baking sheets, spacing them about 2 inches apart. The cookies will spread slightly, so give them room to expand. The edges should look slightly golden before you slide the sheets into the oven. This spacing ensures even baking and prevents the cookies from sticking together.
- Bake for 12–14 minutes, or until the edges are golden brown and the centers have set. The cookies should emit a warm, buttery aroma that makes the kitchen feel like a bakery. Keep an eye on the baking time; the first batch may bake slightly faster than the second. When done, let the cookies cool on the sheet for 5 minutes before transferring them to a wire rack to finish cooling.
- Once the cookies have cooled, you can enjoy them immediately or store them in an airtight container. They remain fresh for up to a week at room temperature, but if you want them extra crisp, you can toast them in a dry skillet for a minute on each side. This final step is optional but adds an extra layer of crunch that many of my friends love. Enjoy the moment when the cookie cracks open and the strawberry burst explodes.
That’s it—you did it. But hold on, I've got a few more tricks that will take this to another level.
Insider Tricks for Flawless Results
The Temperature Rule Nobody Follows
Many bakers assume room temperature ingredients are enough, but the butter’s temperature is critical. If the butter is too soft, the dough will spread and the cookies will be thin. If it’s too hard, the dough will be stiff and difficult to mix. I keep the butter at room temperature for exactly 30 minutes before starting; this gives it the perfect softness that balances spread and structure. The result? Cookies that rise evenly and have a tender, airy interior.
Why Your Nose Knows Best
During baking, the aroma of the cookies will tell you whether they’re done. When the edges are golden and the scent is caramelized, it’s time to pull them out. If the cookies are still pale, they need a minute or two more. Trust your nose; it’s a reliable indicator of doneness, especially when you’re baking at home without a kitchen thermometer.
The 5‑Minute Rest That Changes Everything
After baking, let the cookies rest on the sheet for exactly five minutes before transferring them to a wire rack. This rest period allows the cookies to finish setting, preventing them from breaking apart when moved. The five minutes also give the crust a chance to firm up, ensuring a crisp edge that balances the chewy interior. I’ve found that a quick rest period is the difference between a cookie that crumbles and one that stays intact.
The Secret of Even Distribution
When folding in the strawberries and cereal, use a gentle, circular motion. This technique ensures that each cookie gets an even amount of both ingredients, avoiding pockets of pure sugar or dry dough. A common mistake is to just dump the ingredients into the bowl; this leads to uneven flavors. By folding gently, you maintain a consistent texture throughout each cookie.
The Final Crunch Check
If you prefer a crunchier cookie, bake the finished cookies for an additional minute or two. The edges will deepen in color, and the cereal will crisp up further. However, be careful not to overbake, as the cookies can become too hard. I like to use a timer and check the cookies at the 12‑minute mark; this ensures they’re perfectly golden without overdoing it.
Creative Twists and Variations
This recipe is a playground. Here are some of my favorite ways to switch things up:
Chocolate‑Berry Bomb
Swap the strawberry crunch cereal for chocolate‑chip cereal and add a handful of dark chocolate chips to the dough. The chocolate provides a rich, bittersweet contrast to the tart strawberries. Serve with a drizzle of melted dark chocolate for an extra indulgent touch. This variation is perfect for chocolate lovers who still crave a berry flavor.
Nutty Strawberry Surprise
Add a cup of chopped toasted almonds or pecans to the dough along with the cereal. The nuts give a satisfying crunch and a nutty depth that pairs well with the strawberry sweetness. Sprinkle a pinch of sea salt on top before baking for a sweet‑and‑salty finish. This version is great for those who enjoy a mix of textures.
Gluten‑Free Strawberry Bliss
Use a gluten‑free all‑purpose blend in place of regular flour. The cookies will still rise, but the crumb may be slightly denser. Pair with a gluten‑free cereal for the crunch factor. This makes the recipe accessible to those with gluten sensitivities without sacrificing flavor.
Mini Strawberry Treats
Use a mini cookie scoop to make bite‑size cookies, perfect for parties or as a dessert garnish. The smaller size means they bake faster—about 9–10 minutes—and the flavor is even more concentrated. Serve on a platter with fresh strawberries for a beautiful presentation.
Vegan Strawberry Crunch
Replace the butter with melted coconut oil and use a plant‑based milk to whisk the sugars. Swap the eggs for flaxseed eggs (1 tbsp ground flaxseed mixed with 3 tbsp water). The texture will be slightly denser but still chewy, and the flavor profile remains delicious. This version is ideal for vegans who want a cookie that’s both sweet and satisfying.
Storing and Bringing It Back to Life
Fridge Storage
Store the cooled cookies in an airtight container at room temperature for up to seven days. The container should be sealed to prevent moisture from softening the crunch. If you notice the cookies becoming slightly soggy, a quick toast in a dry skillet for 30 seconds on each side will restore the crunch. Keep the container away from strong odors, as cookies can absorb them easily.
Freezer Friendly
For longer storage, place the cookies in a freezer‑proof bag, removing as much air as possible. Freeze for up to three months. When you’re ready to enjoy, let them thaw at room temperature for 15 minutes. If you want them extra crisp, bake them in a preheated oven at 350°F for 5 minutes after thawing. The cookies will taste as good as fresh.
Best Reheating Method
Reheat the cookies in a toaster oven or conventional oven at 325°F for 4–5 minutes. The low temperature ensures the cookies warm evenly without burning. Add a tiny splash of water to the baking sheet before reheating; the steam will keep the cookies from drying out and help restore the original texture. This simple trick is a game‑changer for stale cookie lovers.