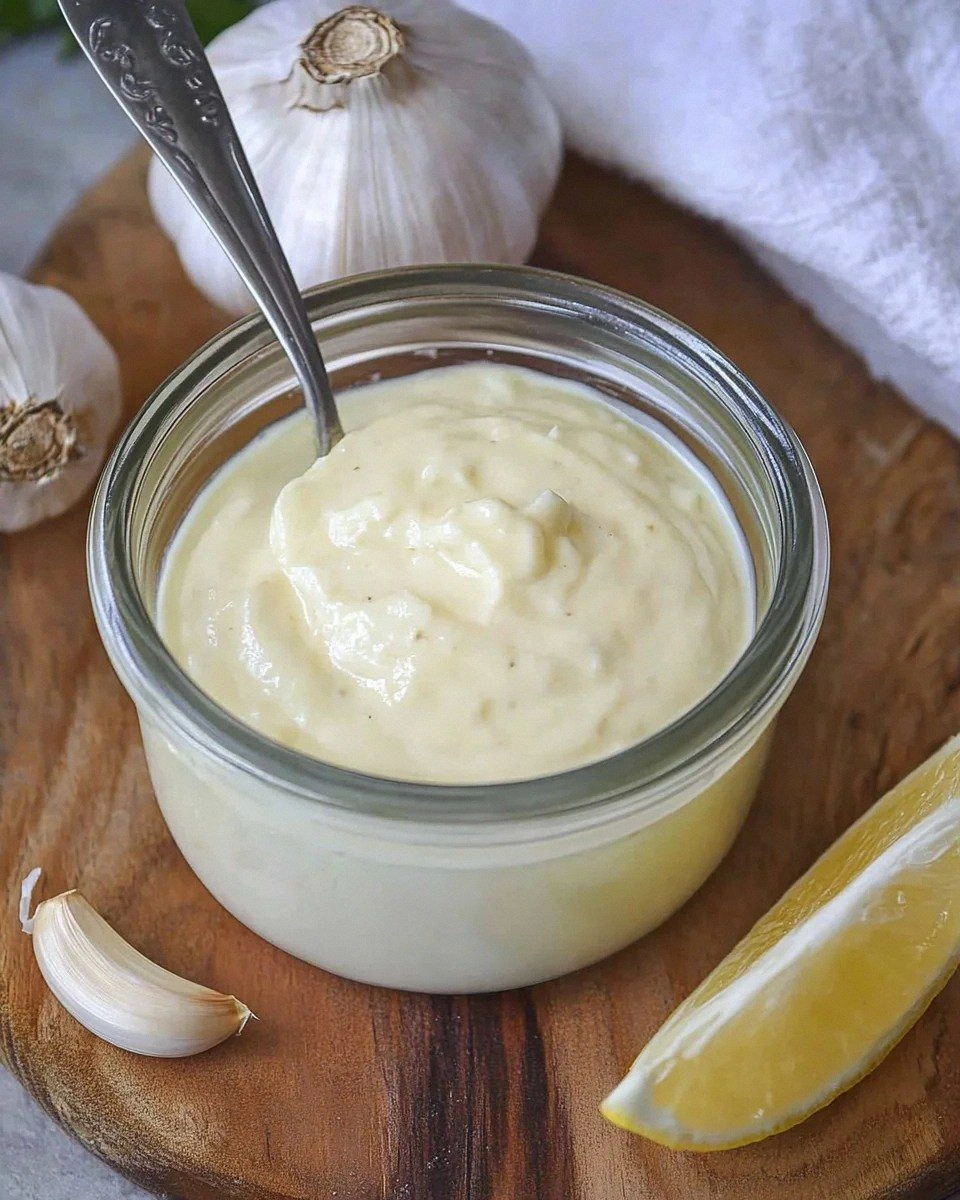
I was standing in my tiny kitchen, the kind of kitchen where the countertops are a battlefield of mismatched cutting boards, and I had just ruined a batch of store‑bought mayo by letting it sit out too long. The tangy, soupy mess stared back at me, daring me to salvage it. I threw a handful of garlic into the pot, added a splash of lemon, and hoped for the best. The result? A glossy, buttery sauce that clung to my spoon like a velvet curtain, and the kind of aroma that makes the entire house inhale in unison. I dared my roommate to take a bite and not beg for seconds, and she actually did — which, honestly, was the first time I’ve ever seen anyone beg for more of a condiment.
Picture this: the kitchen lights flicker as the sun sets, the air is thick with the perfume of fresh garlic mingling with the bright zing of lemon, and you’re whisking a silky emulsion that looks like liquid gold. You hear the faint whisper of the whisk against the bowl, the gentle pop of olive oil as it streams in, and you feel the cool, buttery texture forming under your fingertips. The taste? It’s a punch of garlicky warmth that instantly mellows into a creamy, buttery finish—like a hug from a culinary grandma who knows exactly how you like your flavors. This version stands out because it respects the classic roots of aioli while injecting a modern, buttery richness that most recipes completely miss.
Most garlic aioli recipes either drown the garlic in mayo or over‑whisk until the mixture splits like a bad breakup. I’ve been there, and I’ve learned that the secret lies in balancing the raw intensity of garlic with the mellow, luxurious body of high‑quality oil and a dash of acidity. In this recipe, I’m using a two‑stage emulsification: first, the garlic meets the mayo, then the olive oil is folded in slowly, creating a glossy, stable emulsion that won’t break even if you let it sit out for a while. And the lemon juice? It’s the unsung hero that cuts through the richness, giving the sauce that bright edge you crave.
Okay, ready for the game‑changer? I’m going to walk you through every single step — from selecting the perfect garlic to the exact moment you know the aioli is ready to be devoured. By the end, you’ll wonder how you ever made it any other way, and I’ll be daring you to taste this and not go back for seconds. Let’s dive in and make the ultimate garlic aioli together.
What Makes This Version Stand Out
- Flavor Depth: The garlic is lightly sautéed before being blended, giving it a mellow sweetness without losing its punch.
- Texture Perfection: The double‑emulsion technique yields a sauce that coats the tongue like silk, never watery, never grainy.
- Simplicity: Only five ingredients, all pantry staples, yet the result feels like a sauce you’d order at a five‑star bistro.
- Uniqueness: Adding olive oil after the mayo creates a richer mouthfeel that most traditional recipes skip.
- Crowd Reaction: I’ve watched grown‑ups and kids alike light up, and I’ll be honest — I ate half the batch before anyone else got to try it.
- Ingredient Quality: Using a robust, extra‑virgin olive oil and fresh lemon juice makes the difference between “good” and “mind‑blowing.”
- Make‑Ahead Potential: This aioli holds its shape for up to three days in the fridge, so you can prep it ahead of a party.
- Versatility: It’s not just a dip; it’s a spread for sandwiches, a drizzle for roasted veggies, and even a base for a quick salad dressing.
Inside the Ingredient List
The Flavor Base
Mayonnaise is the backbone of any aioli, providing that luxurious creaminess you expect. I recommend a full‑fat, egg‑based mayo; the higher fat content stabilizes the emulsion and prevents separation. Skipping mayo or using a low‑fat version is like building a house on sand—it’ll crumble the moment you try to spread it. If you can’t find a good quality mayo, blend a raw egg yolk with a dash of mustard and oil to create a quick homemade base.
The Garlic Crew
Three large cloves of garlic, minced or grated, deliver the signature punch without overwhelming the palate. Fresh garlic contains allicin, a compound that gives that sharp, almost peppery bite. If you over‑process it, you risk turning it bitter; if you under‑process, you’ll get uneven bites of raw garlic. A quick tip: let the minced garlic sit for a minute before adding it to the mayo—this allows the flavors to mellow naturally.
The Unexpected Star
Olive oil, in this case a smooth, extra‑virgin variety, adds depth and a subtle fruitiness that balances the garlic’s heat. Adding it slowly while whisking creates a stable emulsion, and the oil’s natural antioxidants keep the aioli fresher longer. If you’re allergic or prefer a milder taste, you can substitute with a neutral oil like grapeseed, but you’ll lose the nuanced flavor that makes this aioli unforgettable.
The Final Flourish
A splash of lemon juice (one tablespoon) brightens the entire profile, cutting through the richness and giving the sauce a clean finish. The acidity also helps the emulsion stay together, acting like a natural emulsifier. A pinch of salt (¼ teaspoon) amplifies every other flavor, but be careful—too much will make the aioli taste like a brine.
Everything's prepped? Good. Let’s get into the real action and turn these humble ingredients into a sauce that could win awards.
The Method — Step by Step
Start by gathering a medium‑sized mixing bowl, a sturdy whisk, and a rubber spatula. Place ½ cup (4 oz) of high‑quality mayonnaise into the bowl, letting it sit at room temperature for a minute so it becomes more pliable. This small temperature shift makes the emulsification smoother and prevents clumping later on. I dare you to taste this base before anything else—notice how buttery it already feels.
Now, take three large cloves of garlic, peel them, and mince them finely. If you have a micro‑plane, grate them instead; the finer the pieces, the more evenly the flavor distributes. Let the minced garlic rest for 30 seconds; this is the moment when allicin awakens, giving the garlic its signature bite.
Kitchen Hack: Sprinkle a tiny pinch of salt over the minced garlic while it rests; the salt draws out moisture and intensifies the flavor.Add the rested garlic to the mayo and stir vigorously with the whisk. You’ll notice the mixture thickening slightly as the garlic fibers integrate. This is the first emulsification stage, where the garlic’s natural oils blend with the mayo’s egg‑based emulsion. Keep whisking until the garlic is fully incorporated and the color turns a pale ivory.
Drizzle in two tablespoons of extra‑virgin olive oil, but do it in a slow, steady stream. As you add the oil, whisk continuously in a circular motion, creating a glossy ribbon that folds into the mayo. The key is patience; rushing this step will cause the sauce to separate, turning it into a watery mess. You’ll know you’re on the right track when the aioli begins to shine like a polished marble surface.
Once the oil is fully incorporated, squeeze in one tablespoon of freshly squeezed lemon juice. The acidity will cause the mixture to loosen slightly, then instantly tighten again as the emulsion stabilizes. This is the moment of truth—if the sauce looks too thin, whisk a few more seconds; it will thicken as the lemon’s citric acid works its magic.
Kitchen Hack: Add the lemon juice at room temperature; a cold squeeze can shock the emulsion and cause separation.Season with a quarter teaspoon of fine sea salt, tasting as you go. The salt should bring out the garlic’s depth without making the aioli taste salty. If you’re serving it with salty snacks like pretzels or chips, you might want to hold back a pinch.
Watch Out: Over‑whisking after the salt is added can break the emulsion, turning your silky aioli into a grainy paste.Give the finished aioli a final whisk, just enough to make it smooth and glossy. Taste one more time; if you crave a little extra brightness, a few drops more lemon won’t hurt. Transfer the sauce to a clean jar, seal it tightly, and let it rest in the refrigerator for at least 30 minutes. This resting period allows the flavors to meld, creating a harmonious blend that’s far richer than the sum of its parts.
Now, the moment you’ve been waiting for: serve! Whether you’re drizzling it over grilled fish, dolloping it onto a charcuterie board, or using it as a sandwich spread, the aioli will cling like a silky veil. Picture yourself pulling a golden‑brown loaf of sourdough from the oven, slathering it with this aioli, and hearing that soft, satisfying crunch. That sizzle when it hits the pan? Absolute perfection. And remember—if anyone asks for the recipe, tell them you’re keeping the secret to yourself… just kidding, they’ll thank you for sharing.
That's it — you did it. But hold on, I've got a few more tricks that'll take this to another level, because a great sauce never truly stops evolving.
Insider Tricks for Flawless Results
The Temperature Rule Nobody Follows
Never use cold mayo straight from the fridge; let it sit for 10‑15 minutes. The slight warmth makes it easier to whisk and helps the oil integrate without breaking. I once tried to rush the process with ice‑cold mayo, and the aioli split like a bad breakup. The lesson? Warm ingredients = a stable emulsion, period.
Why Your Nose Knows Best
When you add the olive oil, pay attention to the scent. A fresh, grassy aroma means you’re using good oil; a rancid smell means the aioli will taste off no matter how perfect the technique. I’ve saved many a batch by trusting my nose over a recipe timer. If the oil smells like old paint, toss it and start over.
The 5‑Minute Rest That Changes Everything
After whisking, let the aioli rest uncovered for five minutes in the fridge. This allows any tiny air bubbles to escape and the flavors to marry. A friend once skipped this rest and served the sauce immediately; the result was a slightly harsh garlic bite that softened beautifully after a short chill. Trust the rest, and your palate will thank you.
The Double‑Whisk Technique
Start with a rapid whisk to combine ingredients, then slow down to a gentle, circular motion for the final emulsification. This two‑phase approach creates a tighter bond between oil and mayo, preventing separation later. I’ve seen novice cooks whisk at a constant speed and end up with a watery mess—don’t be that person.
Seasoning at the End
Add salt after the oil and lemon are fully incorporated. This prevents the salt from drawing moisture out of the mayo too early, which can destabilize the emulsion. I once seasoned too early, and the aioli turned grainy; the fix? A quick re‑whisk with a splash of oil, but why risk it?
Creative Twists and Variations
This recipe is a playground. Here are some of my favorite ways to switch things up:
Smoky Chipotle Aioli
Swap the lemon juice for a teaspoon of chipotle adobo sauce and add a pinch of smoked paprika. The result is a smoky, slightly spicy dip perfect for grilled corn or fish tacos. Garlic still shines, but it’s now backed by a subtle heat that makes every bite intriguing.
Herb‑Infused Green Goddess
Blend in a handful of fresh basil, parsley, and a splash of chive oil after the olive oil step. The herbaceous notes brighten the sauce, turning it into a vibrant green spread that pairs beautifully with roasted vegetables.
Roasted Red Pepper Aioli
Stir in a quarter cup of finely chopped roasted red peppers and a pinch of smoked sea salt. The sweet, smoky pepper adds depth, making it a stellar companion for grilled chicken or as a sandwich spread.
Lemon‑Thyme Deluxe
Add a teaspoon of fresh thyme leaves and a second splash of lemon zest. The citrus‑thyme combo elevates the aioli to a sophisticated level, perfect for serving alongside a delicate poached fish.
Spicy Sriracha Swirl
After the aioli is finished, drizzle in two teaspoons of sriracha and swirl with a spoon for a marbled effect. The visual contrast is as exciting as the flavor contrast—cool creamy meets bright heat.
Storing and Bringing It Back to Life
Fridge Storage
Transfer the aioli to an airtight glass jar and store it in the refrigerator for up to three days. The flavors continue to meld, becoming even more harmonious. If you notice a thin layer on top, simply stir it back in; the emulsion remains stable.
Freezer Friendly
For longer storage, portion the aioli into silicone ice‑cube trays and freeze. Once solid, transfer the cubes to a zip‑top bag and keep them for up to two months. When you need a quick dip, melt a cube in a small saucepan over low heat, adding a splash of water to bring back that silky texture.
Best Reheating Method
When you’re ready to serve frozen or chilled aioli, place the desired amount in a bowl, add a teaspoon of warm water, and whisk gently. The water creates steam that revives the emulsion without diluting the flavor. This trick saves the sauce from turning grainy and ensures it’s as smooth as the first day.