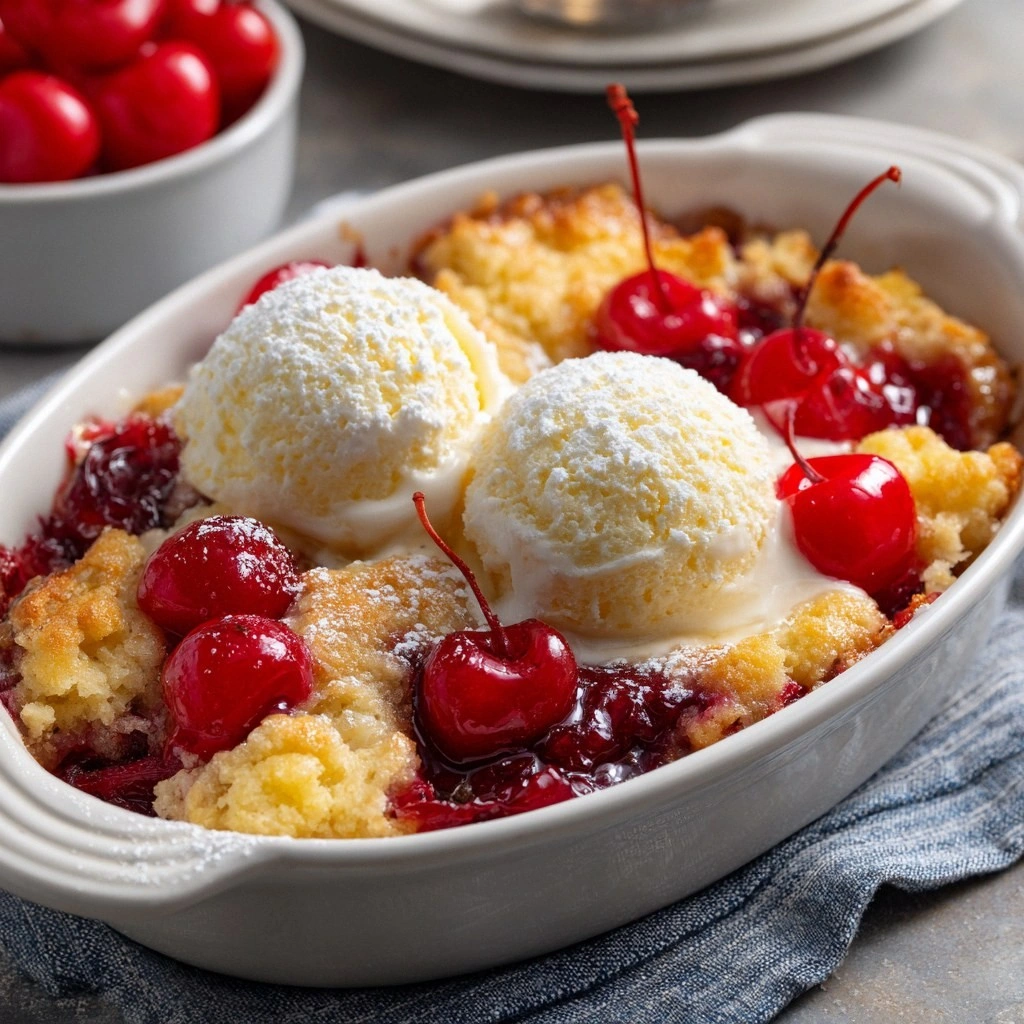
I was halfway through a midnight snack frenzy when the kitchen decided to throw a tantrum. The fridge was a chaotic jungle of overripe fruit, and my cravings were a mix of sweet, tangy, and a hint of adventure. I pulled out a box of cherry pie filling, a can of pineapple chunks, a bag of flour, a jar of sugar, and a block of butter—five simple ingredients that seemed like an impossible match for a dessert that could wow a crowd. But the moment the butter melted and the sweet cherry aroma hit my nose, I knew I’d stumbled upon a culinary revelation.
Picture this: a golden crust that cracks like brittle ice, a fragrant steam of tropical fruit that rises like a sweet cloud, and the first bite that releases a burst of cherry sweetness balanced by the bright acidity of pineapple. I dare you to taste this and not go back for seconds. The texture is a playful paradox—soft, airy inside, yet with a satisfying snap on the edges that shatters like thin ice. The flavor profile is a harmonious duet, where the cherries sing a rich, deep note while the pineapples provide a crisp, citrusy counterpoint.
What makes this version stand out isn’t just the ingredients; it’s the technique that turns a handful of pantry staples into a showstopper. I’m talking about the “dump” method—no whisking, no beating, just a single, bold pour. It’s hands down the best version you'll ever make at home because it eliminates the fuss but preserves the flavor. Most recipes get this completely wrong by overmixing the batter or adding too much liquid, which results in a soggy mess. Here, the balance is perfect, and the result is a cake that rises just enough to be fluffy yet dense enough to hold the fruit.
And if you’re wondering why I’m so obsessed, let me explain. I’ve tried dozens of fruit cakes, each with its own quirks. None of them matched the effortless joy of this one. The next part? Pure magic. Stay with me here—this is worth it.
What Makes This Version Stand Out
- Flavor: The cherries provide a deep, velvety sweetness that pairs perfectly with the bright, zesty pineapple. The combination feels like a tropical summer in a bite.
- Texture: The crumbly, buttery base creates a contrast against the juicy fruit, giving each mouthful a satisfying bite and a melt-in-the-mouth finish.
- Simplicity: With only five ingredients, this recipe is a triumph of minimalism, making it accessible for even the most novice cooks.
- Time: The entire process takes less than an hour, from prep to plate, so you can impress guests on short notice.
- Versatility: It can be served warm or cold, as a dessert or a brunch treat, and even as a topping for ice cream.
- Make‑ahead: The dump cake stays fresh for up to three days, making it ideal for potlucks or busy weeknights.
- Visual Appeal: The golden crust and glossy fruit topping make it Instagram-worthy without any fancy plating.
Inside the Ingredient List
The Flavor Base
Cherry pie filling is the heart of this dessert. It provides the rich, deep sweetness that anchors the flavor profile. If you skip it, the cake loses its signature depth and becomes a bland, pineapple‑only treat. For an extra touch, look for a brand that includes natural vanilla or a splash of almond extract; it elevates the overall aroma.
The Tropical Touch
Pineapple chunks bring a bright, tangy contrast that cuts through the buttery richness. The natural sugars in pineapple caramelize slightly during baking, creating a subtle caramelized glaze on the top. If you prefer a fresher taste, use fresh pineapple; it’s lighter but still delivers that citrus punch.
The Structural Backbone
All‑purpose flour is the backbone that holds the cake together. It absorbs the liquid from the fruit and creates a light, airy crumb. Skipping the flour would result in a dense, wet mess that collapses under its own weight. For a gluten‑free version, you can swap with a 1:1 gluten‑free blend, but keep an eye on the baking time.
The Sweetener
White sugar balances the tartness of the cherries and the acidity of the pineapple. It also helps with browning, giving the cake that golden, caramelized finish. If you’re watching your sugar intake, a half cup of honey or maple syrup can be a flavorful alternative, though the texture may shift slightly.
The Fat Component
Unsalted butter adds richness and creates a tender crumb. When melted and poured over the fruit, it forms a glossy, buttery coating that locks in moisture. If you’re avoiding dairy, a neutral oil like canola or grapeseed can replace butter, but the flavor will be less buttery.
Everything's prepped? Good. Let's get into the real action...
The Method — Step by Step
- Preheat your oven to 350°F (175°C). Line a 9‑inch round cake pan with parchment paper for easy removal. This step ensures a uniform bake and a clean release from the pan.
- In a large mixing bowl, combine the cherry pie filling, pineapple chunks, flour, sugar, and melted butter. Stir gently just until the mixture is cohesive; over‑mixing will create a dense crumb. The batter should look thick and almost lumpy.
- Pour the batter into the prepared pan, smoothing the top with a spatula. The batter will spread slightly, creating an even surface that will bake uniformly.
- Place the pan in the oven and bake for 30 minutes. The cake should rise and develop a golden crust. A quick test: insert a toothpick into the center; it should come out clean with a few moist crumbs.
- Remove the cake from the oven and let it cool in the pan for 10 minutes. This resting period allows the flavors to settle and the cake to firm up.
- Transfer the cake to a wire rack to cool completely. This prevents the bottom from becoming soggy and keeps the crust crisp.
- Optional: If you’d like a glossy finish, brush the top with a thin layer of melted butter or a drizzle of pineapple juice. This step adds shine and enhances the fruit’s natural sweetness.
- Serve warm or at room temperature. Pair it with a scoop of vanilla ice cream or a dollop of whipped cream for an extra indulgent treat.
- Enjoy the moment of triumph—your hands‑crafted, five‑ingredient masterpiece is ready to be devoured. The aroma alone will have your guests lining up for a slice.
That's it — you did it. But hold on, I've got a few more tricks that'll take this to another level...
Insider Tricks for Flawless Results
The Temperature Rule Nobody Follows
Many bakers bake at the same temperature regardless of the recipe. The secret is to bake at 350°F (175°C) and keep the oven door slightly ajar for the last 5 minutes to prevent a hard crust. I once baked at 375°F and the cake collapsed on the inside, leaving me with a soggy mess.
Why Your Nose Knows Best
A well‑baked cake will emit a warm, buttery scent that lingers in the air. If the aroma feels too sweet or too bland, adjust the sugar or butter. Trust your nose; it's the most reliable indicator of doneness.
The 5‑Minute Rest That Changes Everything
Letting the cake rest in the pan for 10 minutes before transferring it to a wire rack allows the crumb to set. Skipping this step can cause the cake to crumble when you try to slice it.
The Secret to a Crispy Crust
A thin layer of melted butter brushed over the top before baking creates a glossy, crisp crust. If you prefer a darker crust, sprinkle a pinch of brown sugar on top before baking for a caramelized effect.
The Quick Chill Trick
If you need to serve the cake immediately, place it in the fridge for 15 minutes after it has cooled to room temperature. The cold will firm up the butter, giving you a clean slice every time.
The Flavor Booster
A splash of vanilla extract or almond extract in the batter enhances the fruit flavors. I added a teaspoon of almond extract for a nutty undertone that pairs beautifully with the cherries.
Creative Twists and Variations
This recipe is a playground. Here are some of my favorite ways to switch things up:
Tropical Coconut Crunch
Swap half the butter for coconut oil and sprinkle toasted coconut flakes on top before baking. The result is a tropical twist with a delightful crunch.
Berry Surprise
Add a cup of fresh blueberries or raspberries to the batter. The berries will burst with flavor, giving the cake a vibrant color and a tangy kick.
Chocolate Drizzle
Drizzle melted dark chocolate over the cooled cake for an indulgent finish. The chocolate pairs beautifully with the fruit and adds a silky texture.
Almond Delight
Replace the flour with almond flour for a gluten‑free version and add slivered almonds on top. The nutty flavor enhances the cherry sweetness.
Spiced Wonder
Add a pinch of ground ginger or cinnamon to the batter. The warm spices give the cake a comforting depth, especially during cooler months.
Lemon Zest
Grate a lemon peel into the batter for a bright citrus note. The zest adds a fresh zing that balances the richness of the butter.
Storing and Bringing It Back to Life
Fridge Storage
Store the cooled cake in an airtight container at room temperature for up to three days. The cake stays moist and the fruit remains juicy. For longer storage, keep it in the fridge for up to a week.
Freezer Friendly
Wrap the cake tightly in plastic wrap and place it in a freezer bag. Freeze for up to two months. Thaw at room temperature for 30 minutes before reheating.
Best Reheating Method
Preheat your oven to 300°F (150°C). Place the cake on a baking sheet and warm for 10–12 minutes. Add a splash of water or milk before reheating to keep the crumb soft and prevent drying.