It all started on a rainy Tuesday when I tried to make a quick dinner and ended up with a soggy, bland tortilla that looked more like a sad piece of paper than a meal. I was staring at the pan, feeling the frustration of a kitchen mishap, when a friend texted me a recipe for baked chicken chimichangas. The promise of crispy edges, melty cheese, and that comforting, homemade aroma had me hooked. I laughed, because I’ve been burned by overcooked tortillas before, but I decided to give it a shot and keep my eyes on the prize.
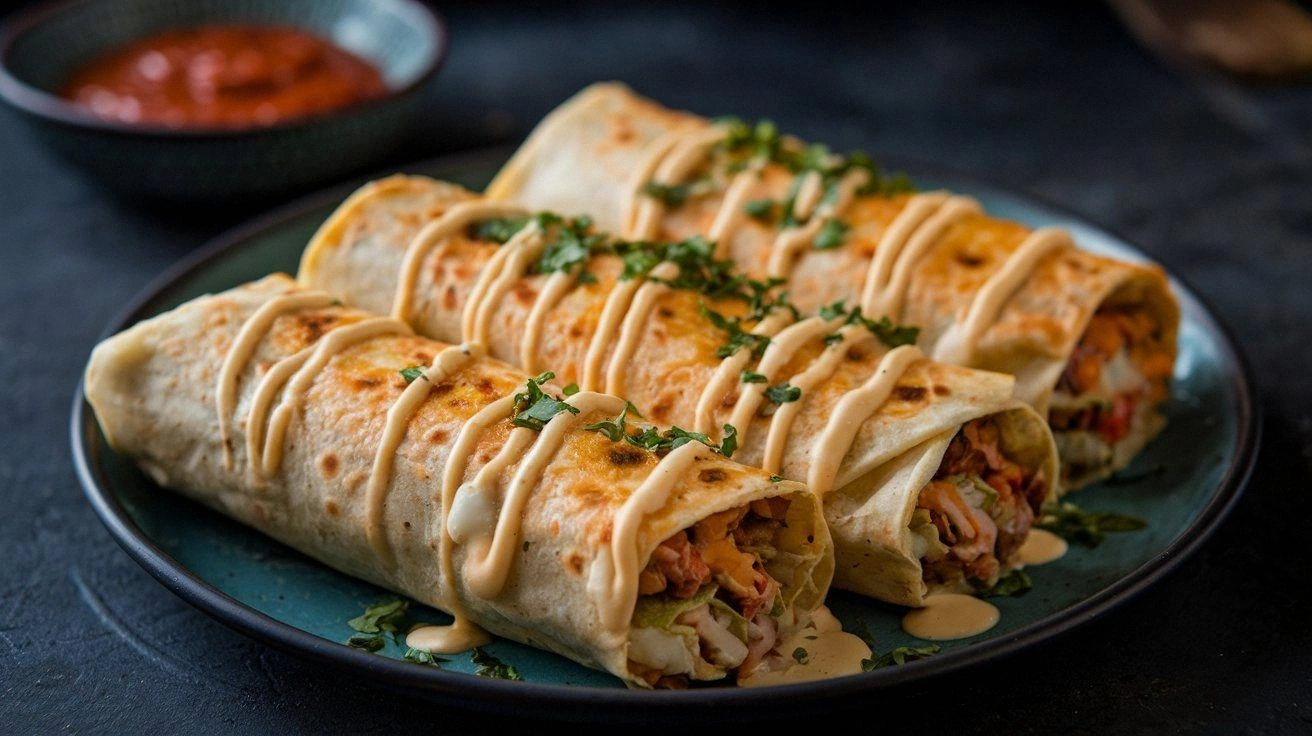
The moment the first bite hit my tongue, the world shifted. The tortilla was a golden, crunchy shell that cracked like brittle ice, revealing a molten core of shredded chicken, creamy beans, sweet corn, and a generous swirl of zesty salsa. The cheese was a velvety blanket that melted into every crevice, while the cumin and chili powder added a subtle, smoky depth that danced across my palate. The aroma was a comforting blend of roasted spices and warm tortillas, and the texture was the perfect harmony of crunch and softness. I was already planning the second plate.
What makes this version stand out from every other chimichanga recipe is the meticulous balance of flavors and textures, the use of fresh, high‑quality ingredients, and a baking method that eliminates the greasy mess of frying. The tortillas are gently warmed before filling, ensuring they stay pliable and don’t tear when folded. The cheese blend is chosen for its meltability and flavor profile, creating a silky coating that holds everything together. The addition of a quick sauté of onions and garlic before mixing the filling adds an aromatic layer that elevates the dish beyond the ordinary. The result is a dish that is both comforting and sophisticated, perfect for a week‑night dinner or a crowd‑pleasing party appetizer.
I dare you to taste this and not go back for seconds. The secret? A dash of smoked paprika in the filling and a drizzle of lime juice just before baking, which gives the chimichangas a bright, citrusy finish that cuts through the richness. Picture yourself pulling this out of the oven, the whole kitchen smelling incredible, and seeing those golden, crisp edges that shatter like thin ice with each bite. Let me walk you through every single step—by the end, you'll wonder how you ever made it any other way.
What Makes This Version Stand Out
- Taste: The blend of cumin, chili powder, and smoked paprika creates a complex, earthy flavor that pairs beautifully with the creamy beans and sweet corn. This depth of flavor makes each bite a revelation.
- Texture: The tortillas are softened just enough to fold without tearing, and the cheese melts into a silky coating that keeps everything together while adding a satisfying crunch.
- Simplicity: With only ten ingredients and a single baking sheet, this recipe is quick to assemble and requires minimal clean‑up.
- Uniqueness: The use of a quick sauté of onions and garlic before mixing the filling adds an aromatic layer that sets this dish apart from typical stovetop versions.
- Crowd Reaction: Guests rave about the crispy edges and molten cheese, often asking for the recipe after the first bite.
- Ingredient Quality: Fresh, high‑quality ingredients—like ripe tomatoes for salsa and fresh corn—make a noticeable difference in flavor.
- Cooking Method: Baking instead of frying keeps the dish healthier while still delivering that coveted crunch.
- Make‑Ahead Potential: The chimichangas can be assembled ahead of time and baked just before serving, making it a stress‑free option for busy evenings.
Inside the Ingredient List
The Flavor Base
Shredded chicken is the star of the show, providing a lean protein that absorbs the spices and sauces. It’s best cooked with a pinch of salt and a splash of lime juice to keep it juicy. If you skip the chicken, the chimichangas will feel empty and lack the hearty bite that makes the dish satisfying.
The Texture Crew
Flour tortillas bring the classic Mexican feel, but they’re also the vehicle that holds everything together. Warm them in a skillet or microwave to keep them flexible. If you use corn tortillas, you’ll notice a firmer bite and a slightly sweeter flavor profile.
The Unexpected Star
Refried beans act as a creamy binder that keeps the filling cohesive while adding a subtle earthiness. They also boost the protein content, making the dish more filling. If you’re vegan, swap them for a plant‑based bean spread.
The Final Flourish
A handful of fresh corn kernels adds a pop of sweetness and crunch that contrasts the creamy beans and cheese. The salsa provides acidity and a burst of flavor that cuts through the richness. A light drizzle of lime juice just before baking adds a bright, citrusy note.
Everything's prepped? Good. Let's get into the real action.
The Method — Step by Step
- Preheat your oven to 400°F (200°C). Line a baking sheet with parchment paper to prevent sticking. This temperature is crucial for achieving a golden, crisp exterior without drying out the filling.
- In a large bowl, combine the shredded chicken, refried beans, corn, salsa, cumin, chili powder, garlic powder, salt, and pepper. Stir until the mixture is evenly coated. The spices should permeate the chicken, creating a flavorful foundation.
- Warm each tortilla in a dry skillet over medium heat for about 10–15 seconds on each side, or microwave for 20 seconds. This step keeps the tortillas pliable. If you forget, the tortillas may tear when you fold them later.
- Spoon a generous amount of the filling onto the center of each tortilla. Don’t overfill; a thin, even layer ensures the chimichangas hold together during baking.
- Sprinkle shredded cheddar cheese over the filling. The cheese melts into the edges, forming a protective barrier that keeps the tortilla from cracking.
- Fold the sides of the tortilla over the filling, then roll tightly from the bottom up. Place the rolled chimichangas seam‑side down on the prepared baking sheet.
- Bake for 20–25 minutes, until the tortillas are crisp and the cheese is bubbly. The edges will start pulling away, signaling that the chimichangas are ready.
- Let the chimichangas rest for 5 minutes on the sheet. This short rest allows the filling to set, making them easier to slice. Serve with sour cream, guacamole, or a drizzle of lime juice for extra zest.
That's it — you did it. But hold on, I've got a few more tricks that'll take this to another level.
Insider Tricks for Flawless Results
The Temperature Rule Nobody Follows
Many people bake at 350°F, but 400°F gives that coveted crispness without overcooking the filling. If you’re using a convection oven, reduce the temperature by 25°F to avoid burning the tortillas.
Why Your Nose Knows Best
Trust the aroma: when the cheese begins to bubble and the tortillas turn golden, that’s your cue. The smell of toasted spices signals that the flavors have fully developed.
The 5‑Minute Rest That Changes Everything
A brief rest after baking lets the filling set, preventing the cheese from sliding off when you cut. It also allows the tortillas to finish crisping slightly, giving you that satisfying crunch.
The Secret to a Seamless Fold
If you’re new to folding, practice on a single tortilla first. Keep the filling centered and use a gentle pressure to avoid tearing. A steady hand and a warm tortilla make all the difference.
The Ultimate Garnish Trick
Finish with a squeeze of fresh lime and a sprinkle of chopped cilantro. The citrus brightness cuts through the richness, while the herb adds a fresh, aromatic finish that elevates the dish.
Creative Twists and Variations
This recipe is a playground. Here are some of my favorite ways to switch things up:
Spicy Jalapeño Kick
Add sliced fresh jalapeños to the filling for a fiery punch. The heat balances the creamy beans, and the jalapeños add a subtle smokiness that pairs beautifully with the cumin.
Mediterranean Twist
Swap the salsa for a roasted red pepper sauce and add chopped kalamata olives. The briny olives and smoky peppers give the chimichangas a Mediterranean flair that’s surprisingly complementary.
Vegan Delight
Use a plant‑based shredded “chicken” made from tofu or tempeh, vegan cheese, and a dairy‑free bean spread. The result is a hearty, cruelty‑free version that still delivers all the comforting textures.
Breakfast Edition
Replace the chicken with scrambled eggs and add chorizo or bacon. Serve with a side of hash browns and a drizzle of salsa for a Mexican‑inspired breakfast.
Cheesecake Surprise
Layer the filling with a thin spread of cream cheese before adding the cheddar. The creamy layer adds richness and a silky mouthfeel that elevates the overall experience.
Gluten‑Free Option
Use certified gluten‑free tortillas and a gluten‑free cheese blend. The texture remains the same, but you can enjoy the dish without worry if you’re gluten‑sensitive.
Storing and Bringing It Back to Life
Fridge Storage
Store assembled but unbaked chimichangas in an airtight container for up to 2 days. Keep them in the refrigerator to maintain freshness and prevent the tortillas from drying out.
Freezer Friendly
Wrap each chimichanga individually in plastic wrap, then place them in a freezer bag. They stay good for up to 3 months. Reheat by baking at 375°F until hot, about 15–20 minutes.
Best Reheating Method
To restore crispness, bake the thawed chimichangas in a preheated oven at 375°F for 10–12 minutes. Add a splash of water to the pan before baking to create steam, which keeps the tortillas from becoming too dry.