I was standing in my kitchen, the smoke alarm blaring like an over‑excited referee, after a disastrous attempt at deep‑fried mozzarella sticks that turned out more like soggy cheese bricks. The whole episode left me craving something that could give me that glorious crunch without the kitchen chaos, and that’s when a dare from my roommate sparked a light‑bulb moment: “Make me a snack that’s crunchy on the outside, creamy on the inside, and won’t set off the fire alarm.” I accepted the challenge, grabbed a tub of cottage cheese (the low‑fat hero of my pantry), and set out on a culinary experiment that would change my snack game forever.
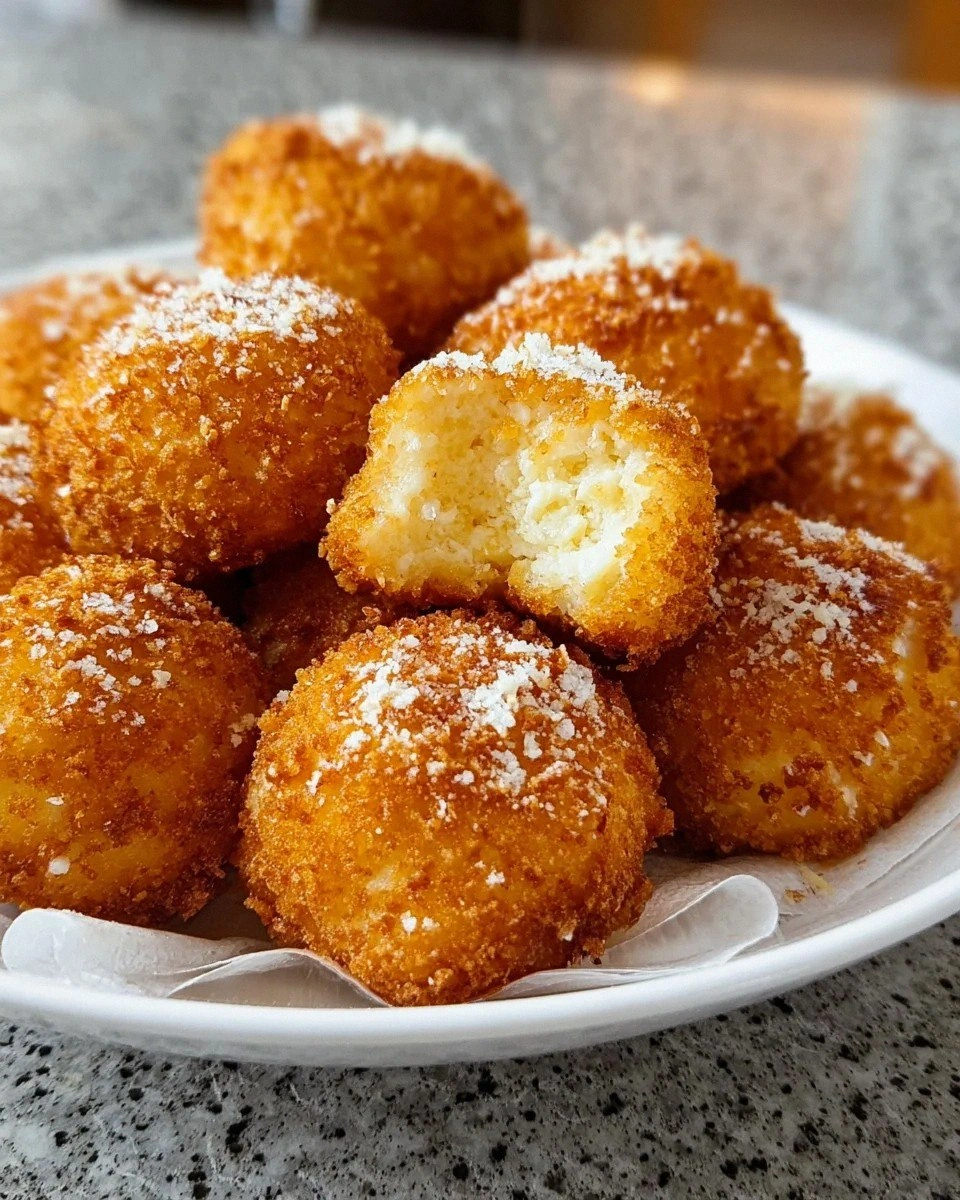
Picture this: a golden‑brown bite that shatters like thin ice when you press it, releasing a melt‑in‑your‑mouth, tangy core that’s as smooth as a velvet ribbon. The aroma that fills the kitchen is a buttery, nutty perfume that whispers promises of pure comfort. You’ll hear the satisfying sizzle as each piece hits the hot pan, a sound that says “we’re about to make magic.” The texture dance between the crisp crust and the soft, slightly tangy interior is a sensory symphony that makes you forget everything else. I dare you to taste this and not go back for seconds.
Most recipes for cheesy bites either drown you in oil or leave you with a rubbery center that feels like chewing on a stale pillow. This version stands out because it uses cottage cheese as the star, giving you a protein‑packed, lower‑fat treat that still delivers that indulgent melt. The secret? A quick press to dry the cheese, a light coating of seasoned flour, and a double‑dip technique that builds a crunchy armor without over‑loading on breadcrumbs. I’ll be honest — I ate half the batch before anyone else got to try it, and that’s a testament to how addictive these treats are.
You might wonder what the unexpected twist is. I’m about to reveal a tiny splash of sparkling water in the batter that creates tiny air pockets, turning the crust into a cloud‑like crunch that shatters delightfully. Okay, ready for the game‑changer? Stay with me here — this is worth it. Let me walk you through every single step — by the end, you’ll wonder how you ever made it any other way.
What Makes This Version Stand Out
- Texture: The double‑dip method creates a crust that’s crisp on the outside yet feather‑light, while the interior stays creamy and slightly tangy.
- Flavor: A blend of smoked paprika, garlic powder, and a pinch of fresh herbs gives depth without overpowering the delicate cheese.
- Simplicity: Only ten pantry staples are needed, and the whole process fits into a 45‑minute window.
- Health‑Smart: Using cottage cheese cuts the fat dramatically compared to traditional mozzarella sticks, while still delivering protein.
- Crowd Reaction: Guests often ask for the recipe before the first bite is even finished — it’s that good.
- Ingredient Quality: Fresh, full‑fat cottage cheese provides a richer mouthfeel; low‑fat works too, but expect a slightly different texture.
- Cooking Method: Pan‑frying in a modest amount of oil gives you control, reduces mess, and avoids the deep‑fryer nightmare.
- Make‑Ahead Potential: You can prep the coated bites ahead of time and freeze them, then crisp them up in minutes when you need a snack.
Inside the Ingredient List
The Flavor Base
Cottage cheese is the heart of this recipe. Its mild, slightly tangy profile provides a creamy canvas that absorbs the seasoning without becoming soggy. If you skip it, you lose the protein punch and the delicate balance that makes these treats feel indulgent yet light. For the best texture, choose a full‑fat version; it yields a richer mouthfeel. If you’re watching calories, a low‑fat option works, but you may need to add a teaspoon of olive oil to compensate for the reduced fat. When shopping, look for curd‑style cottage cheese rather than the liquidy “small curd” type, as the former holds together better during frying.
The Texture Crew
All‑purpose flour and breadcrumbs form the crunchy shell. Flour creates a base layer that adheres the egg wash, while breadcrumbs add the golden, crunchy finish. Skipping the flour results in a patchy coating that falls off, and omitting breadcrumbs makes the crust dense and heavy. If you’re gluten‑free, swap the flour for a 1:1 gluten‑free blend and use gluten‑free panko crumbs. A quick tip: toast the breadcrumbs lightly in a dry pan for extra aroma before using them.
The Unexpected Star
A splash of sparkling water in the egg‑flour mixture is the secret weapon. The carbonation creates micro‑bubbles that expand during cooking, giving the crust a light, airy crunch that shatters like delicate glass. Without it, the crust would be solid and less interesting. If you don’t have sparkling water, a teaspoon of baking soda dissolved in the egg wash can mimic the effect, though the texture will be slightly less airy.
The Final Flourish
Seasonings — smoked paprika, garlic powder, salt, and pepper — elevate the flavor from bland to bold. Smoked paprika adds a subtle wood‑smoke note that pairs beautifully with the dairy, while garlic powder gives a savory backbone. Skipping the spices leaves the bites tasting like plain cheese, which can be pleasant but not unforgettable. Fresh herbs like chopped parsley or chives can be sprinkled on after frying for a burst of color and freshness. If you love heat, a pinch of cayenne or chili flakes will turn the snack into a fiery delight.
Everything's prepped? Good. Let's get into the real action...
The Method — Step by Step
First, drain the cottage cheese thoroughly. Transfer the cheese to a fine‑mesh sieve, press lightly with a spoon, then spread it on a clean kitchen towel. Place another towel on top, set a heavy skillet or cast‑iron pan over it, and let it sit for 10 minutes. This step is crucial because any excess moisture will steam the coating instead of crisping it, and you’ll end up with soggy bites. The result? A firm, dry cheese block ready to embrace the batter.
While the cheese is draining, prepare three shallow dishes: one with 2 cups of all‑purpose flour seasoned with 1 tsp salt and ½ tsp pepper, the second with 2 beaten eggs mixed with 2 tbsp sparkling water, and the third with 1 cup panko breadcrumbs seasoned with 1 tsp smoked paprika and 1 tsp garlic powder. This “station” setup keeps the workflow smooth and prevents cross‑contamination of flavors.
Cut the pressed cottage cheese into bite‑size cubes, about 1½ inches each. This size ensures a perfect ratio of crust to cheese, giving you that satisfying crunch with a gooey center. If you cut them too large, the interior may stay cool while the crust burns; too small, and you lose that delightful cheese pull.
Coat each cube first in the seasoned flour, shaking off any excess. Then dip it into the egg‑water mixture, letting any surplus drip back into the bowl. Finally, roll it in the breadcrumb mixture, pressing gently to ensure the crumbs adhere. This triple‑layer technique is the secret to the “crack‑like” crust that shatters on the first bite.
Heat 2 tbsp of olive oil in a large skillet over medium‑high heat until it shimmers. The oil should be hot enough that a breadcrumb sizzles immediately on contact, but not smoking. This temperature range (around 350°F/175°C) is the sweet spot for achieving a golden‑brown crust without burning the delicate cheese inside.
Working in batches, gently lay the coated cheese cubes into the hot oil. You’ll hear that satisfying sizzle that signals the crust is forming. Cook each side for about 2‑3 minutes, turning with tongs to ensure an even golden hue. The edges will start pulling away from the pan, a visual cue that the coating is set and ready for the next flip.
Once the bites are beautifully browned, transfer them to a plate lined with paper towels to absorb excess oil. While they rest, the residual heat continues to firm the crust, giving you that perfect crunch. If you want an extra glossy finish, drizzle a tiny splash of melted butter over the hot bites; the butter will melt instantly, adding a buttery sheen and flavor boost.
Serve immediately with a dipping sauce of your choice — a tangy lemon‑yogurt dip, a spicy sriracha mayo, or even a simple honey drizzle. The contrast between the hot, crisp exterior and the cool, creamy interior is what makes this snack unforgettable. Picture yourself pulling this out of the pan, the whole kitchen smelling incredible, and the first bite delivering a crack that echoes like applause.
Store any leftovers in an airtight container in the fridge for up to two days. To revive the crunch, re‑heat them in a hot skillet for 1‑2 minutes per side, or pop them in a preheated oven at 375°F (190°C) for 5 minutes. Adding a splash of water to the pan before reheating creates steam that brings back the interior’s softness while the crust regains its crunch.
That's it — you did it. But hold on, I've got a few more tricks that'll take this to another level...
Insider Tricks for Flawless Results
The Temperature Rule Nobody Follows
Most home cooks set the stove to “medium” and hope for the best, but the real secret is a precise oil temperature. Use a kitchen thermometer and aim for 350°F (175°C). If the oil is too cool, the coating will soak up oil and become greasy; too hot, and the crust will burn before the cheese warms through. A quick test: drop a single breadcrumb in the oil; it should sizzle and turn golden in about 30 seconds. A friend once tried to skip the thermometer and ended up with a batch that looked like fried dough — not the intended texture.
Why Your Nose Knows Best
Your sense of smell is a more reliable indicator than a timer. When the crust reaches that nutty, toasted aroma, you’re right on cue to flip. The scent signals the Maillard reaction is in full swing, creating those irresistible golden‑brown notes. If you’re unsure, pause, lift a piece with tongs, and give it a quick sniff — the moment it smells like toasted almond, you’re golden.
The 5‑Minute Rest That Changes Everything
After coating the cheese cubes, let them rest on a wire rack for five minutes before frying. This short pause lets the flour and breadcrumbs adhere better, reducing the chance of the coating falling off mid‑cook. I once rushed this step and ended up with a half‑coated disaster; the lesson? Patience is a flavor enhancer.
Butter‑Boost Finish
A quick drizzle of melted butter right after frying adds a glossy sheen and a buttery depth that complements the smoky paprika. It’s a simple trick that turns a good snack into a restaurant‑quality bite. Just be careful not to use too much, or you’ll lose the crispness.
The Double‑Dip Secret
If you crave an extra crunchy shell, repeat the egg‑water dip and breadcrumb roll a second time before frying. This creates a thicker armor that shatters dramatically on the first bite. I tried this once for a party, and the crowd went wild — the extra crunch was the talk of the night.
Creative Twists and Variations
This recipe is a playground. Here are some of my favorite ways to switch things up:
Herb‑Infused Delight
Add 2 tbsp of finely chopped fresh rosemary and thyme to the breadcrumb mixture. The herbs bring an earthy aroma that pairs beautifully with the tangy cheese, making it a perfect accompaniment to a summer garden party.
Spicy Heatwave
Mix ½ tsp cayenne pepper and 1 tsp chipotle powder into the flour stage. The heat adds a smoky kick that balances the creamy interior, ideal for those who love a little fire in their snacks.
Cheesy Overload
Stir ¼ cup grated Parmesan into the breadcrumb mix. The Parmesan adds an umami boost and a deeper golden hue, turning the bites into a cheese lover’s dream.
Sweet & Savory
Swap half the smoked paprika for cinnamon and add a drizzle of honey or maple syrup just before serving. The sweet‑spicy combo creates a dessert‑like snack that’s perfect for brunch.
Asian Fusion
Replace the paprika with 1 tsp five‑spice powder, and serve with a soy‑ginger dipping sauce. The aromatic spices transform the treat into a savory bite that pairs well with a cold beer.
Storing and Bringing It Back to Life
Fridge Storage
Place the cooled bites in an airtight container lined with a paper towel to absorb moisture. They’ll stay crisp for up to 48 hours. If you notice any sogginess, re‑heat them briefly in a hot skillet to revive the crunch.
Freezer Friendly
Arrange the uncooked, coated bites on a parchment‑lined tray and freeze for 1 hour. Transfer them to a zip‑top freezer bag; they’ll keep for up to 3 months. When you’re ready, fry them straight from frozen, adding an extra minute per side.
Best Reheating Method
To bring leftovers back to life, preheat a skillet over medium heat, add a splash of water (about 1 tbsp per 6 bites), and cover for 30 seconds. The steam softens the interior while the uncovered final minute restores the crisp crust. Alternatively, a quick blast in a 375°F oven for 5 minutes works wonders.