I still remember the Sunday morning I accidentally created the ultimate breakfast sliders. My in-laws were visiting, I had promised everyone "something special," and naturally I'd overslept. In my panic, I started throwing things together like a contestant on one of those cooking competition shows — bacon sizzling, eggs cracking, cheese flying everywhere. The smell of bacon fat hitting the hot pan was like a wake-up call to the entire neighborhood. What started as a desperate attempt to feed hungry guests turned into the most requested recipe in my arsenal, the one my nephew texts me about at 2 AM because he's hosting brunch and needs the exact measurements.
Here's the thing about breakfast sliders that nobody talks about: most versions are either dry as cardboard or so greasy they fall apart before you can get them to your mouth. The bread gets soggy, the eggs turn rubbery, and somehow the cheese never melts properly. I know because I've tried them all — the diner versions that taste like they've been sitting under a heat lamp since dawn, the fancy café attempts that cost twelve dollars for something you could make better at home, the frozen ones that promise convenience but deliver disappointment. If you've ever bitten into a breakfast slider and thought "meh," you're not alone — and I've got the fix.
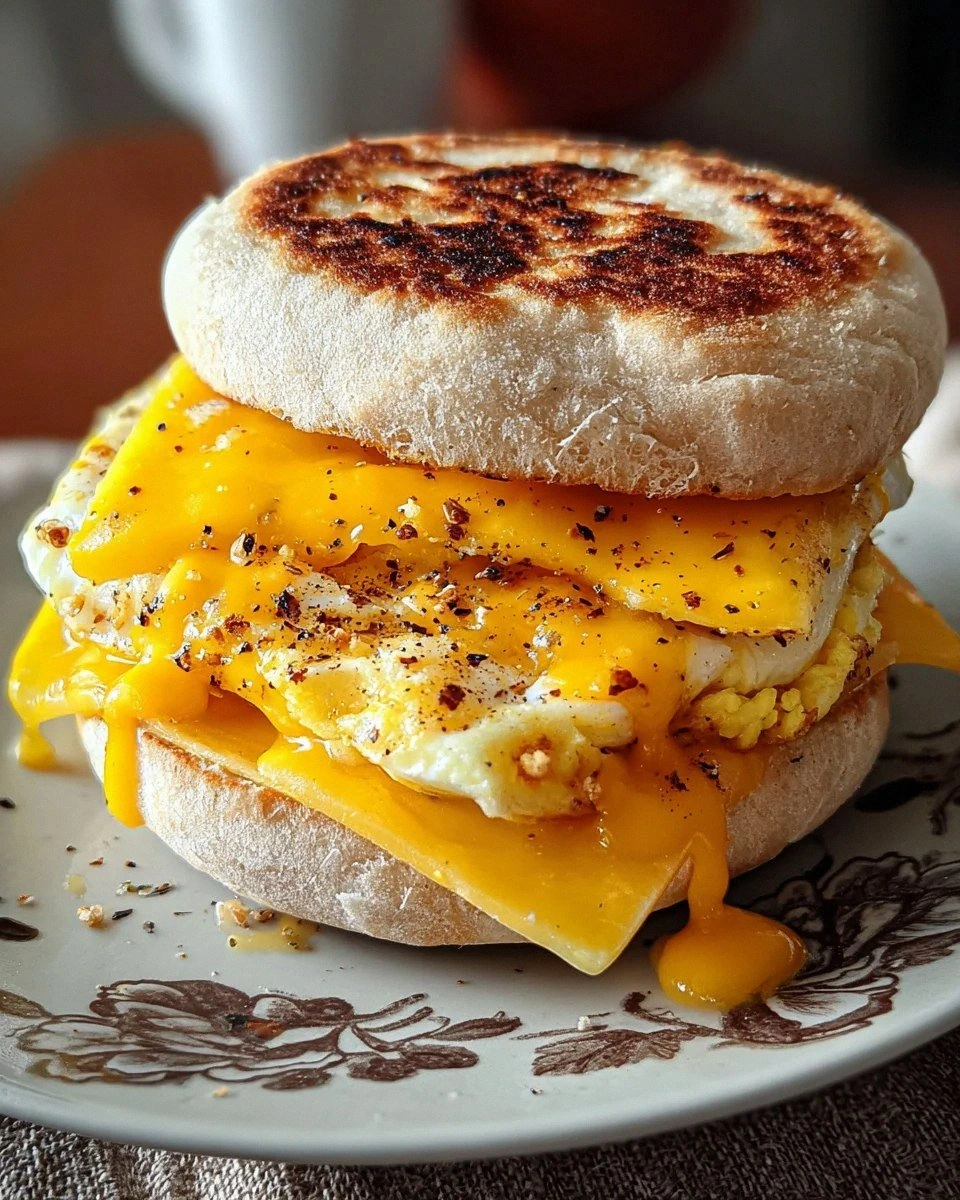
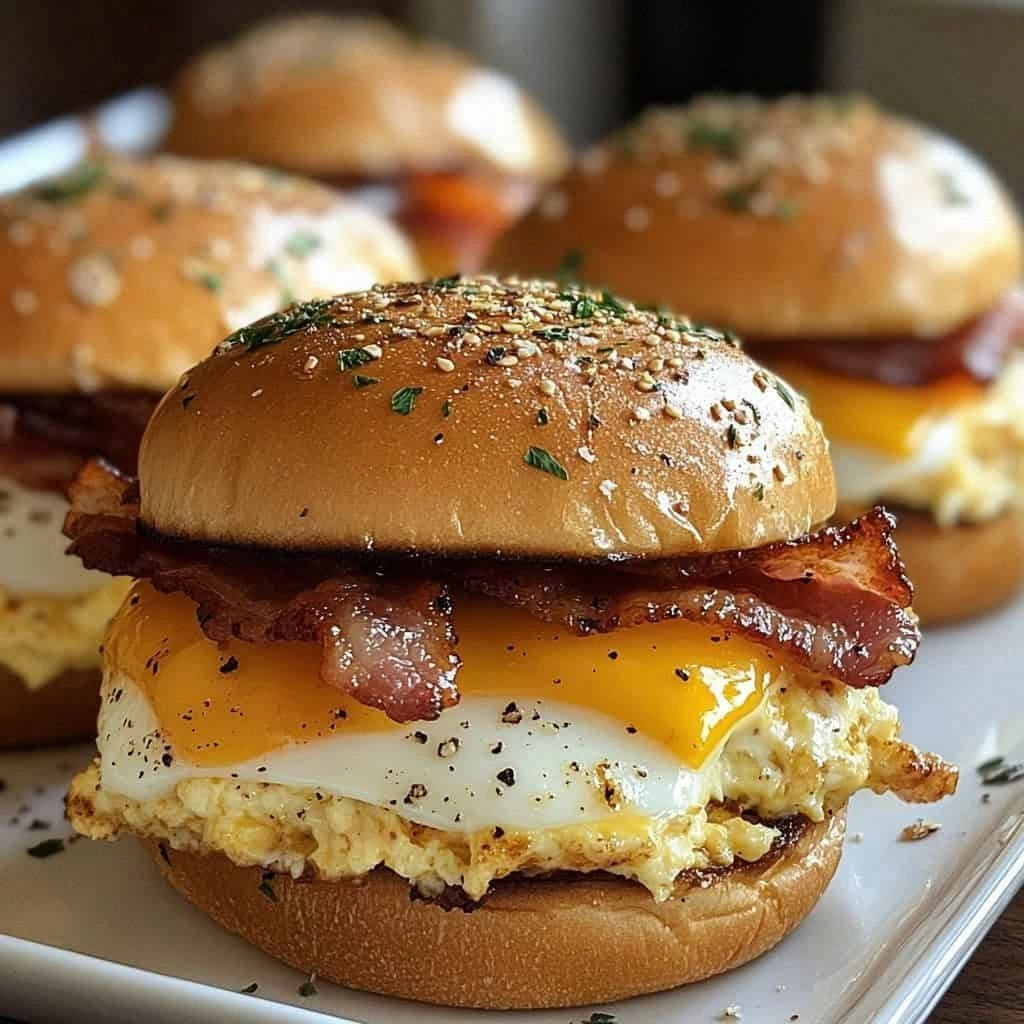
This version is everything those sad imitations wish they could be. The buns get toasted in bacon fat until they're golden and crisp on the outside, pillowy inside. The eggs cook low and slow until they're custardy and rich, practically melting into the cheese. And the bacon — oh, the bacon — gets rendered until it's crisp-cheeked and smoky, the kind that shatters perfectly when you bite down. Picture yourself pulling these out of the oven, the whole kitchen smelling like the best diner in existence crossed with your grandmother's house on Sunday morning. That sizzle when the assembled sliders hit the warm oven? Absolute perfection.
But here's the real secret that takes these from good to legendary: we're building them backwards. Instead of stacking everything cold and hoping it heats through, we're creating layers of temperature and texture that ensure every bite is perfect. The cheese goes both under and over the eggs, creating these little pockets of molten goodness. The buns get a quick steam after assembly, making them soft enough to bite through but sturdy enough to hold everything together. Let me walk you through every single step — by the end, you'll wonder how you ever made it any other way.
What Makes This Version Stand Out
Texture Perfection: The contrast between crispy bacon edges, soft scrambled eggs, and toasted buns creates a symphony of textures that makes every bite interesting. We're not just throwing things together — we're engineering the perfect mouthfeel experience that keeps you coming back for more.
Cheese Strategy: Most recipes use one sad slice of cheese that never melts properly. We're using a double-cheese technique that ensures every bite has that perfect cheese pull, plus we're selecting cheeses that melt at different rates for optimal coverage.
Time-Saving Assembly: While your bacon renders (and trust me, we're doing this the right way), you're prepping everything else. By the time the bacon's ready, your eggs are mixed, your buns are cut, and you're ready to assemble like a breakfast sandwich ninja.
Make-Ahead Magic: These sliders actually get better after a quick rest. Make them the night before, wrap them tight, and in the morning you've got breakfast that tastes like you spent hours slaving away. I dare you to taste this and not go back for seconds.
Feeding-Crowd Power: One batch makes twelve sliders, but here's the genius — they're designed to be pulled apart like monkey bread. Set them out at brunch and watch them disappear faster than you can say "Who wants more bacon?"
Ingredient Flexibility: This base recipe is a launching pad for whatever's in your fridge. Swap the cheese, add some spinach, throw in some hot sauce — the technique stays the same while the flavors can go anywhere.
Breakfast-for-Dinner Approved: These aren't just morning food. I've served these at game nights, potlucks, and even as hangover cures at 3 PM. They're the little black dress of breakfast foods — appropriate anytime, anywhere.
Alright, let's break down exactly what goes into this masterpiece...
Inside the Ingredient List
The Flavor Foundation
The slider buns are your canvas here, and not just any buns will do. You need the soft, sweet Hawaiian-style rolls that can stand up to the fillings without turning to mush. These buns have just enough sweetness to play against the salty bacon and sharp cheese, creating that perfect breakfast balance. If you can't find the brand-name ones, look for any soft dinner roll that's slightly sweet — but stay away from crusty artisan breads that'll fight back when you bite into them. The twelve-count package is perfect because it matches our other ingredients, making assembly a breeze instead of a math problem.
Bacon selection matters more than you think. Thick-cut bacon gives you those meaty bites that make these feel substantial, but regular cut works if that's what you've got. The key is rendering it slowly so the fat melts out and the meat crisps up without burning. I've made these with everything from applewood-smoked to pepper-crusted, and they all work — just avoid anything too heavily seasoned that'll overpower the other flavors. Twelve slices might seem like a lot, but trust me, nobody's ever complained about too much bacon.
The Texture Crew
Twelve large eggs might sound excessive, but we're making enough sliders to feed a crowd, and each slider needs its own perfectly cooked egg. The size matters here — large eggs fit perfectly on the buns and give you that classic breakfast sandwich ratio. We're not doing any fancy egg tricks here; just good, properly scrambled eggs that are creamy and rich. The key is cooking them low and slow, stirring constantly, until they're just set but still slightly glossy. They'll finish cooking from residual heat, giving you that perfect texture that doesn't turn rubbery when you reheat the sliders.
Butter and olive oil might seem redundant, but they serve different purposes. The butter adds richness and helps the eggs cook gently, while the olive oil keeps the butter from burning and adds a subtle fruitiness. This combination gives you the best of both worlds — the flavor of butter with the stability of oil. Don't skip this step or your eggs will stick to the pan and your kitchen will smell like burnt dairy for the rest of the day.
The Cheese Strategy
Twelve slices of cheddar cheese are your insurance policy against dry, boring sliders. Sharp cheddar melts beautifully and has enough flavor to stand up to the bacon without getting lost. But here's the trick — we're using a mild cheddar too, creating layers of cheese flavor that hit different parts of your palate. The sharp cheddar goes on first, directly on the warm eggs where it starts melting immediately. The mild cheddar goes on top, creating that Instagram-worthy cheese pull when you separate the sliders.
If cheddar isn't your thing, this recipe is forgiving. Swiss gives you those nutty holes and a mellower flavor. Pepper jack adds a kick that plays beautifully with the bacon. Even American cheese works here — it's designed to melt perfectly and gives you that classic diner vibe. The only cheese I'd avoid is anything too crumbly or dry, like feta or aged parmesan, because they won't create that cohesive melted layer that holds everything together.
The Final Flourish
Salt and pepper might seem like afterthoughts, but they're what make all the other flavors pop. Season your eggs while they're cooking, not after — this distributes the seasoning evenly and brings out the natural richness of the eggs. A pinch of salt on the toasted buns brings out their sweetness, while freshly cracked pepper adds little bursts of heat that keep things interesting. This is hands down the best version you'll ever make at home, and sometimes it's the smallest details that make the biggest difference.
The optional hot sauce or ketchup isn't just a condiment — it's a customization station that lets everyone make their sliders their own. I set out an array of options: classic ketchup for the traditionalists, Sriracha for the heat seekers, and a smoky chipotle sauce for the adventurers. Stay with me here — this is worth it. That moment when everyone adds their personal touch? Pure magic.
Everything's prepped? Good. Let's get into the real action...
The Method — Step by Step
- Start with your bacon in a cold pan — this is crucial for even rendering. Lay out all twelve slices (cut in half for perfect slider-sized pieces) in your largest skillet, then turn the heat to medium. As the pan heats up, the fat will slowly melt out of the bacon, leaving you with crispy pieces and liquid gold bacon fat. This process takes about 15 minutes, and you need to be patient here. The bacon will go from floppy to golden to perfectly crisp, and if you try to rush it with high heat, you'll end up with burnt edges and rubbery centers.
- While your bacon works its magic, prep your buns. Using a serrated knife, slice through all twelve slider buns while they're still connected — like cutting a loaf of bread. Keep the top and bottom halves intact; this makes assembly much easier and prevents individual buns from rolling around. Brush the cut sides with some of that rendered bacon fat (about 2 tablespoons total), then toast them cut-side-down in a dry skillet until golden brown. That sizzle when they hit the pan? Absolute perfection. The bacon fat toasts the buns while infusing them with smoky flavor, creating a barrier that prevents them from getting soggy.
- Now for the eggs — and this is where most recipes get it wrong. Crack all twelve eggs into a large bowl, add 2 tablespoons of water (this creates steam for fluffier eggs), and season with salt and pepper. Beat them just enough to combine; over-beating makes them tough. Heat your butter and olive oil in a large non-stick pan over low heat — and I mean low. When the butter is just melted and foamy, pour in the eggs and let them sit for 30 seconds. Then, using a rubber spatula, gently push the cooked edges toward the center, letting the uncooked egg flow underneath. This creates those creamy, custardy curds that make restaurant scrambled eggs so good.
- The cheese integration happens in two stages, and this is the game-changer. While your eggs are still slightly loose (they should look about 80% cooked), lay six slices of cheddar over the top. Let them sit for 30 seconds — don't stir — so they start melting into the eggs. Then gently fold everything together, creating pockets of melted cheese throughout the eggs. Remove from heat while they're still slightly glossy; they'll finish cooking from residual heat. This technique gives you cheese in every bite instead of just on top.
- Assembly time — and this is where the magic happens. Preheat your oven to 350°F. On a baking sheet, place the bottom half of your toasted buns. Spread the egg mixture evenly over the buns, pressing down gently so it fills all the nooks and crannies. Top with the crispy bacon pieces, arranging them so each slider gets its fair share. Now add the remaining six slices of cheese on top — this creates a melted cheese blanket that holds everything together. Place the top buns on, but don't press down yet.
- The final steam is what transforms these from good to legendary. Cover the whole pan with aluminum foil, creating a tent so it's not touching the buns. Slide into the oven for 10-12 minutes — just enough time for the cheese to melt completely and the buns to steam slightly. This step makes the buns soft and pillowy while ensuring the cheese melts into every layer. Don't walk away from the oven here — 12 minutes is perfect, but 15 minutes gives you soggy buns and nobody wants that.
- When you pull them out, let them rest for 5 minutes. I know, I know — they smell incredible and you're starving. But this rest lets the cheese set slightly, making them easier to cut and serve. Use a sharp knife to cut between the buns, following the natural seams. If you've done everything right, you'll see perfect layers: toasted bun, creamy cheesy eggs, crispy bacon, and that gorgeous melted cheese on top. I'll be honest — I ate half the batch before anyone else got to try it. They're that good.
- Serving is the fun part. Arrange them on a platter, maybe add some fresh fruit or hash browns on the side, and watch them disappear. Set out your hot sauce and ketchup options, but honestly? These are so good they don't need anything extra. The combination of crispy bacon, creamy eggs, and melted cheese between those sweet, soft buns is breakfast perfection. Okay, ready for the game-changer?
That's it — you did it. But hold on, I've got a few more tricks that'll take this to another level...
Insider Tricks for Flawless Results
The Temperature Rule Nobody Follows
Here's what separates amateur breakfast sliders from the pros: temperature management. Your bacon should never cook above medium heat, your eggs need to stay low and slow, and your oven shouldn't exceed 350°F. A friend tried rushing this recipe once with high heat — let's just say it didn't end well. The bacon burnt before rendering, the eggs turned rubbery, and the cheese seized up into greasy clumps. Low and steady wins this race every time, creating layers of flavor that build instead of compete.
Why Your Nose Knows Best
Don't underestimate the power of aroma in this recipe. When your bacon is perfectly rendered, it'll smell smoky and slightly sweet, not burnt. Your eggs should smell buttery and rich, never sulfurous or overcooked. And when everything's assembled and heating, your kitchen should smell like the best breakfast diner you've ever visited. If something smells off, it probably is. That moment when the cheese hits the warm eggs and you get that incredible aroma? Pure magic. Your nose is your built-in kitchen timer — trust it.
The 5-Minute Rest That Changes Everything
After you assemble the sliders but before you bake them, let them sit for 5 minutes. This lets the cheese start warming up from room temperature, so it melts more evenly in the oven. Cold cheese straight from the fridge needs higher heat and longer time to melt, which can overcook your buns. Room-temperature cheese melts into creamy perfection, creating those Instagram-worthy cheese pulls that make everyone reach for their phones before they reach for a slider.
The Bun Selection Secret
Not all slider buns are created equal, and this is where you can really elevate your game. Look for buns that are slightly sweet but not dessert-sweet, soft but not mushy, and most importantly — fresh. Stale buns will never recover, no matter how much bacon fat you brush them with. If you can only find day-old buns, wrap them in a damp paper towel and microwave for 10 seconds before toasting. This little steam bath revives them just enough to make them pillowy again. And now the fun part.
Creative Twists and Variations
This recipe is a playground. Here are some of my favorite ways to switch things up:
The Southwestern Takeover
Swap the cheddar for pepper jack, add a spoonful of salsa to the eggs while they cook, and include some diced green chilies in the layers. The spicy cheese melts into the eggs while the salsa adds moisture and flavor. Top with a dollop of sour cream and some fresh cilantro before serving. This version has just enough kick to wake up your taste buds without overwhelming the breakfast vibe.
The Mediterranean Morning
Replace the cheddar with crumbled feta and shredded mozzarella, add some chopped spinach to the eggs, and include sliced tomatoes with the bacon. The feta stays pleasantly chunky while the mozzarella gives you the melt factor. A sprinkle of oregano and a drizzle of olive oil before the final bake transports you straight to a Greek island breakfast, even if you're in a studio apartment in the middle of winter.
The Everything Bagel Experience
Brush the buns with everything bagel seasoning before toasting, use cream cheese instead of cheddar (soften it first so it spreads easily), and add some smoked salmon along with the bacon. The cream cheese melts into creamy perfection while the everything seasoning gives you that classic bagel shop flavor. This one feels fancy enough for brunch guests but takes the same amount of time as the original.
The French Toast Fusion
Dip the buns in a mixture of beaten egg, milk, and cinnamon before toasting them in bacon fat. Use maple cheddar if you can find it, or brush the assembled sliders with maple syrup before baking. The result tastes like the best French toast breakfast sandwich you've ever had, with the sweet and salty combination that makes people close their eyes when they take the first bite.
The Veggie Powerhouse
Keep the eggs and cheese but swap the bacon for roasted red peppers, sautéed mushrooms, and spinach. Add some caramelized onions for sweetness and umami depth. Even dedicated carnivores love this version — the vegetables add texture and flavor complexity that makes you forget all about the missing bacon. Plus, you can feel virtuous while still eating something incredibly satisfying.
The Everything-But-The-Kitchen-Sink
This is where you use up whatever's in your fridge. Leftover roasted vegetables? Chop them up and add them to the eggs. Half a tomato? Slice it thin and layer it in. Different cheeses? Mix them up for complex flavor. A spoonful of pesto? Brush it on the buns before toasting. The base technique stays the same, but the flavor possibilities are endless. If you've ever struggled with using up leftovers, you're not alone — and I've got the fix.
Storing and Bringing It Back to Life
Fridge Storage
Let the sliders cool completely before storing — hot cheese creates condensation that makes everything soggy. Wrap them individually in plastic wrap, then store in an airtight container. They'll keep for up to 4 days in the refrigerator, though honestly, they've never lasted that long in my house. The key is wrapping them tight so they don't absorb any weird fridge flavors. If you made a double batch (smart move), you can keep half wrapped and ready for emergency breakfast situations.
Freezer Friendly
These sliders freeze beautifully, making them perfect for meal prep. Wrap each cooled slider in plastic wrap, then aluminum foil, and store in a freezer bag. They'll keep for up to 2 months frozen — though good luck keeping them around that long. To reheat, unwrap and microwave for 2 minutes, then finish in a toaster oven for 3-4 minutes to crisp up the buns. The texture isn't quite as perfect as fresh, but it's about 95% there, which is better than any frozen breakfast sandwich you can buy.
Best Reheating Method
For refrigerated sliders, the oven is your friend. Wrap them in foil and heat at 325°F for 15 minutes — this steams them back to life without drying them out. For a single slider, the microwave works: wrap in a damp paper towel and microwave for 45 seconds, then let stand for 30 seconds (this lets the heat distribute evenly). Add a tiny splash of water before reheating — it steams back to perfection. Whatever you do, don't reheat them uncovered in the microwave unless you enjoy rubbery eggs and tough bread.