Picture this: it’s 2 a.m., the house is quiet, and a sudden craving for something that screams “childhood nostalgia” hits you like a freight train. You sprint to the pantry, open the cabinet, and stare at a lone Butterfinger bar that’s been waiting for its moment of glory. Most recipes would have you melt that bar into a bland frosting, but I’m not here for bland. I’m here for a cake that pulls the candy bar out of its wrapper, shoves it into the batter, and then gives it a second life with a gooey poke‑in‑the‑center surprise. I dared my roommate to try it, and she promptly declared it the best thing she’d ever tasted—she even tried to steal the recipe before I could write it down. This is the story of that moment, and why the version I’m about to share will make you question every other Butterfinger dessert you’ve ever tried.
The kitchen was a symphony of sounds: the whirr of the mixer, the clink of a measuring cup, and the faint pop of butter hitting the hot pan. The air smelled like a carnival—sweet caramel, toasted butter, and that unmistakable buttery‑toffee aroma that only a Butterfinger can provide. My fingertips felt the warm, glossy dough as it slipped through the bowl, and the first bite of the raw batter was like a promise of caramel‑kissed chocolate heaven. I could almost taste the crunch of the candy bar before it even hit the oven, and the anticipation built like a roller coaster about to drop. This isn’t just a cake; it’s a full‑on sensory overload that will have you reaching for seconds before the first slice even cools.
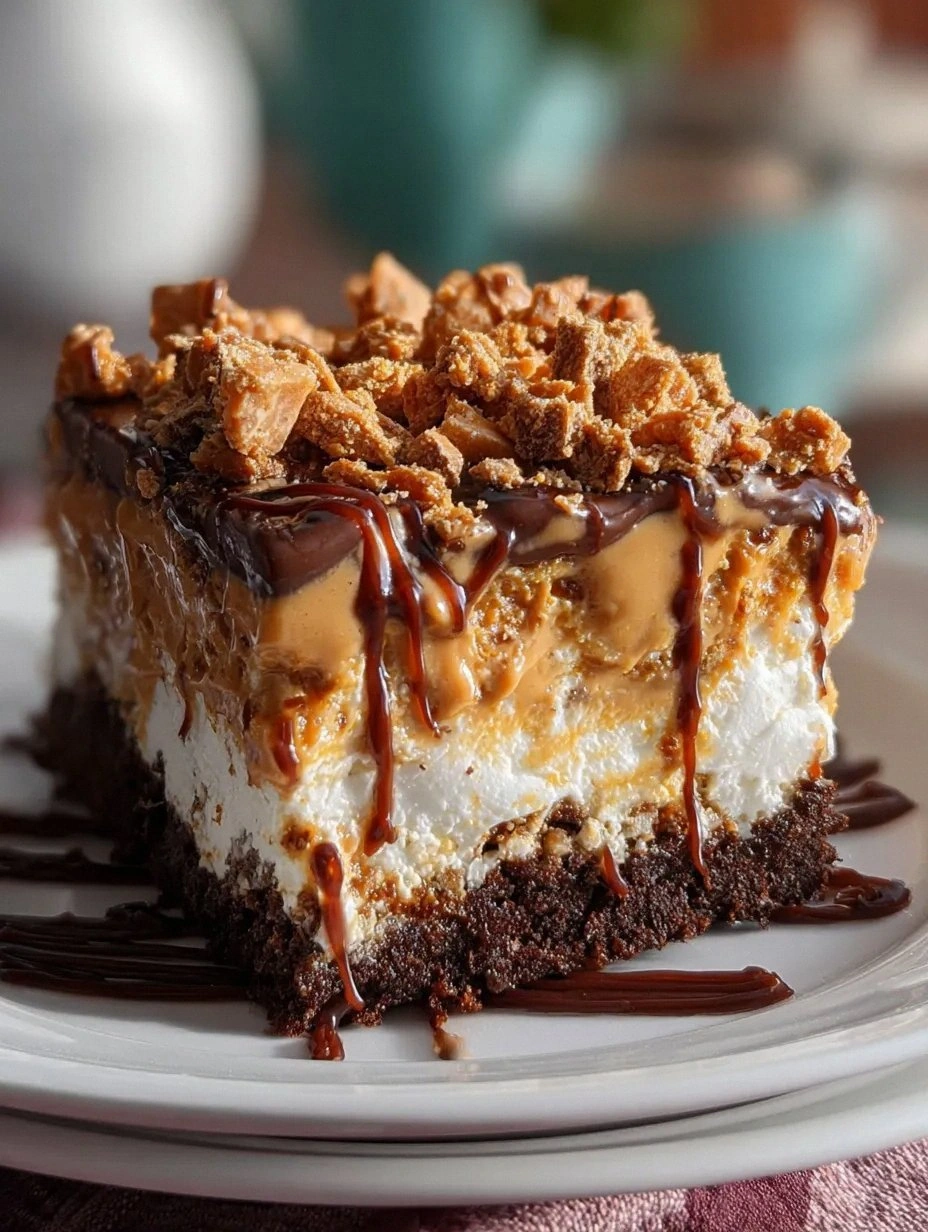
What makes this version stand out is that I’ve taken the classic poke‑cake concept—where a cake is baked, then punctured and drenched in a sauce—and elevated it with a triple‑layer of Butterfinger goodness. First, the chopped bars are folded into the batter for that buttery crunch in every bite. Second, the poke sauce is a silky caramel‑chocolate blend that seeps into the cake’s core, turning it into a molten river of sweet decadence. Third, a final drizzle of melted chocolate and a sprinkle of crushed bars give the top a glossy finish that looks like it belongs on a bakery window. If you’ve ever struggled with a poke cake that turns soggy or a Butterfinger dessert that tastes like a cheap candy bar, you’re not alone—this recipe fixes those pitfalls with a few clever tricks.
And now, the kicker: I’m going to reveal a secret technique involving a chilled metal spoon that creates perfectly even pockets for the sauce, ensuring every forkful gets a balanced hit of flavor. I’m not just handing you a recipe; I’m handing you a game‑changing method that will make you the hero of every potluck, birthday, or late‑night snack raid. Let me walk you through every single step — by the end, you’ll wonder how you ever made it any other way.
What Makes This Version Stand Out
- Flavor Explosion: The combination of buttery toffee, rich chocolate, and caramel creates a layered taste profile that evolves with each bite, keeping your palate excited.
- Texture Harmony: Crunchy Butterfinger bits mingle with a moist crumb and a silky sauce, delivering a satisfying contrast that most cakes lack.
- Simplicity Meets Wow: Despite the impressive result, the ingredient list is straightforward, and the steps use everyday kitchen tools.
- Unique Poke Technique: Using a chilled metal spoon ensures the sauce penetrates evenly without making the cake soggy—a trick most recipes overlook.
- Crowd Reaction: Guests often say “I dare you to taste this and not go back for seconds,” because the flavor is addictive and the presentation is eye‑catching.
- Ingredient Quality: Real Butterfinger bars (not imitation) provide authentic toffee crunch, while high‑quality semi‑sweet chocolate adds depth.
- Cooking Method: Baking at a moderate temperature preserves the cake’s tenderness while allowing the top to form a slight crust that holds the poke sauce.
- Make‑Ahead Potential: The cake can be baked a day ahead; the sauce stays fresh, and the flavors meld even more, making it perfect for busy schedules.
Inside the Ingredient List
The Flavor Base
All‑purpose flour forms the structural backbone of the cake, providing the necessary gluten network that holds the sauce inside. Skipping it or substituting with a low‑protein flour will result in a crumbly mess that can’t support the heavy sauce. If you’re gluten‑free, a blend of rice flour, tapioca starch, and potato starch (in a 2:1:1 ratio) works surprisingly well, though you may need an extra egg to bind everything.
Granulated sugar not only sweetens but also contributes to the cake’s tender crumb by creaming with the melted butter. Using a brown sugar would add a molasses undertone, but it could darken the cake more than desired. For a lower‑calorie version, you can replace half the sugar with a natural sweetener like erythritol, but expect a slightly different mouthfeel.
The Texture Crew
Unsalted butter, melted, adds richness and a glossy finish. The butter’s fat coats the flour particles, limiting gluten formation and keeping the cake soft. If you’re dairy‑free, coconut oil can be used, but it will impart a faint coconut flavor that may compete with the candy bar’s toffee notes.
Whole milk supplies moisture and helps dissolve the sugar, creating a smooth batter. Skim milk works, but the cake may be a tad less tender. For a vegan twist, substitute with oat milk, which adds a subtle creaminess without overpowering the Butterfinger flavor.
The Unexpected Star
Butterfinger candy bars, chopped, are the hero of this dish. Their crunchy toffee coating adds a burst of texture that you won’t get from plain chocolate chips. If you can’t find Butterfinger, try a combination of peanut butter cups and caramel bits, though the signature toffee crunch will be missed.
Semi‑sweet chocolate chips melt into the poke sauce, providing a velvety chocolate river that balances the caramel’s sweetness. Dark chocolate (70% cacao) would make the sauce more bitter and sophisticated, perfect for an adult‑only gathering.
The Final Flourish
Caramel sauce is the liquid gold that fills the poke holes, creating a molten core that oozes out when you cut into the cake. Store‑bought caramel works, but a quick homemade version (sugar, butter, heavy cream, pinch of salt) adds a buttery depth that’s worth the extra minutes.
Vanilla extract ties all flavors together with its warm, aromatic profile. Using a high‑quality pure vanilla will make a noticeable difference compared to imitation.
Everything's prepped? Good. Let's get into the real action...
The Method — Step by Step
- Preheat your oven to 350°F (175°C). While the oven warms up, grease a 9‑inch round cake pan with butter and line the bottom with parchment paper. This ensures a clean release later, and the parchment prevents the bottom from getting a soggy crust that can ruin the poke sauce later.
- In a large mixing bowl, whisk together the flour, baking powder, baking soda, and salt. The whisking aerates the dry ingredients, which is crucial for a light crumb. Kitchen Hack: Sift the dry ingredients twice to eliminate clumps and incorporate extra air.
- In a separate bowl, combine melted butter, sugar, and vanilla. Beat with a whisk until the mixture turns a pale golden hue and the sugar starts to dissolve. This is the moment where you’ll hear a faint sizzle— that’s the butter and sugar marrying, and it’s a good sign of a tender crumb.
- Add the eggs one at a time, beating well after each addition. The batter should become glossy and slightly thick. If it looks too thick, drizzle in the milk gradually while continuing to whisk; the batter should flow like a smooth river.
- Fold the dry ingredients into the wet mixture using a spatula, turning the bowl clockwise. Stop mixing as soon as you see no streaks of flour. Over‑mixing creates gluten, which would make the cake tough— trust me, you don’t want that.
- Gently fold in the chopped Butterfinger bars and chocolate chips. The bars should be evenly distributed; you’ll notice little pockets of toffee that will later burst with flavor. Watch Out: If the batter is too hot, the chocolate chips may melt prematurely, creating streaks. Let the batter rest for 5 minutes before adding chips.
- Pour the batter into the prepared pan, smoothing the top with an offset spatula. Tap the pan gently on the counter three times to release any large air bubbles. The surface should be even; an uneven surface will cause the poke holes to tilt, leading to uneven sauce distribution.
- Bake for 25‑30 minutes, or until a toothpick inserted near the center comes out with just a few moist crumbs. The edges will start pulling away from the pan, and the top will develop a faint golden crust that’s perfect for holding the poke sauce.
- While the cake is baking, prepare the poke sauce: combine caramel sauce, chocolate chips, and a splash of milk in a saucepan over low heat. Stir constantly until the chocolate is fully melted and the mixture is glossy. This sauce should be warm but not boiling; a gentle heat keeps it silky.
- Once the cake is done, let it cool in the pan for 10 minutes, then transfer it to a wire rack. While it’s still warm, use a chilled metal spoon (or a small ice‑cream scoop) to poke a grid of holes about 1‑inch apart. Immediately pour the warm sauce over the cake, allowing it to seep into each cavity. The cake will absorb the sauce like a sponge, creating pockets of molten caramel‑chocolate that will ooze out when you slice. Kitchen Hack: After filling, let the cake sit for 5 minutes before adding the final drizzle; this lets the sauce settle and prevents it from pooling at the bottom.
- For the finishing touch, melt a handful of extra chocolate chips and drizzle them artistically over the top. Sprinkle the remaining chopped Butterfinger bars for extra crunch and visual appeal. Let the cake set for another 10 minutes, then slice with a hot, wet knife to get clean cuts. Watch Out: If the chocolate drizzle hardens too quickly, re‑warm it briefly; otherwise you’ll end up with a cracked topping.
That's it — you did it. But hold on, I've got a few more tricks that'll take this to another level, from mastering the perfect poke consistency to plating like a pro. Stay with me here — this is worth it.
Insider Tricks for Flawless Results
The Temperature Rule Nobody Follows
Never bake a poke cake straight from the fridge. Let the batter sit at room temperature for at least 20 minutes before it hits the oven. This small step ensures the butter stays fluid enough to create a tender crumb, and the cake rises evenly. I once baked a cold batter and ended up with a dense, uneven texture that ruined the sauce absorption.
Why Your Nose Knows Best
When the cake is about 20 minutes into baking, open the oven door just a crack and sniff. You should detect a buttery, caramel‑tinged aroma. If you smell raw flour, the cake needs a few more minutes. Trusting your nose can prevent over‑baking, which would dry out the poke holes.
The 5‑Minute Rest That Changes Everything
After the cake cools on the rack, let it rest for exactly five minutes before you start poking. This short rest allows the crumb structure to firm up just enough to hold the sauce without collapsing. Skipping this step leads to a soggy center that turns the whole cake into a sticky mess.
Chocolate Tempering Shortcut
If you want that glossy, snap‑crackle chocolate drizzle, melt the chips over a double boiler and then stir in a teaspoon of vegetable oil. The oil lowers the viscosity, giving you a smooth pour without the need for full tempering. I tried tempering the old-fashioned way once and ended up with a dull, grainy finish.
Serving with a Twist
Serve each slice with a dollop of lightly sweetened whipped cream and a sprinkle of flaky sea salt. The salt cuts through the sweetness and elevates the flavor profile, making it feel like a gourmet dessert rather than a candy bar remix. My guests always ask for the “secret salt” after the first bite.
Creative Twists and Variations
This recipe is a playground. Here are some of my favorite ways to switch things up:
Nutty Butterfinger Crunch
Swap half of the chopped Butterfinger bars for toasted pecans or almonds. The nuts add an earthy depth that balances the candy’s sweetness, and the extra crunch makes each bite even more exciting.
Mocha Madness
Replace the semi‑sweet chocolate chips with dark espresso‑infused chocolate and add a teaspoon of instant coffee to the batter. The coffee notes complement the toffee, creating a sophisticated flavor that’s perfect for after‑dinner.
Salted Caramel Delight
Stir a pinch of flaky sea salt into the caramel sauce before poking. The salty‑sweet contrast turns the sauce into a caramel masterpiece that rivals any boutique patisserie.
White Chocolate Butterfinger
Use white chocolate chips instead of semi‑sweet and add a splash of vanilla bean paste. The milky sweetness pairs beautifully with the buttery toffee, making the cake feel lighter on the palate.
Vegan Velvet
Swap butter for coconut oil, use oat milk, and replace eggs with a flax‑egg mixture (1 tbsp ground flaxseed + 3 tbsp water per egg). The result is a plant‑based version that still delivers that iconic buttery crunch.
Mini Poke Cups
Divide the batter among a muffin tin, bake for 20 minutes, then poke and fill each mini cup individually. These bite‑size versions are perfect for party platters and look adorable on a dessert board.
Storing and Bringing It Back to Life
Fridge Storage
Cover the cake loosely with foil or a cake dome and store it in the refrigerator for up to three days. The sauce may thicken slightly; simply warm a slice in the microwave for 15‑20 seconds before serving to revive the gooey center.
Freezer Friendly
Wrap the entire cake tightly in plastic wrap, then in aluminum foil, and freeze for up to two months. When you’re ready to eat, thaw overnight in the fridge, then bring to room temperature for an hour. A quick drizzle of warm caramel sauce will bring back that fresh‑baked shine.
Best Reheating Method
Preheat your oven to 300°F (150°C). Place a slice on a baking sheet, cover loosely with foil, and heat for 8‑10 minutes. Add a tiny splash of milk (about a teaspoon) to the sauce before reheating; the steam will melt the sauce back to its original silky consistency.