I was standing in my kitchen on a rainy Tuesday, staring at a half‑empty tub of cottage cheese and a bag of frozen cherries that had been screaming for attention since I bought them. The clock ticked, the kettle whistled, and my brain kept looping the same thought: “What if I could turn these humble pantry heroes into a dessert that feels like a cheat‑day indulgence but actually fuels my morning?” I tossed a banana into the mix, grabbed the cocoa powder, and—without a recipe in sight—started blending. The moment the blender roared, a sweet, earthy aroma erupted, and I knew I was onto something that would change my breakfast forever.
Imagine the scene: the kitchen counter glistening with a splash of almond milk, the bright ruby of cherries spilling like confetti, and the deep, velvety brown of cocoa swirling like a midnight river. You can hear the low hum of the motor, feel the cool weight of the bowl in your hands, and taste that first spoonful—rich chocolate hugging the tart cherry, the creamy cottage cheese providing a silk‑smooth backdrop, and a whisper of honey that makes the whole thing sing. It’s a sensory overload that makes you pause, close your eyes, and let the flavors dance across your palate. That, my friend, is the moment you realize you’ve just invented a breakfast masterpiece.
Most smoothie bowls out there either drown you in sugar or leave you with a watery mess that slides off the spoon. This version, however, is a game‑changer: it balances protein, healthy fats, and natural sweetness while delivering a texture that’s both thick enough to hold toppings and smooth enough to melt in your mouth. I dare you to taste this and not go back for seconds; the combination of cottage cheese and cocoa is so unexpectedly luxurious that you’ll question every other breakfast you’ve ever had. And guess what? I’m about to reveal a secret technique involving a quick “freeze‑then‑blend” trick that locks in flavor and prevents the bowl from turning into a soupy disappointment.
Let me walk you through every single step — by the end, you’ll wonder how you ever made it any other way. Okay, ready for the game‑changer? This next part? Pure magic. Stay with me here — this is worth it.
What Makes This Version Stand Out
- Taste: The deep cocoa pairs perfectly with the bright acidity of cherries, while cottage cheese adds a subtle dairy richness that feels like a secret indulgence.
- Texture: The bowl is thick enough to support crunchy toppings yet creamy enough to glide across your tongue like a silky dream.
- Simplicity: Only six whole‑food ingredients, all of which you likely have on hand, mean you can throw this together in under fifteen minutes.
- Uniqueness: Using cottage cheese as the base is a twist most recipes miss, delivering a protein punch without the grainy aftertaste of Greek yogurt.
- Crowd Reaction: Friends who think they’re just having a “healthy” bowl end up begging for the recipe, and the surprise factor is priceless.
- Ingredient Quality: Fresh cherries or high‑quality frozen ones bring antioxidants, while dark cocoa powder offers heart‑healthy flavonoids.
- Method: The quick “freeze‑then‑blend” step locks in flavor and prevents dilution, a technique most home cooks overlook.
- Make‑Ahead Potential: Prep the base the night before, store it chilled, and you’ll have a ready‑to‑blend breakfast that saves you precious morning minutes.
Inside the Ingredient List
The Flavor Base
Cottage cheese is the unsung hero of this bowl. Its mild, slightly tangy profile acts like a blank canvas, allowing the chocolate and cherry notes to shine without being overpowered. If you skip it, you lose the creamy body and the protein boost that keeps you full until lunch. For the best results, choose a full‑fat version; the fat carries the cocoa flavor like a velvet rope, while low‑fat versions can feel a bit thin.
The Texture Crew
Banana brings natural sweetness and a buttery smoothness that ties the whole bowl together. It also adds potassium, which helps balance the electrolytes you lose during a morning workout. If you’re allergic or simply don’t like banana, try a half‑ripe avocado for a similar creaminess with a subtle green note. The almond milk provides a light, nutty backdrop and keeps the mixture from becoming too dense.
The Unexpected Star
Cocoa powder is the dark knight of this recipe, delivering a deep chocolate flavor without the sugar overload of melted chocolate. Choose an unsweetened, high‑cocoa‑percentage powder for maximum antioxidant power. If you accidentally grab a sweetened cocoa, reduce the honey by half to keep the bowl from turning into a dessert soda.
The Final Flourish
Cherries add a burst of juiciness and a pop of color that makes the bowl Instagram‑ready. Fresh cherries are perfect in summer, but frozen ones work year‑round and retain their bright flavor after thawing. A drizzle of honey finishes the dish with a floral sweetness, but maple syrup or agave are excellent vegan alternatives that add a different depth of flavor.
Everything's prepped? Good. Let's get into the real action...
The Method — Step by Step
-
First, gather all six ingredients and make sure your blender is clean and dry. A clean blade ensures no stray flavors interfere with the delicate balance we’re aiming for. I like to set out the cottage cheese in a generous bowl, the cherries (still frozen) on a plate, and the banana peeled and sliced for easy blending. This visual prep step also builds excitement, so you’re mentally ready for the deliciousness about to happen.
Kitchen Hack: Slice the banana into thin rounds and freeze them for 15 minutes; this prevents the bowl from becoming too warm and keeps the texture ultra‑smooth. -
Next, add the cottage cheese and almond milk to the blender first. The liquid creates a vortex that pulls the denser ingredients down, ensuring an even blend. As the motor whirs, you’ll notice a gentle, creamy swirl forming—this is the base of your bowl. If you hear any grinding noises, pause and scrape the sides; you don’t want any clumps of cheese stuck to the blade.
-
Now toss in the frozen cherries, banana slices, and cocoa powder. The frozen cherries should crackle as they hit the blades, a sound that tells you they’re still icy enough to keep the bowl thick. The cocoa will gradually dissolve, turning the mixture a deep, inviting brown. At this stage, add the honey; its viscosity helps bind the ingredients together, creating that luxurious mouthfeel.
Watch Out: Over‑blending can heat the mixture, turning the smooth bowl into a thin soup. Stop blending as soon as the texture is thick and glossy. -
Blend on high for 30‑45 seconds, then pause and scrape the sides with a spatula. This is the moment of truth: the mixture should be thick enough to hold a spoon upright but fluid enough to swirl when you tilt the bowl. If it looks too thick, drizzle in a splash more almond milk—just a tablespoon at a time. If it’s too runny, add a spoonful of cottage cheese or a few extra frozen cherries.
-
Once the consistency is perfect, pour the smoothie into a wide bowl. The bowl should be pre‑chilled if you love an extra‑cold breakfast; a quick 5‑minute chill in the freezer does the trick. This step not only keeps the bowl frosty but also helps the toppings stay crunchy longer.
Kitchen Hack: Sprinkle a pinch of sea salt on top of the bowl; it amplifies the chocolate flavor and balances the natural sweetness of the fruit. -
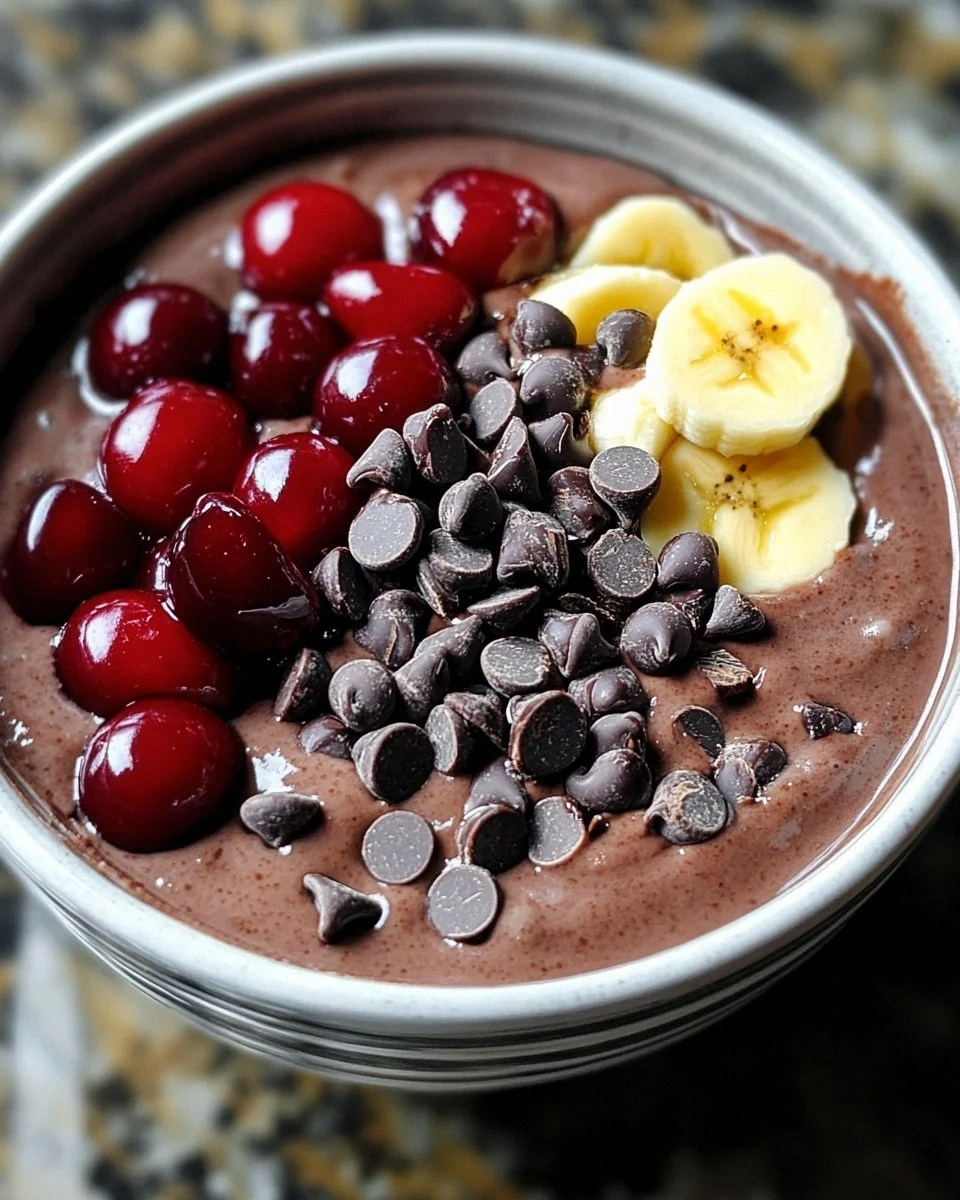
Now comes the fun part: topping selection. I love a combination of sliced fresh cherries, a drizzle of extra honey, a sprinkle of toasted almond slivers, and a dusting of cocoa nibs for crunch. The contrast between the silky base and the crunchy toppings creates a textural symphony that makes each bite exciting. Feel free to add a handful of granola or a dollop of Greek yogurt for extra protein.
-
Give the bowl a final gentle press with the back of a spoon, just enough to settle the toppings without crushing them. This subtle press helps the flavors meld, letting the honey seep into the cherry slices and the cocoa nibs coat the almond slivers. Take a moment to admire the colors—the deep brown, ruby red, and creamy white are as pleasing to the eye as they are to the palate.
-
Finally, sit down, take a deep breath, and dig in. The first spoonful should hit your tongue with a velvety chocolate wave, followed by the bright pop of cherry and the lingering creaminess of cottage cheese. I’ll be honest — I ate half the batch before anyone else got to try it, and the leftovers stayed perfectly thick for a second serving. That’s it — you did it. But hold on, I've got a few more tricks that'll take this to another level...
Insider Tricks for Flawless Results
The Freeze‑Then‑Blend Rule Nobody Follows
Freezing the fruit and banana before blending is a secret weapon that keeps the bowl thick and prevents it from turning into a watery mess. When the frozen pieces hit the blades, they create a frosty vortex that locks in air, giving the bowl a light, airy texture. A friend once tried skipping this step and ended up with a soupy mess that clung to the spoon; we all laughed, but the lesson stuck. Remember, a solid chill is the foundation of a perfect bowl.
Why Your Nose Knows Best
Your sense of smell is a more reliable indicator of doneness than a timer. As you blend, pause and inhale the aroma; when you detect a balanced chocolate‑cherry scent with a hint of almond, the bowl is ready. If the smell is still too “raw” or the cocoa feels sharp, give it another ten seconds. Trusting your nose saves you from over‑processing, which can heat the mixture and ruin the texture.
The 5‑Minute Rest That Changes Everything
After blending, let the bowl rest for exactly five minutes before adding toppings. This short rest allows the fibers in the fruit to settle, the cocoa to fully hydrate, and the cottage cheese to thicken slightly. The result is a smoother base that holds toppings without sinking. I once skipped this rest and watched my granola drown—big mistake.
The Salt Boost Trick
A pinch of flaky sea salt sprinkled on top does more than just season; it amplifies the chocolate’s depth and balances the natural sweetness of the fruit. The contrast of salt and sweet is a classic culinary technique that makes flavors pop. I’m not saying you need a salt shaker at the table, just a light dusting before serving.
Layered Topping Technique
Instead of dumping all toppings at once, layer them in three stages: first, a base of sliced cherries; second, a drizzle of honey and almond slivers; third, a final dusting of cocoa nibs. This method ensures each bite delivers a balanced mix of texture and flavor. A friend tried a random sprinkle and ended up with clumps of almond in one bite and none in the next—layering solves that.
Creative Twists and Variations
This recipe is a playground. Here are some of my favorite ways to switch things up:
Nutty Crunch Delight
Swap almond slivers for toasted pistachios and add a spoonful of peanut butter swirled into the base. The nutty richness deepens the chocolate flavor, and the green pistachios add a pop of color that makes the bowl look festive.
Tropical Sunrise
Replace cherries with frozen mango chunks and add a splash of coconut milk instead of almond milk. The result is a bright, sun‑kissed bowl where tropical sweetness meets chocolate, perfect for a summer brunch.
Protein Power Boost
Add a scoop of vanilla whey protein powder to the blend and top with hemp seeds. This variation turns the bowl into a post‑workout recovery meal without sacrificing the indulgent taste.
Vegan Velvet
Swap cottage cheese for silken tofu and use maple syrup instead of honey. The tofu mimics the creamy texture while keeping the dish entirely plant‑based, and the maple adds a caramel note that pairs beautifully with cocoa.
Spiced Autumn
Add a pinch of cinnamon and a dash of ground cardamom to the blender, and garnish with toasted pumpkin seeds. The warm spices transform the bowl into a cozy, autumn‑ready treat that still feels fresh.
Berry‑Blast Fusion
Mix in a handful of frozen blueberries and raspberries alongside the cherries for a mixed‑berry version. The additional berries introduce subtle tartness and a burst of antioxidants, making each spoonful a colorful surprise.
Storing and Bringing It Back to Life
Fridge Storage
Transfer any leftover bowl to an airtight container and store it in the refrigerator for up to 48 hours. The thick base holds up well, but you may notice a slight separation; simply give it a quick stir before serving. Adding a splash of almond milk (about a tablespoon) before reheating restores the original creaminess.
Freezer Friendly
If you want to make a batch for the week, portion the blended base into freezer‑safe bags, leaving a little headspace for expansion. Freeze for up to three months. When you’re ready to eat, thaw overnight in the fridge, then blend again with a splash of almond milk to revive the texture.
Best Reheating Method
For a quick warm‑up, place the bowl in a microwave‑safe dish and heat on medium power for 30‑45 seconds, stirring halfway. Add a teaspoon of water or almond milk before heating; the steam created keeps the bowl from drying out and brings back that silky mouthfeel. Avoid high heat, which can cause the cocoa to become bitter.