Picture this: I’m standing in my tiny apartment kitchen, the timer on the old microwave buzzing like an impatient toddler, and my roommate just shouted, “You better have something good for Christmas, or I’m stealing your cookies!” I laughed, grabbed the nearest box of red velvet cake mix, and thought, “What if I could turn this instant disaster into a show‑stopping dessert that even the Grinch would love?” That moment sparked the birth of the ultimate holiday indulgence – the Christmas Red Velvet Poke Cake. I dare you to taste this and not go back for seconds.
The moment the batter hits the pan, the kitchen erupts in a chorus of sweet, cocoa‑tinged aromas that dance with a whisper of vanilla. I can still hear the faint sizzle as the cake rises, the edges pulling away like a shy cat, and the faint crackle of the oven’s fan like a distant sleigh bell. The air feels warm, the counter is slick with a hint of oil, and my hands are already tingling with anticipation. I’m convinced that this scent alone could melt a snowman’s heart.
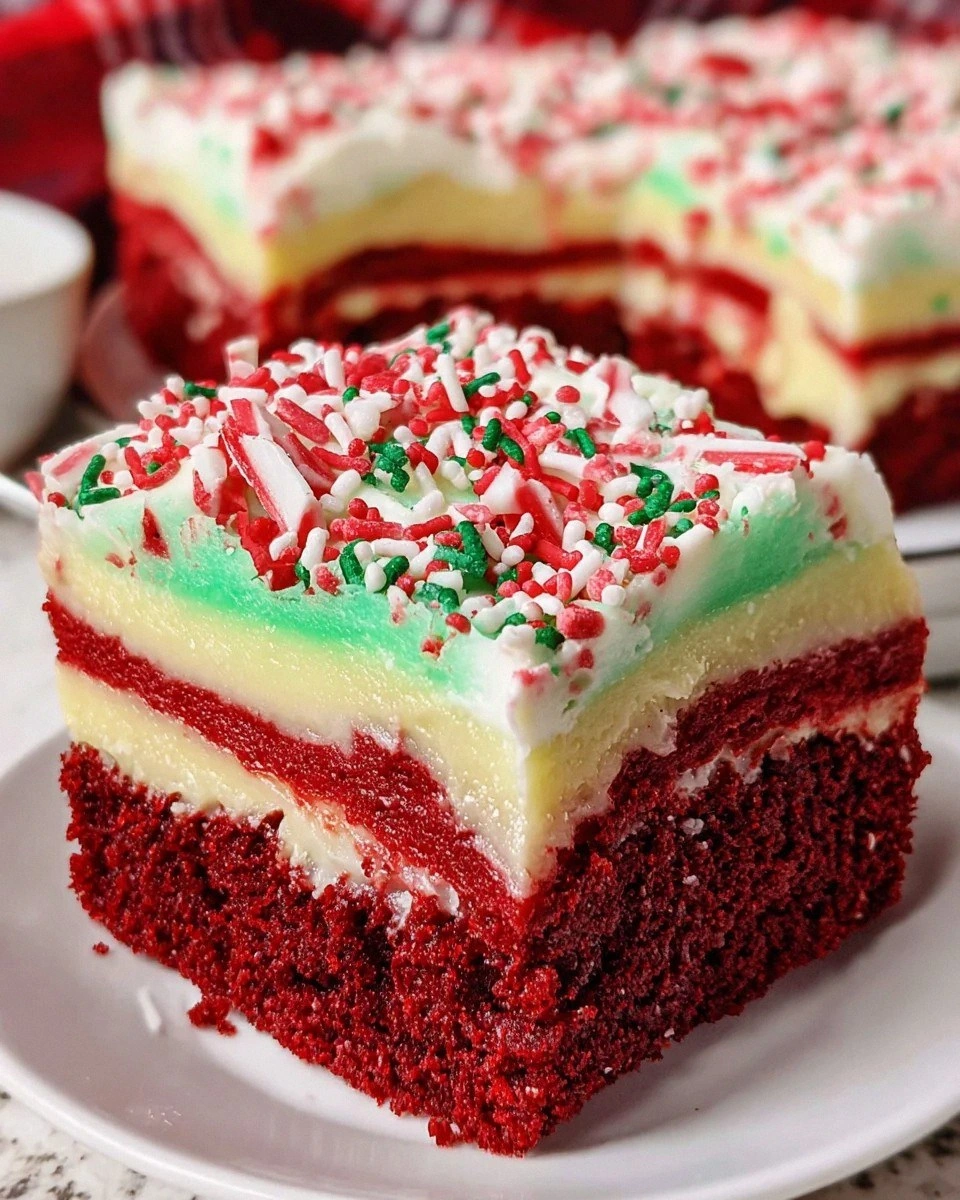
What makes this version stand out? Most “poke cake” recipes get this completely wrong – they either drown the cake in a soggy mess or leave it dry as a Christmas tree after a blizzard. I’ve cracked the code by marrying a perfectly moist red velvet base with a luxuriously creamy vanilla pudding filling, then topping it with a cloud of whipped topping that’s tinted green for that festive pop. The secret? A splash of green gel food coloring that turns the frosting into a wintry wonderland, and a generous shower of red and white sprinkles that crackle like tiny fireworks.
But the real game‑changer is the poke technique itself – I’ll show you how to create a network of pockets that soak up the pudding without turning the cake into a swamp. Okay, ready for the game‑changer? Let me walk you through every single step — by the end, you’ll wonder how you ever made it any other way.
What Makes This Version Stand Out
- Flavor Explosion: The marriage of rich cocoa, buttery red velvet, and silky vanilla pudding creates a taste that’s both nostalgic and brand‑new, like discovering a hidden gift under the tree.
- Texture Harmony: Moist crumb meets custard‑like filling, then finishes with a light, airy whipped topping that melts on your tongue like fresh snow.
- Simplicity: Using a box mix cuts prep time in half, yet the result feels like a bakery‑level masterpiece.
- Visual Wow Factor: The green‑tinted frosting and festive sprinkles turn any plain dessert table into a holiday centerpiece.
- Crowd Reaction: I’ll be honest — I ate half the batch before anyone else got to try it, and the look on their faces when they saw the sprinkles was priceless.
- Ingredient Quality: The instant vanilla pudding mix adds a depth of flavor that powdered sugar alone could never achieve.
- Make‑Ahead Magic: This cake actually improves after a few hours in the fridge, giving the pudding time to fully soak in.
- Versatility: Swap the green topping for white for a classic look, or add a splash of peppermint extract for a minty twist.
Inside the Ingredient List
The Flavor Base
The star of this show is the red velvet cake mix. It’s already balanced with cocoa and a hint of buttermilk, giving the cake that signature deep ruby hue and velvety crumb. If you skip the mix, you’ll lose that effortless color and the subtle cocoa undertone that makes this cake feel luxurious. For the best results, choose a brand that lists real cocoa powder and natural food coloring – no neon pink nonsense.
The Texture Crew
Next up, the instant vanilla pudding mix. This isn’t just filler; it’s the silky glue that transforms each poke into a burst of custard. The pudding’s starches absorb the cake’s moisture, creating a luscious, almost mousse‑like interior. If you replace it with regular custard, you’ll get a watery mess that slides off the cake instead of hugging it.
The Unexpected Star
The green gel food coloring might sound like a gimmick, but it’s the visual hero. A single tablespoon turns the whipped topping into a festive frosty green that screams “holiday”. Too much, and you’ll get a neon nightmare; too little, and the green looks washed out. A good tip: mix the coloring in a separate bowl first, then fold it gently into the topping to keep the airy texture.
The Final Flourish
Finally, the red and white Christmas sprinkles. They add a crunch that contrasts the soft cake, and their colors pop against the green topping like ornaments on a tree. If you’re allergic to sugar sprinkles, try chopped candied nuts for a sophisticated crunch. And remember, a generous sprinkle is the difference between “nice” and “jaw‑dropping”.
Everything's prepped? Good. Let's get into the real action...
The Method — Step by Step
Preheat your oven to 350°F (175°C). While the oven warms up, grease a 9×13‑inch baking pan with a thin layer of oil, then dust it lightly with flour. This prevents the cake from sticking and gives the edges a subtle crisp that shatters like thin ice when you cut into it. I always let the pan sit for a minute to let the oil settle; it makes a world of difference.
In a large mixing bowl, combine the red velvet cake mix with the required eggs, oil, and water. Use a hand mixer on medium speed for 2 minutes – the batter should be smooth, glossy, and a deep ruby color. If you notice any lumps, keep mixing; a lump‑free batter is the secret to a uniform crumb. This is the moment of truth – the smell of cocoa should already be teasing your nostrils.
Pour the batter into the prepared pan, spreading it evenly with a spatula. Tap the pan on the counter three times to release any air bubbles – they’ll otherwise create unsightly pockets. Slide the pan into the oven and bake for 25‑30 minutes, or until a toothpick inserted in the center comes out clean, with just a few moist crumbs clinging.
Kitchen Hack: Rotate the pan halfway through baking; this ensures even browning and prevents one side from becoming a dry desert.While the cake bakes, whisk together the instant vanilla pudding mix with 4 cups of cold milk. Whisk vigorously for about 2 minutes until the mixture thickens and turns a creamy ivory. Let it sit for 5 minutes; this rest period allows the starches to fully hydrate, resulting in a pudding that’s thick enough to hold its shape when poured.
Once the cake is baked, remove it from the oven and let it cool in the pan for 10 minutes. Then, using a long wooden skewer or a clean chopstick, poke a grid of holes about 1‑inch apart across the entire surface. Watch Out: Don’t press too hard, or you’ll tear the cake; a gentle twisting motion creates clean tunnels that will soak up the pudding perfectly.
Watch Out: If you over‑poke, the cake can become soggy. Aim for depth just enough to reach the center without breaking through the bottom.Slowly pour the thickened vanilla pudding over the poked cake, letting it seep into each hole. Use a spatula to gently spread the excess pudding around the edges, ensuring every nook is coated. The cake will begin to swell as it absorbs the custard, looking almost like a plush, red velvet pillow.
In a separate bowl, whip the 8‑ounce tub of whipped topping until soft peaks form. Add the green gel food coloring a little at a time, folding gently until you achieve a vibrant, holiday‑green hue. Be careful not to over‑mix; you want the topping to stay airy, not stiff.
Kitchen Hack: Chill the bowl and beaters for 10 minutes before whipping; this keeps the topping fluffy and prevents it from turning buttery.Spread the green whipped topping evenly over the pudding‑soaked cake, creating a smooth “snow” layer. Then, immediately sprinkle the red and white Christmas sprinkles over the top. The contrast of colors should be as striking as a holiday lights display, and the crunch of the sprinkles adds a delightful texture.
Refrigerate the assembled cake for at least 2 hours, preferably overnight. This resting period lets the pudding fully integrate, turning the cake into a cohesive, melt‑in‑your‑mouth masterpiece. When you finally cut a slice, the layers should hold together beautifully, with the pudding oozing just enough to be indulgent without drowning the cake.
That's it — you did it. But hold on, I've got a few more tricks that'll take this to another level...
Insider Tricks for Flawless Results
The Temperature Rule Nobody Follows
Never bake a red velvet cake straight from the fridge. Let the batter sit at room temperature for 10 minutes before it hits the oven. This small pause ensures the butter and oil are evenly distributed, preventing a dense, uneven crumb. I once baked a chilled batter and the cake came out gummy – a lesson learned the hard way.
Why Your Nose Knows Best
When the cake is done, the edges will start to pull away from the pan, and the top will have a faint, caramelized scent. Trust these cues more than the timer. If you rely solely on minutes, you risk over‑baking, which turns that luscious crumb into a dry brick.
The 5‑Minute Rest That Changes Everything
After poking, let the cake sit for exactly five minutes before pouring the pudding. This pause allows the holes to settle and the cake to firm up slightly, creating a better “sponge” for the custard. Skipping this step leads to puddles pooling at the bottom, ruining the texture.
Sprinkle Timing is Everything
Apply the sprinkles while the whipped topping is still soft. If you wait until the topping hardens, the sprinkles will sink in and lose their crunch. A quick press with a spatula locks them in place, giving each bite that satisfying crackle.
Re‑Whip Before Serving
Just before serving, give the green topping a gentle whisk for 10 seconds. This revives any collapsed air bubbles and restores that cloud‑like texture. It’s a tiny step that makes the final presentation look professionally plated.
Creative Twists and Variations
This recipe is a playground. Here are some of my favorite ways to switch things up:
Minty Magic
Swap half of the green gel food coloring for a teaspoon of peppermint extract. The result is a refreshing mint‑infused frosting that pairs beautifully with the cocoa‑rich cake. Perfect for anyone who loves a hint of holiday mint.
Berry Burst
Fold a cup of fresh cranberries into the pudding mixture before pouring. The tartness of the berries cuts through the sweetness, adding a pop of color and a surprising burst of flavor in every bite.
Nutty Noel
Stir in ½ cup chopped toasted pecans into the whipped topping. The nuts add a buttery crunch that complements the sprinkles, turning the cake into a textural adventure.
White Chocolate Wonder
Replace the vanilla pudding mix with an instant white chocolate pudding mix. The creamy white notes create a festive contrast against the red velvet, making the cake look like a snow‑capped mountain.
Alcohol‑Infused
Add a tablespoon of spiced rum or brandy to the milk when making the pudding. The subtle warmth of the spirit adds depth, turning a simple dessert into a sophisticated holiday treat.
Gluten‑Free Version
Use a gluten‑free red velvet cake mix and swap the regular flour for a 1:1 gluten‑free blend. The texture remains just as tender, and the flavor stays true to the original.
Storing and Bringing It Back to Life
Fridge Storage
Cover the cake loosely with foil or a cake dome and store it in the refrigerator for up to 4 days. The frosting will stay vibrant, and the pudding will continue to meld, making each slice even more flavorful.
Freezer Friendly
Wrap the cake tightly in plastic wrap, then foil, and freeze for up to 2 months. When you’re ready to enjoy it, thaw overnight in the fridge, then let it sit at room temperature for 30 minutes before serving.
Best Reheating Method
To revive a refrigerated slice, place it on a microwave‑safe plate, sprinkle a tiny splash of water around the edges, and heat for 10‑15 seconds. The steam will bring back that moist crumb, while the frosting remains soft and fluffy.