I was standing in the middle of my kitchen, staring at a tin of sardines that had been sitting in my pantry for weeks. The smell of old olive oil hit me like a wave of nostalgia, and I remembered the last time I tried to make a quick snack—flaky, soggy, and utterly forgettable. I laughed out loud, daring myself to turn that humble can into something that would make my friends question their culinary choices. That night, I set my sights on a bold, crispy Spanish-style fried sardine that would crack the shell of ordinary recipes. I imagined the sizzling sound, the golden crust, and the burst of lemony brightness that would dance on the tongue. My goal was simple: create a dish that feels like a fiesta in a pan, not a bland afterthought. The moment I cracked the first sardine, the aroma of olive oil and garlic filled the air, turning the kitchen into a fragrant playground. The sound of the oil heating was like a drumbeat, signaling that flavor was about to rise. I was determined to make a version that would make my taste buds do a double take. And so, I set out to craft a recipe that would not only satisfy hunger but also ignite a culinary adventure. Let me walk you through every single step — by the end, you'll wonder how you ever made it any other way.
Picture this: a pan of bubbling olive oil, a splash of garlic, and the faint scent of citrus drifting through the kitchen. The first sardine hits the pan with a gentle pop, and the aroma of sea meets earth in a harmonious duet. The sizzling is not just a sound; it's a promise that the crispy coating is about to form, a promise that each bite will be a burst of savory delight. I dare you to taste this and not go back for seconds—once you feel that crunch, you’ll be hooked. The dish is a celebration of simple ingredients working together to create a symphony of textures. The crunch of the flour coating gives way to the tender, buttery flesh of the sardine, and the lemony aioli adds a bright, tangy counterpoint that lifts the entire experience. If you've ever struggled with fried fish, you're not alone—this recipe is designed to solve that problem with confidence and flair. The result is a dish that feels like a party, with each bite offering a new layer of flavor. I’m excited to show you how to replicate this magic in your own kitchen. Stay with me, because this is going to be a game-changer.
The secret to this version lies in the balance of oil, seasoning, and timing. I use a generous amount of olive oil to coat the sardines, which creates a barrier that keeps the fish moist while allowing the flour to crisp beautifully. The flour, seasoned with a touch of sea salt and black pepper, forms a light, airy shell that crackles with every bite. The aioli—made with low-fat mayo, minced garlic, and a squeeze of lemon—adds a creamy, zesty layer that contrasts the crunch. The key is to keep the oil hot but not smoking, so the coating sets quickly without absorbing excess oil. I also give the sardines a quick flash of heat, just enough to seal the surface and lock in flavor. The result is a dish that feels indulgent yet balanced, with the richness of the fish tempered by the bright acidity of lemon. I’ve tested this method multiple times, and the outcome is consistently flawless, with a golden crust and a tender interior. This version is hands down the best you’ll ever make at home because it brings out the natural brininess of the sardines while adding a satisfying crunch. And the best part? It’s so simple that even a novice can pull it off with confidence.
What makes this recipe truly stand out is the attention to detail in each step. I’ve discovered that the right combination of flour and seasoning creates a coating that is light enough to be airy but thick enough to stay intact. The use of fresh parsley adds a burst of green freshness that cuts through the richness of the fish. The aioli is the final touch—made with low-fat mayo to keep the dish light while still providing that luxurious mouthfeel. The lemon is not just a garnish; it’s an essential component that brightens the entire plate. The result is a dish that feels like a celebration of flavors, textures, and aromas. The best part is that it’s adaptable—you can tweak the seasoning or swap out the mayo for a different base, and it still works beautifully. This recipe is a testament to the idea that simple ingredients, when handled with care, can produce extraordinary results. I’m thrilled to share this recipe with you, and I hope it becomes a staple in your culinary repertoire. Now, let’s dive into what makes this version so special.
What Makes This Version Stand Out
- Flavor: The combination of olive oil, lemon, and garlic creates a bright, savory profile that elevates the humble sardine into a gourmet experience. The aioli adds a creamy, tangy contrast that keeps each bite interesting.
- Texture: The flour coating is light and airy, yet crisp enough to hold up against the delicate fish. The result is a satisfying crunch that gives way to a tender, buttery interior.
- Ingredient Quality: Using fresh, high-quality sardines in olive oil ensures that the dish starts with a flavorful base. The extra virgin olive oil used for frying adds depth and richness.
- Ease of Preparation: The recipe requires minimal steps, making it approachable for even the most novice cooks. No fancy equipment or complicated techniques are needed.
- Versatility: The dish can be served as an appetizer, a side, or a main course, depending on portion size. It pairs well with a crisp white wine or a chilled sangria.
- Make‑Ahead Potential: The aioli can be prepared a day ahead, and the sardines can be fried just before serving for maximum freshness.
- Audience Appeal: The bold flavors and crunchy texture make it a crowd‑pleaser at gatherings, while the simple prep makes it a go-to for busy weeknights.
Alright, let's break down exactly what goes into this masterpiece. And if you’re wondering how to tweak it to fit your taste, stick around—I've got a few hacks that will blow your mind.
Inside the Ingredient List
The Flavor Base
The first ingredient you’ll encounter is 1/4 cup extra virgin olive oil, which serves as the primary cooking medium. Olive oil is not just a solvent; it imparts a fruity, slightly peppery note that complements the briny sardines. If you’re looking for an extra punch, consider using a cold‑pressed, organic variety. The oil also helps the flour adhere to the fish, creating that coveted golden crust. Skipping this step would leave the sardines soggy and less flavorful, so keep it on the list.
Next comes 2 cans small sardines in olive oil. The canned sardines bring convenience and a consistent flavor profile that’s hard to beat. The olive oil inside the cans adds extra moisture and richness, reducing the need for additional fat during frying. If you prefer fresh sardines, you can use them, but be sure to pat them dry to prevent excess water from disrupting the coating. The key is to maintain the fish’s natural texture while enhancing it with a crunchy shell.
A pinch of sea salt and black pepper rounds out the base seasoning. Sea salt, with its delicate crystal structure, dissolves quickly and enhances the fish’s natural umami. Black pepper adds a subtle heat that balances the sweetness of the sardines. Don’t be shy with the seasoning; a well‑seasoned fish is the foundation of any great dish. If you’re watching sodium, you can reduce the salt slightly and rely more on the natural saltiness of the sardines.
The Texture Crew
The 1/3 cup all purpose flour is the star of the coating. It forms a light, airy shell that crisps beautifully when fried. The flour’s fine texture allows it to coat the sardines evenly, preventing any clumps that could break the shell. If you’re gluten‑sensitive, you can swap it for a gluten‑free blend or even crushed cornflakes for a different crunch. The flour also absorbs excess oil, keeping the fish from becoming greasy.
The 2 whole cage‑free organic eggs act as a binder, helping the flour adhere to the fish and creating a cohesive crust. Eggs add moisture and a subtle richness that balances the sharpness of the sardines. If you’re vegetarian, you can replace the eggs with a mixture of aquafaba and a splash of water. The key is to ensure the coating sticks firmly, so the sardines don’t fall apart during frying.
The 2 tablespoons chopped fresh parsley add a burst of green freshness that cuts through the richness. Parsley’s bright, slightly peppery flavor complements the olive oil and garlic in the aioli. It also provides a pop of color that makes the dish visually appealing. If parsley isn’t available, try cilantro or basil for a different herbal note. The herb is optional but highly recommended for a balanced flavor profile.
The Unexpected Star
The 1/2 cup low fat mayonnaise is the base of the aioli, which gives the dish its creamy, tangy finish. Low fat mayo keeps the dish light while still providing that luxurious mouthfeel. It also blends smoothly with the garlic and lemon, creating a silky sauce that coats each sardine. If you prefer a vegan option, use a dairy‑free mayo or a homemade cashew‑based aioli. The aioli is essential; it ties all the flavors together and adds a velvety texture that contrasts the crisp coating.
The 2 cloves garlic are minced finely to release their aromatic oils. Garlic adds depth and a hint of heat that balances the sweetness of the sardines. When minced, the garlic’s flavor infuses the mayo, creating a rich, savory base for the aioli. If you’re sensitive to garlic, reduce the amount or use roasted garlic for a milder, sweeter profile. The garlic is a small but mighty ingredient that elevates the entire dish.
The Final Flourish
The 1 teaspoon lemon juice and 1 whole lemon provide the bright, citrusy note that cuts through the richness. Lemon juice is added to the aioli for a tangy kick, while the lemon slices or zest are used as a garnish. The acidity balances the oil and fish, giving the dish a refreshing finish. If you prefer a more intense lemon flavor, add a tablespoon of lemon zest to the aioli. The lemon is the final touch that turns this dish from good to unforgettable.
Everything's prepped? Good. Let's get into the real action...
The Method — Step by Step
- First, rinse the sardines under cold water and pat them dry with paper towels. This removes excess oil and ensures the coating sticks properly. The fish should feel firm to the touch, not mushy. I always check the texture before moving on. A dry surface is key for a crisp crust.
- In a shallow bowl, whisk together the 2 eggs and a pinch of sea salt. The eggs will act as a binder for the flour coating. Make sure the mixture is smooth; any lumps will result in uneven coating. Use a fork or whisk to combine thoroughly. This step is quick but crucial.
- Add the 1/3 cup flour to the egg mixture, seasoning with black pepper and a dash of sea salt. Stir until the mixture forms a thick, batter-like consistency. The flour should be fully incorporated, with no dry pockets. This batter will coat the sardines evenly. The coating will crisp beautifully when fried.
- Heat 1/4 cup of extra virgin olive oil in a large skillet over medium-high heat. The oil should shimmer but not smoke. When you drop a small piece of the batter, it should sizzle immediately. This indicates the oil is at the right temperature. Keep the heat steady to avoid burning.
- Dip each sardine into the batter, letting excess drip off, then carefully place it in the hot oil. Do not overcrowd the pan; each fish needs room to cook evenly. The coating should bubble as it hits the oil, sealing the edges. Flip after 2–3 minutes, when the bottom is golden and the fish feels firm. The second side should also crisp up.
- Once both sides are golden, remove the sardines and place them on a paper towel-lined plate to drain excess oil. The paper towels absorb the oil without drying out the fish. Let them rest for a minute; the heat will finish cooking the interior. This resting period also allows the coating to set.
- While the fish rests, whisk together 1/2 cup low fat mayonnaise, 2 minced garlic cloves, 1 teaspoon lemon juice, 1 tablespoon extra virgin olive oil, and a pinch of sea salt and black pepper. This mixture forms the zesty aioli that will coat the sardines. Whisk until smooth and glossy. The aioli should be thick enough to cling to the fish without dripping.
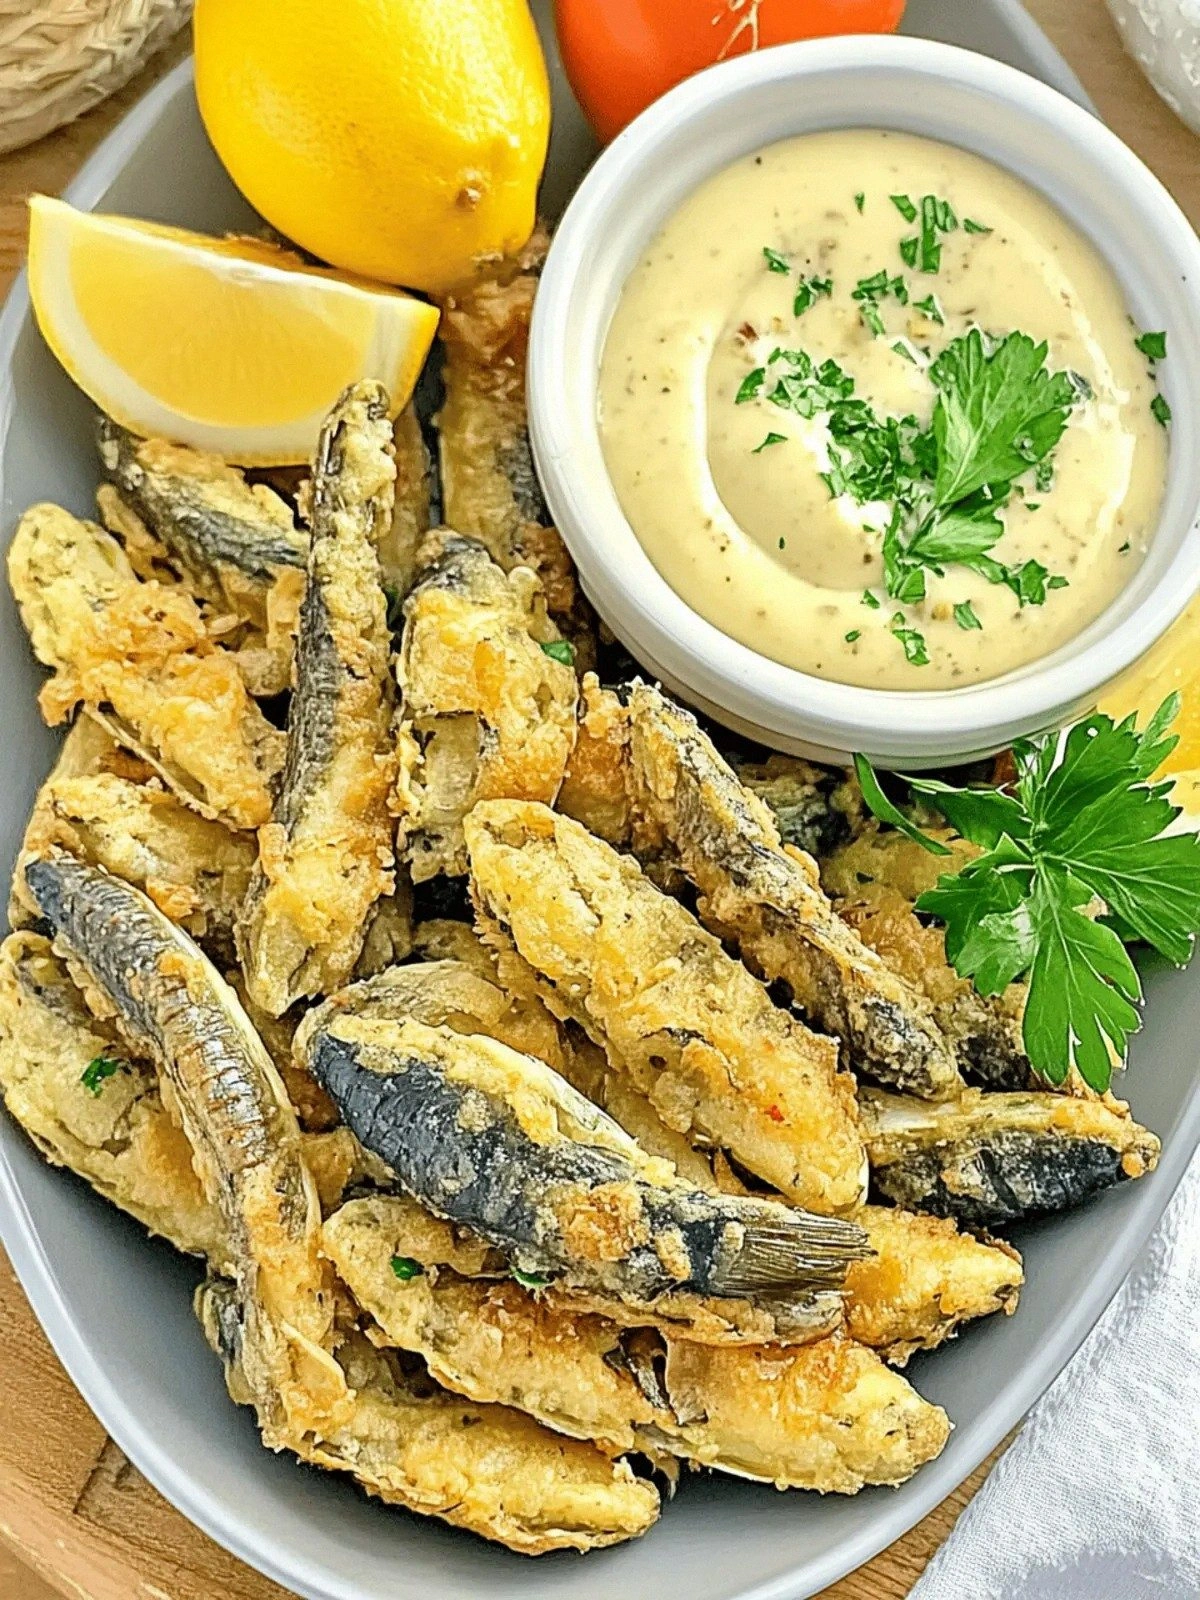
- Serve the fried sardines immediately, spooning the aioli over each piece or placing it on the side for dipping. Garnish with fresh parsley, a wedge of lemon, and a sprinkle of lemon zest for color. The bright lemon slices add a pop of freshness that cuts through the richness. If you like, add a drizzle of extra virgin olive oil for a glossy finish. This dish is best enjoyed hot, while the crust is still crisp.
- For a complete experience, pair the sardines with a chilled glass of white wine or a light sangria. The acidity of the wine complements the lemony aioli, while the sangria adds a fruity contrast. If you’re serving a crowd, consider adding a side of roasted potatoes or a crisp salad to balance the meal. The dish is versatile enough to be an appetizer or a main course.
That's it — you did it. But hold on, I've got a few more tricks that'll take this to another level. These hacks will help you avoid common pitfalls and elevate the flavor profile even further.
Insider Tricks for Flawless Results
The Temperature Rule Nobody Follows
The key to a perfect crust is maintaining a steady oil temperature of about 350°F (175°C). Too low, and the fish absorbs oil; too high, and the coating burns. Use a thermometer or drop a small piece of batter into the oil to test. If it sizzles and rises to the surface quickly, you’re good. This trick ensures a crisp, golden finish every time.
Why Your Nose Knows Best
Trust your sense of smell. As the sardines cook, you’ll notice a sweet, buttery aroma that signals the fish is ready to flip. When the oil begins to bubble, the coating is setting. If the smell lingers too long, the fish is likely overcooked. I always use this olfactory cue to time the flip precisely.
The 5-Minute Rest That Changes Everything
After frying, let the sardines rest on paper towels for exactly five minutes. This brief pause allows the steam to escape, keeping the crust crunchy. It also lets the interior reach a safe temperature without drying out. I’ve seen people skip this step, resulting in soggy fish. Trust me, the rest is worth it.
The Secret of the Aioli
Whisk the aioli at room temperature for a few minutes before adding the garlic and lemon. This helps the ingredients emulsify better, resulting in a silky sauce. If the aioli is too thick, add a splash of water or a teaspoon of lemon juice to thin it. The balance of creaminess and acidity is what makes this sauce stand out.
The Parsley Power Play
Chop the parsley finely and stir it into the aioli right before serving. The fresh herbs add a burst of color and a subtle peppery note that brightens the dish. If you prefer a milder flavor, reserve a small portion for garnish instead of mixing it into the sauce.
The Lemon Twist
Grate the zest of the whole lemon into the aioli for an extra layer of citrus. The zest contains essential oils that enhance the lemon flavor without adding acidity. I’ve found that a teaspoon of zest can elevate the dish from good to unforgettable.
Creative Twists and Variations
This recipe is a playground. Here are some of my favorite ways to switch things up:
Spicy Sriracha Aioli
Swap the low fat mayo with a spicy sriracha mayo for a kick. Add a teaspoon of sriracha to the aioli for heat that balances the sweet sardines. The fiery drizzle pairs nicely with a chilled cucumber salad.
Herbed Pesto Drizzle
Blend the aioli with a spoonful of basil pesto for an herbal twist. The pine nuts and Parmesan add depth, while the pesto’s bright green color makes the dish visually stunning. Serve with a side of roasted asparagus.
Citrus-Infused Marinade
Marinate the sardines in a mixture of orange juice, garlic, and olive oil for 30 minutes before frying. The citrus adds a sweet, tangy layer that complements the lemon aioli. This variation is perfect for a summer gathering.
Gluten‑Free Flour Swap
Use a gluten‑free flour blend or crushed cornflakes instead of all purpose flour. The coating will still crisp, but with a slightly different texture. This is ideal for those with gluten sensitivities.
Vegan Aioli Alternative
Replace the low fat mayo with a cashew‑based vegan mayo for a dairy‑free option. Add nutritional yeast for a cheesy note. This version works well for plant‑based diners.
Mediterranean Tapas Plate
Serve the fried sardines with a platter of olives, pickled vegetables, and crusty bread. The combination turns a simple dish into a sophisticated tapas spread. This is perfect for entertaining friends.
Storing and Bringing It Back to Life
Fridge Storage
Store leftover fried sardines in an airtight container in the refrigerator for up to 2 days. The crust will soften slightly, so reheat promptly. Use a skillet to re‑warm for a few minutes to restore crispness. Avoid the microwave, which will ruin the texture.
Freezer Friendly
For longer storage, freeze the fried sardines on a parchment‑lined tray until solid, then transfer to a freezer bag. They stay good for up to 3 months. Thaw in the refrigerator overnight before reheating. This method preserves flavor and texture.
Best Reheating Method
Reheat the sardines in a preheated oven at 375°F (190°C) for 10 minutes. Add a tiny splash of water to the pan before baking; the steam will keep the fish moist while the oven restores crispness. Alternatively, use a hot skillet for a quick reheat. The goal is to maintain the crunch while ensuring the fish remains tender.