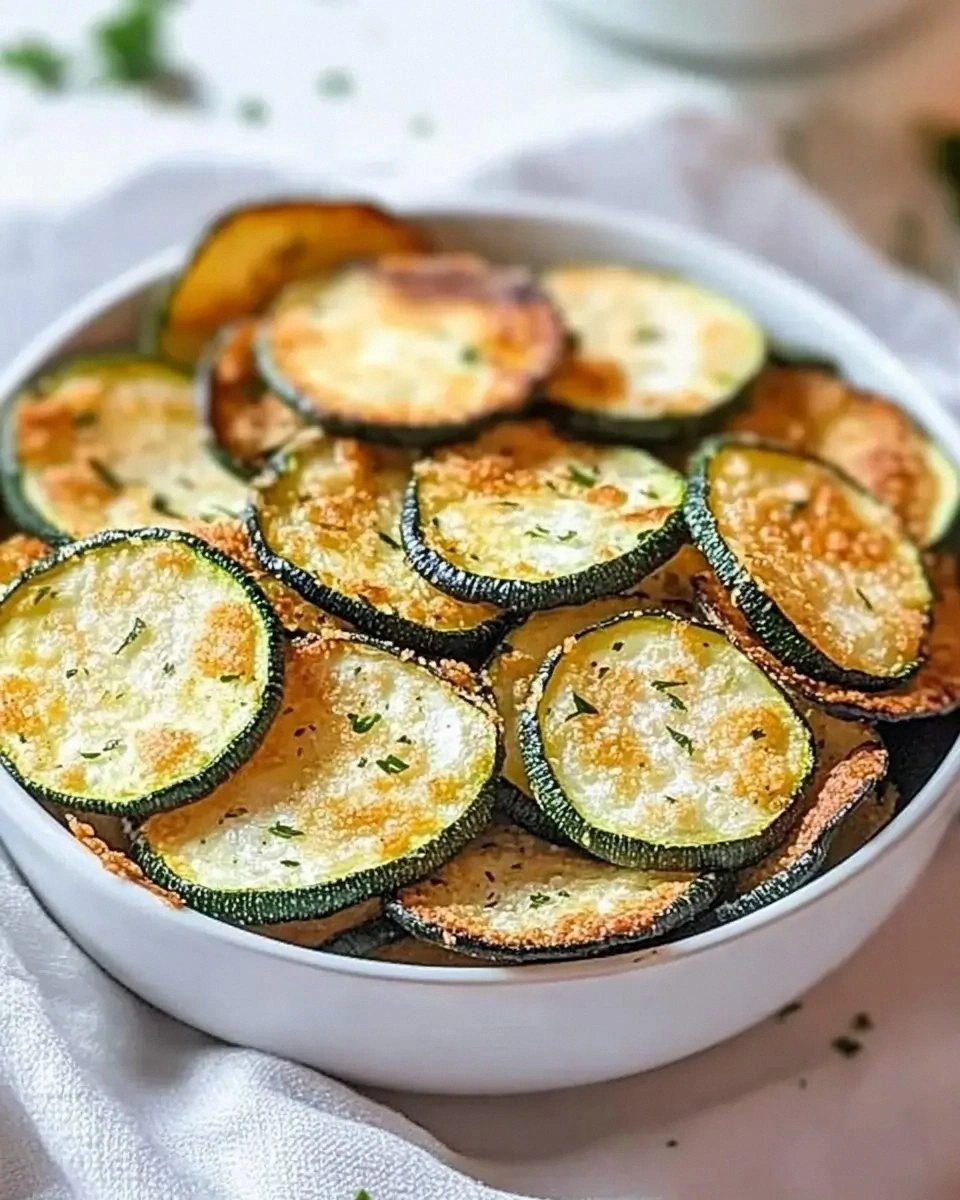
I was standing in my kitchen, staring at a half‑eaten bag of store‑bought potato chips, when a friend dared me to create something that would make those chips weep in shame. I thought, “Challenge accepted,” and the next 30 minutes turned into a full‑blown experiment that left my countertop covered in zucchini shavings, breadcrumbs, and a cloud of Parmesan perfume. The first bite was a revelation – a crunch that sang louder than any kettle‑corn I’d ever heard, a flavor punch that hit the palate like a tiny, green fireworks show. I dared you to taste this and not go back for seconds, because honestly, I ate half the batch before anyone else got a chance.
Picture this: the oven door swings open, and a tray of golden‑brown, perfectly curved chips slides out, steam rising like a curtain of applause. The scent of garlic, paprika, and toasted breadcrumbs fills the room, making the air feel thick enough to cut with a knife. You hear the faint crackle as the chips settle, a sound that says, “I’m ready.” Your fingers reach for a chip, the heat still lingering, and the first bite shatters with a satisfying snap that reminds you of thin ice under a boot – crisp, delicate, yet impossibly sturdy. It’s a sensory overload that turns a humble vegetable into a star.
Most zucchini chip recipes get this completely wrong – they either end up soggy, bland, or so oily they feel like a cheat day gone rogue. I’ve tried the “just toss it in oil and bake” method, and the result was a limp, greasy mess that made me question my life choices. The secret to this version is a three‑step coating system that locks in moisture while creating that coveted crunch, plus a precise oven temperature that turns the zucchini into a culinary superhero. And the best part? You only need a handful of pantry staples, no fancy gadgets, no deep‑fried horror stories.
Okay, ready for the game‑changer? I’m about to spill the beans – or rather, the breadcrumbs – on a technique that will make your zucchini chips the talk of every gathering. We’ll be using a light dusting of seasoned breadcrumbs combined with grated Parmesan, but the real magic happens when we flash‑bake them on a high‑heat rack, letting the hot air do the heavy lifting. Stay with me here – this is worth it. Let me walk you through every single step — by the end, you’ll wonder how you ever made it any other way.
What Makes This Version Stand Out
- Crunch Factor: The double‑coat method creates a crust that shatters like thin ice, delivering a satisfying snap that out‑crunches any store‑bought chip.
- Flavor Burst: A blend of garlic powder, onion powder, and paprika infuses each bite with a savory depth that feels like a mini‑seasoning party.
- Health Halo: Using zucchini instead of potatoes cuts the carb count dramatically while keeping the indulgent feel of a fried snack.
- Simplicity: No deep‑frying, no fancy tools – just a sheet pan, a rack, and a few pantry staples you already own.
- Crowd‑Pleaser: Even the most skeptical kids (and adults) can’t resist the cheesy aroma and the addictive crunch.
- Make‑Ahead Magic: These chips stay crisp for hours if stored right, making them perfect for parties, movie nights, or a quick snack at the office.
- Ingredient Integrity: Fresh zucchini provides a subtle sweetness that pairs beautifully with the salty Parmesan, creating a balanced flavor profile.
- Customizable: The base recipe is a canvas – swap spices, add herbs, or even drizzle with a spicy aioli for a gourmet twist.
Inside the Ingredient List
The Flavor Base
Salt is the silent hero here – a teaspoon does more than just season; it amplifies the natural sweetness of the zucchini and helps the breadcrumb coating adhere. If you skip it, the chips will taste flat, and the seasoning won’t cling properly. For a low‑sodium twist, try using a seasoned salt blend, but be mindful of the added flavors. Garlic powder and onion powder each contribute a deep, aromatic backbone that turns a simple vegetable into a flavor bomb. They’re both shelf‑stable, so you can keep them on hand for any snack emergency.
The Texture Crew
Paprika adds a subtle smoky note and a gorgeous golden hue that makes the chips look as good as they taste. If you prefer a heat kick, swap half of it for smoked chipotle powder. Black pepper at half a teaspoon brings a gentle bite that balances the cheese’s richness. The breadcrumbs are the structural skeleton – they create that airy crunch. Using panko will give an even lighter texture, but classic breadcrumbs work just fine and absorb the egg wash perfectly.
The Unexpected Star
Parmesan cheese is the unsung champion of this recipe. Its umami depth and salty tang elevate the chips from “good” to “legendary.” When it melts, it forms a thin, crispy film that locks in the zucchini’s moisture, preventing sogginess. If you’re dairy‑free, a finely grated nutritional yeast can mimic the cheesy flavor, though the texture will be slightly different.
The Final Flourish
The eggs act as the glue that binds the breadcrumb‑Parmesan mixture to the zucchini slices. Beating them lightly ensures an even coating without creating a rubbery texture. Finally, a light drizzle of cooking spray or olive oil helps the chips achieve that golden‑brown finish without drowning them in fat. If you’re watching calories, the spray is the better choice; for extra flavor, a quick brush of olive oil adds a subtle fruitiness.
Everything's prepped? Good. Let's get into the real action...

The Method — Step by Step
Preheat your oven to 425°F (220°C) and position a wire rack on a rimmed baking sheet. This setup allows hot air to circulate around each slice, ensuring an even, crispy texture. The moment the oven hits temperature, you’ll hear a faint hum that signals it’s ready to work its magic.
Slice the zucchinis lengthwise into 1/8‑inch thick ribbons using a mandoline or a sharp chef’s knife. Consistency is key – uneven slices bake unevenly, leading to a mix of soggy and burnt chips. As you work, the bright green ribbons will glisten, promising a vibrant final product.
In a shallow bowl, whisk together the two eggs with a splash of water (about 1 tablespoon). This lightens the coating and helps it cling without becoming too heavy. The mixture should be glossy but not too runny – think of a thin custard.
In a separate bowl, combine the breadcrumbs, grated Parmesan, salt, garlic powder, onion powder, paprika, and black pepper. Stir until the spices are evenly distributed, creating a fragrant, golden‑brown mixture that will cling to the egg‑wet zucchini slices like a second skin.
One by one, dip each zucchini ribbon into the egg wash, letting any excess drip back into the bowl. Then, roll it in the breadcrumb mixture, pressing gently to ensure the coating adheres fully. This double‑dip technique is the secret to a uniform crunch.
Arrange the coated slices on the pre‑heated wire rack in a single layer. Lightly spray the tops with cooking spray or drizzle a thin line of olive oil. This final touch encourages browning and adds that irresistible sheen.
Slide the sheet into the oven and bake for 12‑15 minutes, then flip each chip and bake an additional 8‑10 minutes. You’re looking for a deep golden color and edges that start to curl away from the rack. That sizzle when it hits the pan? Absolute perfection.
Remove the chips from the oven and let them cool on the rack for 5 minutes. As they cool, they crisp up further, turning from soft‑warm to a solid, crackling snack. Taste one right away – the moment the crunch meets your tongue is pure joy.
That's it — you did it. But hold on, I've got a few more tricks that'll take this to another level. Trust me, once you master the basics, you’ll want to experiment with every possible flavor combination under the sun.
Insider Tricks for Flawless Results
The Temperature Rule Nobody Follows
Most home cooks set the oven to 350°F and wonder why their chips never get that perfect crunch. The truth is, you need a high, consistent heat – 425°F is the sweet spot. The hot air creates a rapid Maillard reaction, locking in flavor and texture before the zucchini releases too much moisture. If your oven has hot spots, rotate the tray halfway through baking.
Why Your Nose Knows Best
Never rely solely on a timer. The moment the kitchen fills with a toasted, nutty aroma, you know the chips are near perfection. That scent is a reliable indicator that the breadcrumbs have caramelized just enough. Trust your nose, and you’ll avoid the dreaded burnt‑edge scenario.
The 5‑Minute Rest That Changes Everything
After baking, let the chips rest on the rack for at least five minutes. This pause lets steam escape and the coating set, turning a potentially soft bite into a firm, shatter‑like crunch. I once served chips straight from the oven, and they were a bit pliable – the rest period solved that instantly.
Seasoning on the Fly
If you love a spicy kick, toss the hot chips with a dash of cayenne pepper or a drizzle of hot sauce right after they cool. The heat will cling to the oil residue, creating a balanced heat that doesn’t overwhelm the delicate zucchini flavor.
The Double‑Dip Secret
Skipping the egg wash and going straight to breadcrumbs leads to a flaky, uneven coating. The egg creates a binding layer that ensures every breadcrumb particle stays put, resulting in a uniform crunch. This step is the difference between “good” and “hands down the best version you'll ever make at home.”
Creative Twists and Variations
This recipe is a playground. Here are some of my favorite ways to switch things up:
Herb‑Infused Delight
Add 1 tablespoon of dried Italian herbs to the breadcrumb mix. The aromatic blend transforms the chips into a Mediterranean snack, perfect paired with a side of hummus.
Spicy Sriracha Crunch
Mix 1 teaspoon of sriracha into the egg wash and sprinkle a pinch of crushed red pepper flakes on the finished chips. The result is a fiery bite that still retains the original crunch.
Cheesy Jalapeño Blast
Fold finely diced jalapeños into the breadcrumb mixture and increase the Parmesan to ¾ cup. The heat of the jalapeños pairs beautifully with the extra cheese, creating a bold flavor profile.
Sweet & Savory Twist
Swap half the paprika for cinnamon and add a light drizzle of honey after baking. The subtle sweetness balances the salty cheese, offering a snack that’s perfect for brunch.
Gluten‑Free Crunch
Replace regular breadcrumbs with almond flour or crushed rice crackers. The texture stays crisp, and you get a nutty undertone that complements the zucchini beautifully.
Storing and Bringing It Back to Life
Fridge Storage
Place cooled chips in an airtight container lined with a paper towel to absorb any residual moisture. They’ll stay crisp for up to 2 days. If you notice any soft spots, pop the container into a pre‑heated 300°F oven for 5 minutes to revive the crunch.
Freezer Friendly
Spread chips on a parchment‑lined tray and freeze for 30 minutes, then transfer to a zip‑top bag. They’ll keep for up to a month. When you’re ready to serve, reheat directly from frozen on a hot rack for 8‑10 minutes.
Best Reheating Method
To bring chips back to life, preheat your oven to 350°F, arrange them on a wire rack, and spray lightly with cooking spray. Add a tiny splash of water (just a few drops) to the tray – the steam will loosen any stale edges, and the heat will re‑crisp the coating. In under 5 minutes, they’ll be as good as fresh.