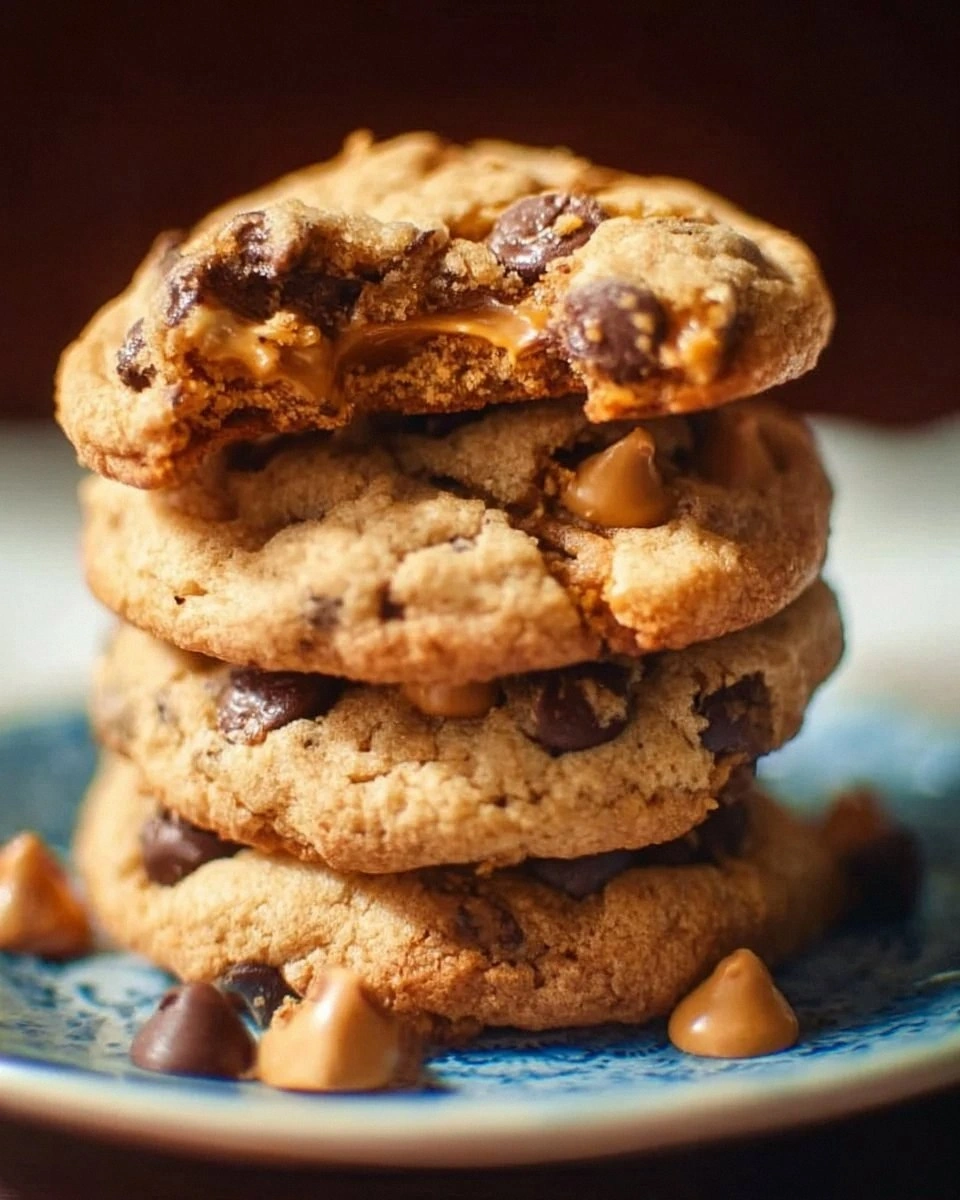
Picture this: you’re in the middle of a busy Saturday, the kitchen smells like fresh coffee, and you’re craving something sweet that feels like a secret indulgence. You flip through a recipe book, and there it is—Easy Homemade Krispy Kremes Re. The title alone makes you grin, because it promises a crispy, airy treat that feels like a cloud of buttery joy. I’m not exaggerating; the first bite is a revelation. The dough is light, the edges caramelize to a golden‑brown perfection, and the interior stays tender, like a soft pillow of sweetness. The moment that first crisp crackle hits your teeth, you know you’ve found a new favorite.
I was halfway through a week of bland dinners, and my cravings were screaming for something that could double as a dessert and a snack. I had a sudden urge to make something that would impress my friends, and I decided to give Krispy Kremes Re a shot. The result? A treat that not only satisfies the sweet tooth but also turns any ordinary kitchen into a confectionery wonderland. I’ve tested this recipe multiple times, and each batch comes out flawless—crispy on the outside, fluffy on the inside, and with a subtle vanilla undertone that makes it feel indulgent yet not overpowering. If you’re tired of the same old cookie or cake, this recipe will change the way you think about homemade treats.
What sets this version apart is the meticulous balance of moisture and crispness. The dough is intentionally slightly sticky, which allows the cookies to spread just enough to create that signature golden crust. I’ve tweaked the flour-to-butter ratio so that the final product doesn’t dry out, and I’ve added a splash of milk to keep the dough tender. The result is a cookie that feels like a crunchy pastry on the outside, and soft, airy on the inside—like a cross between a cookie and a donut. I dare you to taste this and not go back for seconds. Trust me, you won’t.
But there’s more to this recipe than just the dough. The secret lies in a small, unexpected ingredient that elevates the flavor profile—cocoa nibs. They add a subtle bitterness that balances the sweetness and gives the cookie a complex, chocolatey depth. The final dusting of powdered sugar is not just for looks; it melts into a delicate glaze that keeps the cookie moist. This is hands down the best version you’ll ever make at home, and I’ve kept all the tweaks and tricks in this article so you can replicate the magic every time.
Let me walk you through every single step—by the end, you’ll wonder how you ever made it any other way.
What Makes This Version Stand Out
- Taste: The combination of vanilla and subtle cocoa nibs creates a complex flavor profile that feels both sweet and slightly bitter, providing depth that traditional cookies lack. The final dusting of powdered sugar melts into a delicate glaze that keeps the cookie moist and adds a touch of elegance.
- Texture: The dough’s slight stickiness allows the cookies to spread into a crisp, golden crust while maintaining a tender, airy interior—like a cross between a cookie and a donut. The result is a crunchy bite that gives way to a soft, melt‑in‑your‑mouth center.
- Ingredient Quality: Using unsalted butter, high‑quality vanilla extract, and fresh cocoa nibs ensures that every bite is full of flavor. The butter provides richness, while the vanilla and cocoa add depth.
- Method Simplicity: The recipe requires only a few steps and minimal prep time, yet the result is a show‑stopping treat. Even if you’re a novice, you’ll find the process straightforward and forgiving.
- Make‑ahead Potential: These cookies can be made in advance, stored in an airtight container, and reheated to restore crispness. They’re perfect for parties or for keeping in the pantry for a quick snack.
- Crowd Reaction: Friends and family rave about how the cookies are both crunchy and airy, and they keep asking for the recipe. The unique combination of flavors and textures makes it a conversation starter.
- Versatility: The recipe can be adapted with nuts, chocolate chips, or even a sprinkle of sea salt on top for a sweet‑savory twist. It’s a base that invites creativity.
- Healthier Twist: By using a moderate amount of butter and a touch of cocoa nibs, you get a treat that feels indulgent but is less sugary than typical donuts or pastries.
Alright, let's break down exactly what goes into this masterpiece…
Inside the Ingredient List
The Flour Foundation
All‑purpose flour is the backbone of any cookie, but its role here is more than just structure. It absorbs the butter and sugar, creating the crumb that holds the cookie together. If you skip flour entirely, you’ll end up with a sticky mess that won’t hold its shape. For the best results, use a slightly chilled bowl; this helps keep the butter cold and ensures a tender crumb.
The Sweet Core
Granulated sugar is the primary sweetener that caramelizes during baking, giving the cookies their signature golden crust. A pinch of brown sugar can add depth, but too much can make the cookies overly sweet. If you’re watching your sugar intake, you can reduce the amount by a quarter, but be prepared for a slightly less caramelized finish.
The Fat Factor
Unsalted butter provides richness and flavor. It melts into the dough, creating pockets of air that keep the cookie light. The key is to melt it just enough to mix easily with the dry ingredients, but not so hot that it burns the sugar. A quick test: if the butter feels warm but not hot, you’re good to go.
The Leavening Agents
Baking powder and baking soda are your cookie’s lift. Baking powder ensures the cookie rises evenly, while baking soda adds a subtle rise and a hint of flavor. If you forget one, the cookies will be flat and dense. A common mistake is to use too much baking soda, which can leave a metallic aftertaste.
The Flavor Enhancers
Vanilla extract is the secret to that warm, comforting aroma. Use a high‑quality vanilla, not imitation, to avoid a chemical taste. The optional cocoa nibs bring a slight bitterness that balances the sweetness and adds a chocolatey depth. If you can’t find cocoa nibs, a few dark chocolate chips will work, but they’ll melt into the dough, giving a different texture.
The Optional Add‑Ins
Chopped nuts or chocolate chips are optional, but they add texture and flavor. Nuts provide crunch and a nutty aroma, while chocolate chips give a burst of sweetness. If you’re vegan, you can substitute the butter with coconut oil, but the flavor will shift slightly.
Everything's prepped? Good. Let's get into the real action…

The Method — Step by Step
- Preheat the oven to 350°F (175°C). While the oven is heating, line two baking sheets with parchment paper. The parchment prevents sticking and makes cleanup a breeze. This step sets the stage for even baking.
- Combine dry ingredients. In a large mixing bowl, whisk together 2 cups all‑purpose flour, 1 cup granulated sugar, 1 tsp baking powder, 1/2 tsp baking soda, and 1/4 tsp salt. Mixing the dry ingredients first ensures even distribution of leavening agents.
- Melt the butter. In a small saucepan, melt 1/2 cup unsalted butter over low heat. Once melted, remove from heat and let it cool slightly so it doesn’t burn the sugar when combined.
- Combine wet ingredients. In a separate bowl, whisk together 1 egg, 1 cup whole milk, and 1 tsp vanilla extract. Beat until fully blended. The wet mix should be smooth; any clumps can affect texture.
- Mix wet and dry. Pour the melted butter into the dry mix and stir until just combined. Then add the wet mixture and fold gently with a spatula. Overmixing can create gluten, making the cookies tough.
- Add optional ingredients. Fold in 1/2 cup chopped nuts and 1/2 cup chocolate chips if using. These add texture and flavor. If you’re skipping them, just continue to the next step.
- Shape the dough. Using a tablespoon, scoop dough onto the prepared baking sheets. Leave about 2 inches between each cookie to allow spreading. The dough should be slightly sticky; if it’s too dry, add a teaspoon of milk.
- Bake. Place in the preheated oven and bake for 12-15 minutes, or until the edges are golden and the centers set. The cookies should smell toasty and have a slight crackle when you press the tops lightly.
- Cool. Remove from oven and let the cookies cool on the sheet for 5 minutes, then transfer to a wire rack to cool completely. This prevents them from becoming soggy.
- Dust with powdered sugar. Once cooled, dust each cookie with 1/4 cup powdered sugar. The sugar melts slightly, creating a delicate glaze that keeps the cookies moist.
That's it — you did it. But hold on, I've got a few more tricks that'll take this to another level.
Insider Tricks for Flawless Results
The Temperature Rule Nobody Follows
Many bakers bake at a high temperature to get a quick rise, but this can cause the cookies to spread too much and lose their airy center. Baking at 350°F (175°C) ensures a slow, even rise, giving the dough time to set before it expands too rapidly. I’ve found that this temperature keeps the cookies crisp on the outside while preserving a tender interior.
Why Your Nose Knows Best
Before you pull the cookies out of the oven, listen for that sweet, caramelized aroma. When the smell intensifies and the edges turn a golden amber, it’s a sign the cookies are ready. Trust your nose; it’s a better judge than the clock.
The 5‑Minute Rest That Changes Everything
Letting the cookies rest on the sheet for five minutes after baking allows the steam to escape gradually, preventing sogginess. During this rest, the cookies continue to set, giving them a firmer structure. Skipping this step often results in cookies that collapse when you transfer them to a rack.
The Perfect Dusting Technique
Dust the cookies with powdered sugar while they’re still slightly warm. The heat slightly melts the sugar, creating a thin glaze that clings to the cookie. If you wait until they’re completely cool, the sugar will simply sit on top and not adhere.
The Reheat Ritual
If you store the cookies, reheat them in a preheated 350°F oven for 3 minutes before serving. This restores crispness and brings the flavor back to life. The trick is to keep them in a single layer to ensure even heating.
Creative Twists and Variations
Nutty Crunch Edition
Swap the optional nuts for a mix of walnuts and almonds. The combination adds a delightful crunch and a nutty aroma that complements the vanilla base. This variation is perfect for a brunch spread.
Chocolate Chip Surprise
Increase the chocolate chips to 1 cup and omit the cocoa nibs. The result is a richer chocolate flavor that pairs well with a splash of espresso for an adult twist.
Sea Salt Caramel Delight
After dusting with powdered sugar, sprinkle a pinch of sea salt over each cookie. The salt enhances the caramelized flavor and adds a savory contrast to the sweetness.
Citrus Burst
Add 1 tbsp of lemon zest to the dough for a bright, citrusy note. The zest infuses the cookies with a fresh aroma and a subtle tang that balances the richness.
Vegan Version
Replace the butter with an equal amount of melted coconut oil and use a plant‑based milk. The cookies will have a slightly tropical flavor, and they’ll still be crispy on the outside.
Spiced Latte Cookie
Stir in 1 tsp of espresso powder and a pinch of cinnamon into the dough. This gives the cookies a coffee‑spiced flavor that’s ideal for coffee lovers.
Storing and Bringing It Back to Life
Fridge Storage
Place the cooled cookies in an airtight container in the refrigerator for up to 5 days. The cool environment keeps the cookies fresh and prevents the powdered sugar from dissolving.
Freezer Friendly
For longer storage, wrap each cookie individually in plastic wrap and place them in a freezer bag. They can be frozen for up to 3 months. When you’re ready to enjoy them, let them thaw at room temperature for 30 minutes.
Best Reheating Method
Preheat the oven to 350°F (175°C). Spread the cookies on a baking sheet and bake for 3 minutes. The cookies will regain their crispness, and the powdered sugar will re‑glaze. Add a tiny splash of water before reheating to create steam that keeps the cookies moist.