The kitchen was a battlefield that morning. I had just finished a marathon baking session, frosting a dozen cupcakes, when the timer on my phone rang with a shrill “DING!” I was halfway through a batch of cookie dough, the fridge door left ajar, and the air was thick with the sweet scent of vanilla and melted butter. That was when the idea hit me like a bolt of lightning: why not turn the leftover Greek yogurt and peanut butter into a frozen bite‑size dessert that could be whipped up in minutes? It was a dare from a friend who claimed “no one could make a better frozen yogurt treat than you.”
Picture the kitchen: the counter gleaming, the fridge humming, a single bowl of creamy Greek yogurt sitting like a silent partner ready for action. The air is perfumed with honey, the faint metallic tang of peanut butter, and the unmistakable aroma of chocolate chips that promise decadence. The sound of the blender whirring, the gentle clink of spoon against bowl, and the faint hiss of the freezer door as it closes. The texture of the yogurt is silky, the peanut butter smooth, and the chocolate chips a promise of crunchy bursts. The taste, already hinted at by the sweet, nutty undertones, is waiting to be amplified into a frozen masterpiece.
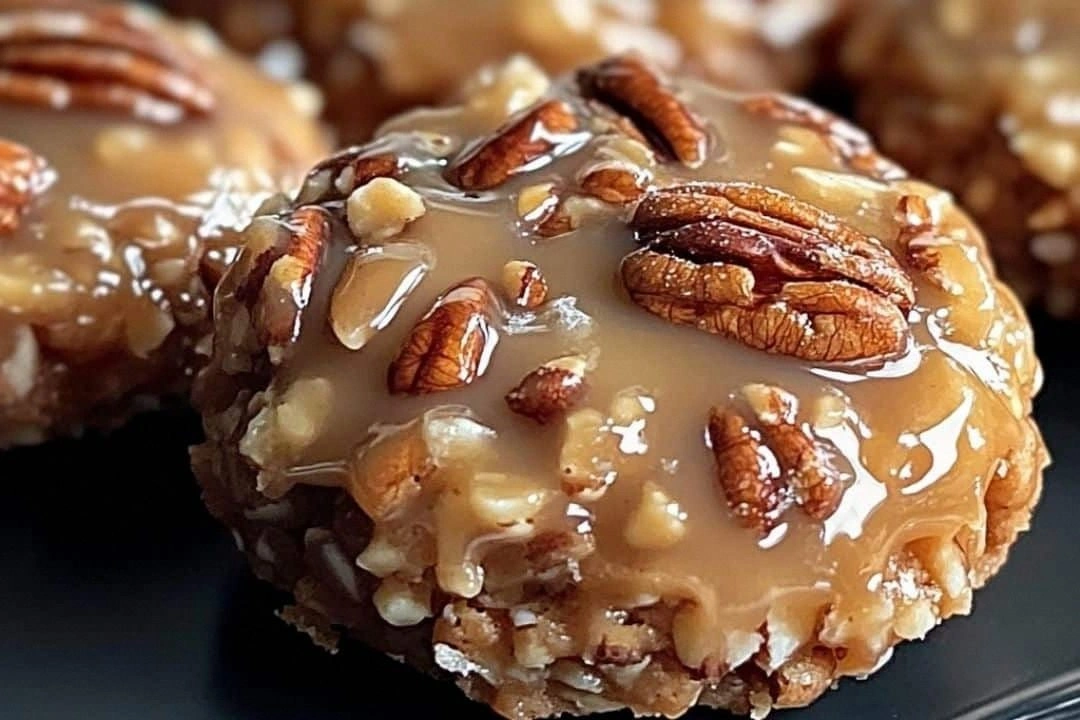
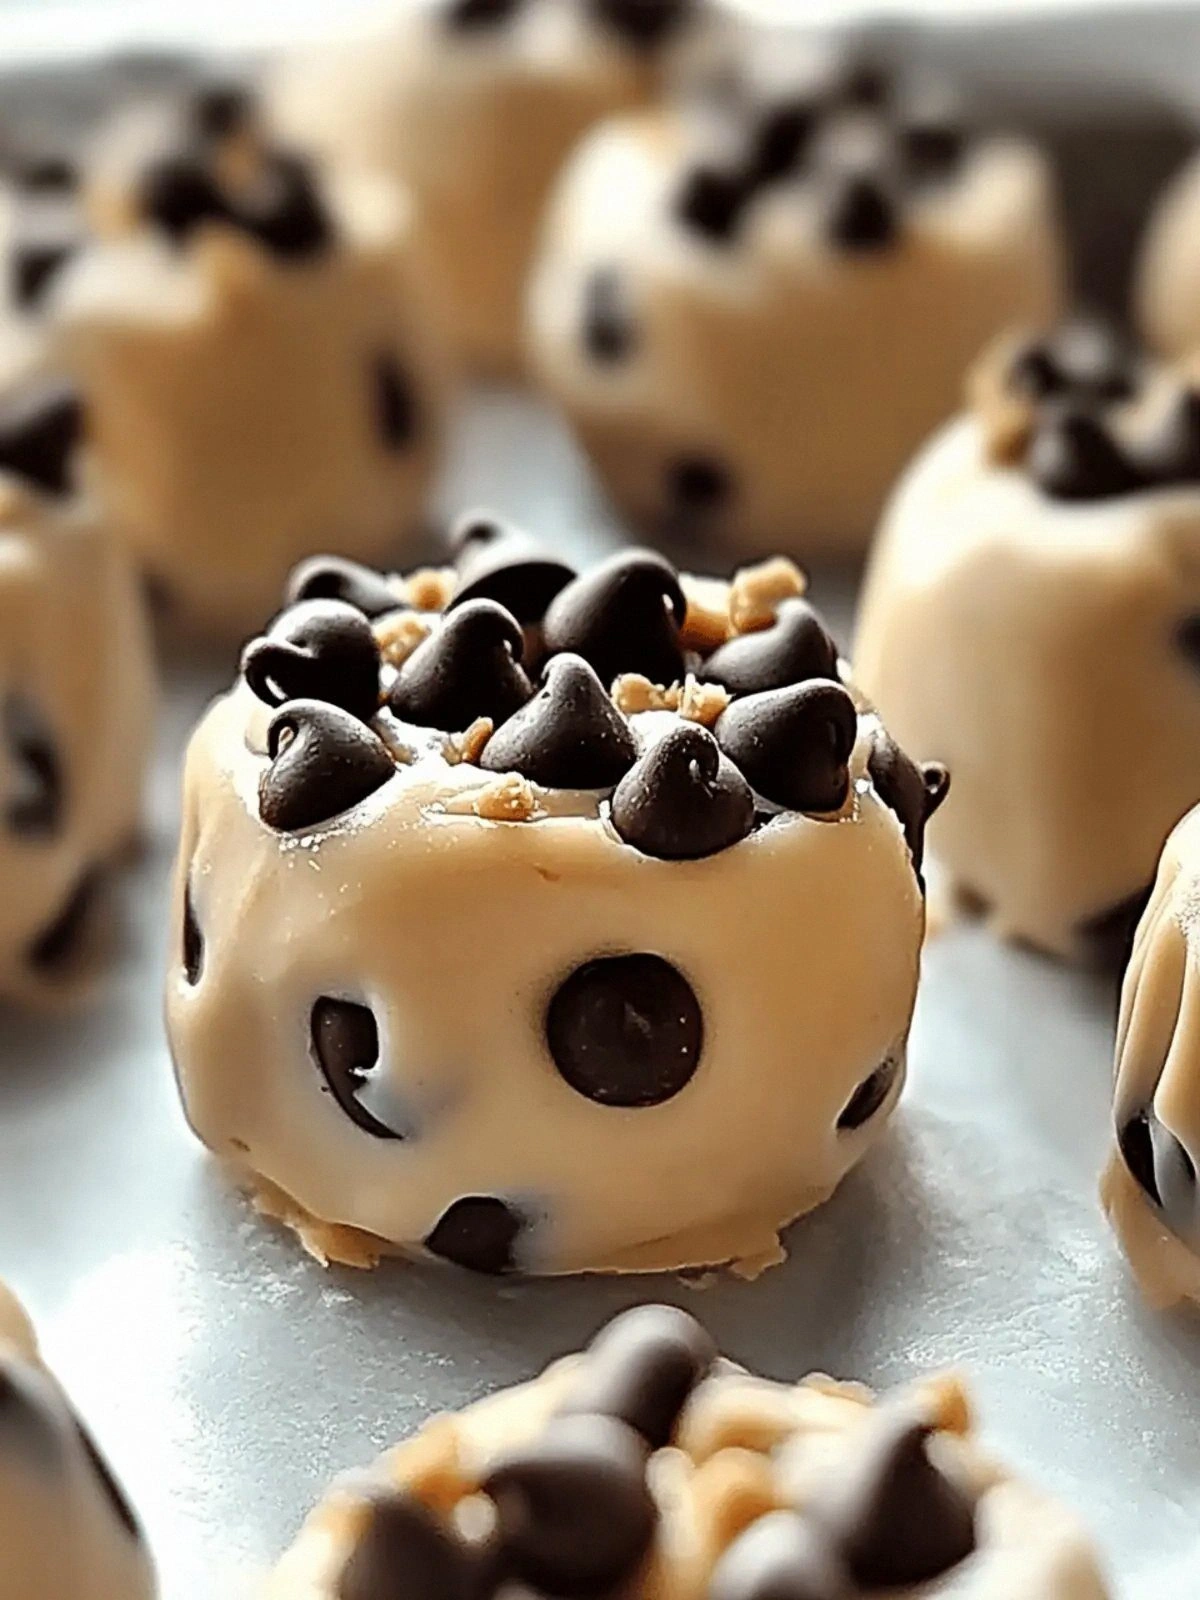
What makes this version stand out from every other frozen yogurt recipe is the meticulous balance of flavors and textures. It’s not just Greek yogurt and peanut butter; it’s a symphony of honey, vanilla, dark chocolate, mini chocolate chips, coconut oil, crushed peanuts, sea salt, and shredded coconut. Each component plays a distinct role: the honey sweetens without overpowering, the vanilla adds depth, the dark chocolate chips provide a bittersweet contrast, the coconut oil gives a silky finish, and the crushed peanuts and coconut add crunch. The result is a dessert that melts in your mouth, leaving a lingering nutty aftertaste that keeps you coming back for more. This is hands down the best version you'll ever make at home.
I dare you to taste this and not go back for seconds. I’ve been told that the first bite is so satisfying that you’ll find yourself reaching for the bowl again, even if you’re on a diet. The secret? A little trick with the coconut oil that keeps the mixture smooth and prevents it from becoming too icy. The next part of this recipe will reveal that trick, and trust me, you’ll wonder how you ever made frozen yogurt without it. Let me walk you through every single step — by the end, you'll wonder how you ever made it any other way.
What Makes This Version Stand Out
- Flavor Harmony: The combination of honey, vanilla, and peanut butter creates a balanced sweet‑savory profile that feels like a gourmet dessert without the fuss.
- Texture Contrast: Mini chocolate chips and dark chocolate chips give a delightful bite, while crushed peanuts and shredded coconut add a satisfying crunch.
- Protein Punch: Greek yogurt delivers a protein boost, turning this treat into a post‑workout snack that feels indulgent yet nourishing.
- Simple Prep: Only ten minutes of prep time, no baking or complex equipment, making it accessible for busy evenings or last‑minute parties.
- Make‑Ahead Flexibility: The mixture can be frozen for up to a week, so you can prep ahead for a gathering and have a crowd‑pleaser ready.
- All‑Natural Ingredients: No artificial additives or preservatives—just wholesome, pantry staples that taste real.
- Versatile Serving: Works as a dessert, a snack, or a party topper—just scoop onto a plate, drizzle with extra chocolate, or serve in a cup.
- Visual Appeal: The glossy, colorful appearance of the chocolate chips against the creamy base makes it Instagram‑worthy.
Alright, let's break down exactly what goes into this masterpiece…
Inside the Ingredient List
The Flavor Base
Plain Greek Yogurt: This is the backbone of the dish. It provides a tangy lift that balances the sweetness of honey and the richness of peanut butter. If you skip it, the mixture becomes too heavy and loses its signature creamy texture. A high‑fat Greek yogurt works best for a smoother mouthfeel.
Honey: Not just a sweetener; honey adds a floral nuance that complements the nutty peanut butter. It also helps lower the freezing point, keeping the mixture soft. If you prefer a lower sugar content, consider using a sugar‑free honey substitute, but note the flavor will shift slightly.
The Texture Crew
Creamy Peanut Butter: The peanut butter must be smooth and free of chunks. It provides the nutty depth and a silky body that keeps the frozen bites from cracking. If you use chunky peanut butter, the texture becomes uneven; blend it first to achieve consistency.
Dark Chocolate Chips: These bring a bittersweet punch that cuts through the sweetness. Dark chocolate also has antioxidants, making this treat a little healthier. If you’re allergic to cocoa, substitute with white chocolate chips for a sweeter profile.
The Unexpected Star
Coconut Oil: A tablespoon of coconut oil adds a subtle tropical aroma and prevents the mixture from becoming too icy. It also gives the frozen bites a glossy sheen. If you’re lactose intolerant or vegan, this ingredient is naturally dairy‑free and still works perfectly.
Crushed Peanuts: These provide crunch that contrasts with the smooth base. They also add an extra layer of peanut flavor, making the treat feel richer. If you prefer a nutty alternative, chopped almonds or cashews can be used.
The Final Flourish
Sea Salt: A pinch of sea salt elevates the flavors and balances the sweetness. If you’re watching sodium, use a low‑sodium salt or a sprinkle of Himalayan pink salt for a subtle mineral note.
Shredded Coconut: Adds a chewy, tropical texture that pairs beautifully with the chocolate. It also gives a hint of coconutty sweetness that makes the bite feel exotic. If you’re avoiding dairy, this is a perfect vegan addition.
Everything's prepped? Good. Let's get into the real action...
The Method — Step by Step
Start by placing the Greek yogurt in a large mixing bowl. Whisk it until it’s smooth and free of lumps. The texture should feel silky, almost like a thick cream. This step is crucial because any graininess will carry through the final bite. If you’re in a hurry, use a hand mixer for a few seconds to ensure uniformity.
Add the creamy peanut butter to the yogurt and blend until fully incorporated. The mixture should look like a homogenous, pale beige color. The peanut butter will give the base a subtle nutty aroma that lingers. If it feels too thick, stir in a tablespoon of almond milk to reach a pourable consistency. The goal is a silky base that freezes evenly.
Stir in the honey and vanilla extract. The honey should coat the back of a spoon, indicating it’s well distributed. The vanilla adds a depth of flavor that elevates the overall taste. Taste the mixture now; it should have a balanced sweet‑savory profile. Adjust if necessary by adding a drop more honey or vanilla.
Introduce the coconut oil, stirring until it melts and blends. This step is the trick that keeps the frozen bites from becoming too hard. The coconut oil coats the mixture, giving it a glossy sheen and a subtle tropical note. Watch for any separation; if it occurs, gently reheat the mixture in a double boiler until it’s smooth again. This will prevent icy pockets in the final product.
Fold in the dark chocolate chips and mini chocolate chips. The chocolate should be evenly distributed, creating pockets of meltable sweetness. The dark chips add a slight bitterness that balances the honey, while the mini chips give a crunchy surprise. Gently stir to avoid breaking the chips into smaller pieces. The mixture should look like a chocolate‑laden cream.
Add the crushed peanuts and shredded coconut, then sprinkle a pinch of sea salt. The peanuts add crunch, and the coconut gives a chewy texture. The sea salt should be just a hint; too much will overpower the sweet flavors. Stir until everything is evenly coated. The mixture should now look like a colorful, textured mousse.
Line a baking dish or silicone mold with parchment paper. Pour the mixture into the prepared dish, smoothing the top with a spatula. The surface should be level to ensure even freezing. Place the dish in the freezer for at least 4 hours, or until the mixture is firm but still slightly soft in the center.
Once frozen, remove the dish from the freezer and let it sit at room temperature for 5 minutes. This brief thaw allows you to cut or scoop the bites without them sticking. Use a sharp knife or a small cookie cutter to shape them into bite‑sized pieces. Arrange the bites on a platter and serve immediately, or keep them in a sealed container for later.
That's it — you did it. But hold on, I've got a few more tricks that'll take this to another level. These insider tips will help you avoid common pitfalls and elevate the flavor profile even further.
Insider Tricks for Flawless Results
The Temperature Rule Nobody Follows
Many people freeze their yogurt mixture at room temperature, leading to uneven textures. The trick is to chill the mixture in the refrigerator for 30 minutes before pouring it into the freezer. This reduces the initial temperature gap, preventing ice crystals from forming. I once froze a batch at room temp, and it turned into a slushy mess. That lesson taught me the importance of pre‑cooling.
Why Your Nose Knows Best
Smell is your best ally when judging readiness. A faint nutty aroma indicates the chocolate has melted into the base. If you notice a strong coconut scent, the mixture may still be too wet. Trust your nose; it will tell you when the texture is just right. I’ve found that the aroma of honey rising to the surface signals the perfect balance.
The 5‑Minute Rest That Changes Everything
After removing the frozen bites from the dish, let them rest for 5 minutes before cutting. This short pause allows the surface to firm up, reducing the chance of sticking. It also gives the chocolate a chance to set slightly, creating a more satisfying bite. I’ve seen this trick used by professional chefs for parfaits and ice cream bars.
Crunch Control
If you prefer a softer bite, reduce the amount of crushed peanuts. For a crunchier experience, increase the peanuts and add a few extra mini chocolate chips. The key is balance; too many peanuts can overpower the yogurt base. Experiment with different nut types to discover your favorite texture.
Serving Size Matters
This recipe makes about 20 bite‑sized servings for a party of eight. If you’re cooking for a smaller group, simply halve the recipe and adjust the freezer time accordingly. Keep in mind that the mixture will freeze faster in a smaller mold, so keep an eye on it to avoid over‑freezing.
Flavor Layering
For an extra flavor dimension, drizzle a thin line of melted dark chocolate over the top of the frozen bites before serving. The chocolate will set into a glossy glaze, adding a glossy finish and a subtle bitterness that contrasts the sweetness. This step is optional but highly recommended for those who love a chocolate finish.
Creative Twists and Variations
This recipe is a playground. Here are some of my favorite ways to switch things up:
Minty Matcha Delight
Swap half the dark chocolate chips for matcha powder and add a splash of green tea extract. The earthy matcha pairs beautifully with the honey and peanut butter, creating a refreshing twist. Perfect for a spring gathering.
Caramelized Banana Bites
Fold in mashed ripe banana and a pinch of cinnamon. The banana adds natural sweetness and a creamy texture. Sprinkle a few caramelized sugar crystals on top for a sweet‑savory crunch.
Almond & Honey Swirl
Replace the peanut butter with almond butter and drizzle honey on top before freezing. The almond butter provides a slightly nutty, buttery flavor that complements the honey. This variation is ideal for peanut‑allergy sufferers.
Chocolate‑Covered Coconut Crunch
Add an extra 1/2 cup of shredded coconut and drizzle melted dark chocolate over the top before freezing. The chocolate coating will set into a crunchy shell, giving the bite a satisfying snap.
Spiced Chili Peanut Bites
Introduce a pinch of cayenne pepper and a dash of smoked paprika to the mixture. The heat will contrast with the sweetness, creating a complex flavor profile. This version is great for adventurous eaters who love a kick.
Berry‑Infused Yogurt Bites
Blend in a handful of frozen berries (strawberries or blueberries) before freezing. The berries will infuse the yogurt with a natural fruit flavor, and the burst of juice adds a refreshing note. This is a perfect summer treat.
Storing and Bringing It Back to Life
Fridge Storage
Store the frozen bites in an airtight container in the freezer for up to two weeks. Keep them wrapped in parchment paper or a silicone liner to prevent sticking. When ready to serve, let them sit at room temperature for 5 minutes before scooping.
Freezer Friendly
If you need to keep the bites for longer, place them in a resealable freezer bag and remove as much air as possible. This will help prevent freezer burn and preserve flavor. Label the bag with the date so you know when to use them.
Best Reheating Method
To bring the bites back to a creamy consistency, microwave them in 15‑second bursts, stirring in between. Alternatively, place them in a bowl of warm water for a few minutes. Add a tiny splash of water before reheating; it steams back to perfection, restoring the silky texture.