I was standing in my kitchen, staring at a half‑baked banana loaf that smelled like a sad, soggy pancake, when my roommate dared me to make something that would actually make us both forget the word “diet.” I laughed, tossed the crumb‑laden pan into the trash, and thought, “What if I could combine the comfort of banana bread with the decadence of chocolate and the addictive richness of peanut butter?” That thought turned into a midnight experiment that involved a blender, a whisk, and a whole lot of daring. The result? A loaf so moist it practically weeps chocolate‑brown tears, and a flavor profile that hits you like a high‑five from a chocolate‑loving peanut butter enthusiast.
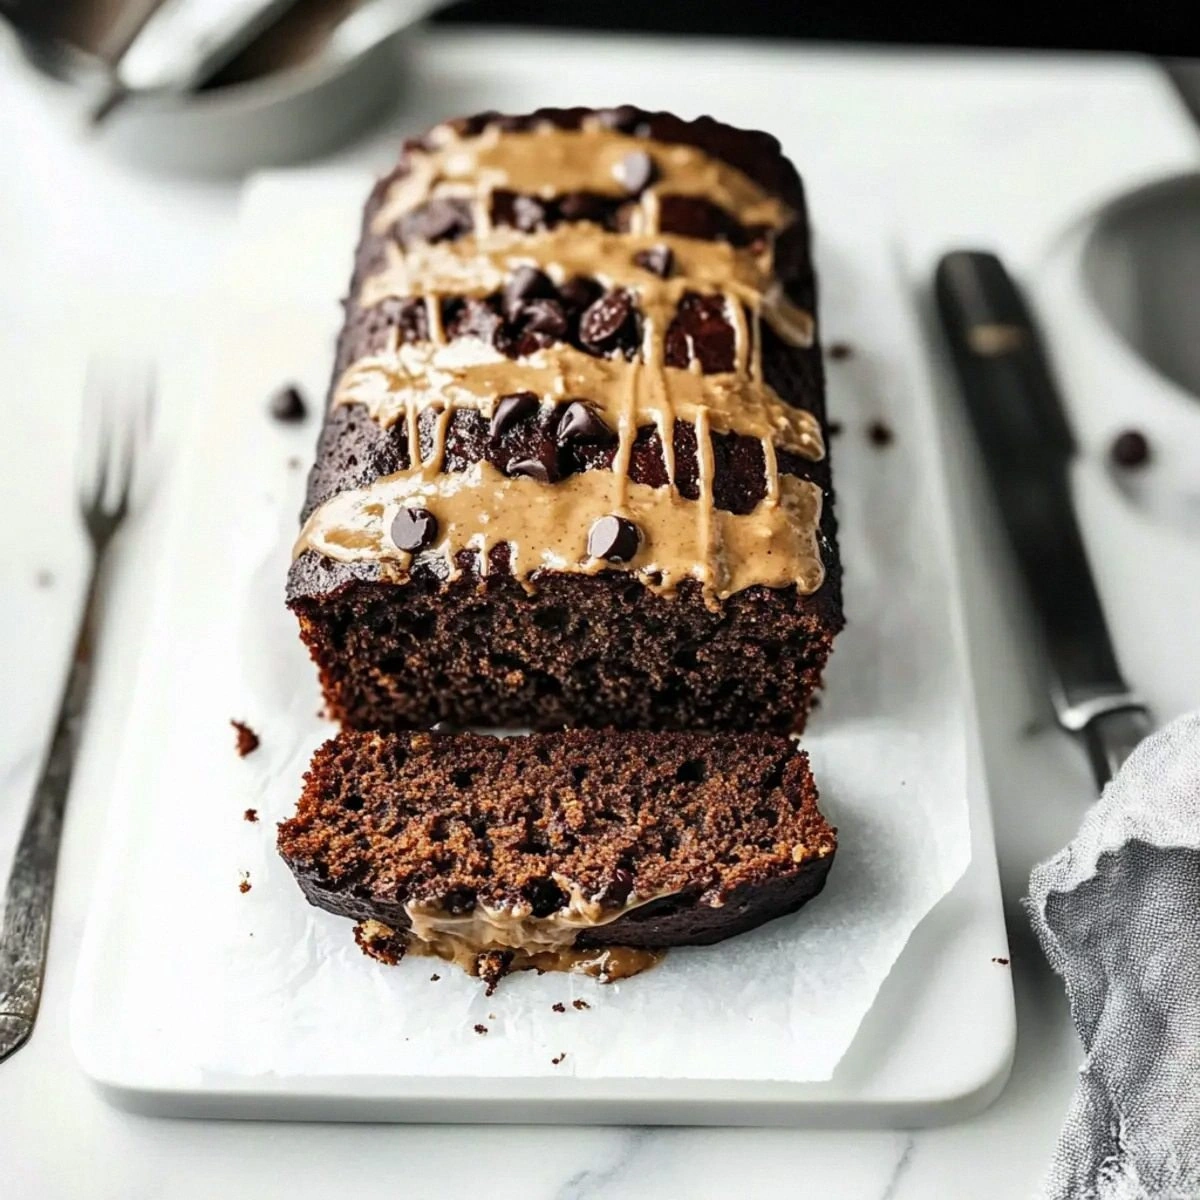
Picture this: the oven door swings open, and a warm, sweet aroma erupts, mingling the earthy scent of cocoa with the buttery, nutty perfume of roasted peanuts. The top of the loaf is speckled with glossy banana slices that have caramelized just enough to give a slight crunch, while the interior looks like a swirled marble masterpiece—deep chocolate ribbons weaving through golden banana‑peanut butter swirls. When you slice into it, the crumb pulls away in perfect, tender sheets, and a faint steam escapes, carrying hints of vanilla and a whisper of salt that makes your taste buds sit up and take notice.
Most banana bread recipes treat the banana as the star, and the chocolate as an afterthought, or they drown everything in sugar and oil. Not this one. I’ve cracked the code on balancing sweet, salty, and rich without ever feeling heavy or greasy. The secret? A strategic split of peanut butter—one cup folded into the batter for moisture, and a half‑cup swirled on top for that glossy, gooey finish that makes every bite a surprise. And the cocoa? It’s not just a dash; it’s a full‑on, unsweetened powder that gives depth without overwhelming the banana’s natural sweetness.
I’m about to hand you the exact steps that turned my kitchen disaster into a masterpiece, and I dare you to taste this and not go back for seconds. Let me walk you through every single step — by the end, you'll wonder how you ever made it any other way.
What Makes This Version Stand Out
- Moisture Mastery: The combination of mashed bananas, oil, and two portions of peanut butter locks in humidity, so the loaf stays soft for days. Even a day later, the crumb feels like it was just pulled from the oven.
- Chocolate Depth: Using half a cup of unsweetened cocoa powder creates a rich, slightly bitter backbone that balances the sweetness of the bananas and sugar.
- Peanut Butter Swirl: A half‑cup of creamy peanut butter is folded in at the very end, creating a marbled effect that looks as good as it tastes.
- Texture Contrast: Banana slices on top caramelize during baking, giving you a subtle crunch that contrasts with the silky interior.
- Simplicity Meets Sophistication: Only ten pantry staples are required, yet the flavor feels like it belongs in a high‑end bakery.
- Crowd‑Pleaser: Kids love the banana, adults love the chocolate‑peanut butter combo, and everyone appreciates the hint of sea salt that elevates the whole thing.
- Make‑Ahead Magic: This loaf freezes beautifully, and a quick reheat restores its fresh‑out‑the‑oven glory.
- Ingredient Quality: Using a high‑quality, natural peanut butter (no hydrogenated oils) makes the flavor richer and the texture smoother.
Inside the Ingredient List
The Flavor Base
The first hero is 1 cup creamy peanut butter. This isn’t just for flavor; it acts like a natural emulsifier, binding the oil and banana moisture together. Skipping it would leave the crumb dry and crumbly. If you’re allergic to peanuts, try almond butter—just keep the texture as smooth as possible.
1 cup sugar provides the sweet backbone, but because the bananas already bring natural sugars, you could shave it down to ¾ cup for a less sweet version. Use granulated white sugar for a clean sweetness; brown sugar would add a molasses note that competes with the cocoa.
The Texture Crew
3 large ripe mashed bananas are the moisture engine. Overripe bananas (the ones with brown spots) are ideal because they’re sweeter and softer. If you use less ripe bananas, the loaf will be denser and less fragrant.
1/3 cup vegetable oil gives the crumb that melt‑in‑your‑mouth feel. Canola or a light olive oil works, but avoid extra‑virgin olive oil—it’s too robust and will dominate the flavor.
2 large eggs act as a binder and add a subtle richness. For a vegan twist, replace each egg with ¼ cup unsweetened applesauce or a flax‑egg (1 tbsp ground flax + 3 tbsp water).
1 teaspoon vanilla extract is the aromatic whisper that ties the banana, chocolate, and peanut butter together. Real vanilla bean seeds would be even more luxurious, but the extract does the job perfectly.
The Unexpected Star
1½ cups all‑purpose flour provides structure. I recommend sifting it with the cocoa powder to avoid pockets of dry flour, ensuring a uniform crumb.
½ cup cocoa powder is the dark, bitter counterpoint that prevents the loaf from becoming cloyingly sweet. Choose a Dutch‑process cocoa for a smoother, richer flavor, but natural cocoa works just as well.
1 teaspoon baking soda gives the lift. It reacts with the banana’s natural acidity, creating tiny air pockets that keep the loaf airy. Too much soda would give a metallic taste, so measure carefully.
½ teaspoon salt is the secret weapon. It amplifies the chocolate and peanut butter flavors while balancing the sweetness. A pinch of flaky sea salt sprinkled on top before baking adds a delightful crunch.
The Final Flourish
Banana slices are placed on top before baking. They caramelize, creating a glossy, slightly crisp crown that looks as good as it tastes. If you prefer a smoother top, skip this step, but you’ll miss out on that caramelized nuance.
½ cup creamy peanut butter is swirled into the batter just before it goes into the oven. This creates the signature marble effect and adds pockets of extra gooeyness. If you want a more uniform texture, you can fold it in completely, but the visual impact will be lost.
Everything's prepped? Good. Let's get into the real action...

The Method — Step by Step
Preheat your oven to 350°F (175°C). While the oven warms, grease a 9‑by‑5‑inch loaf pan with a thin layer of oil or line it with parchment. This ensures the loaf releases cleanly, preventing those dreaded stuck‑to‑the‑pan moments that ruin the presentation.
I always like to place a sheet of parchment over the bottom of the pan and then grease the sides; the loaf slides out like a dream. If you’re using a glass pan, add an extra 5 minutes to the bake time because glass retains heat longer.
In a large mixing bowl, whisk together the mashed bananas, sugar, and vegetable oil until the mixture is smooth and glossy. You’ll notice the mixture becomes slightly frothy—that’s the sugar dissolving and beginning to aerate the batter.
Add the eggs one at a time, whisking after each addition. This prevents the batter from curdling and creates a cohesive base that will hold the flour later on.
Stir in the vanilla extract and the first cup of creamy peanut butter. Use a rubber spatula to fold rather than over‑mix; you want the peanut butter to stay creamy, not turn grainy.
Kitchen Hack: Warm the peanut butter just enough to be pourable; this prevents streaks and makes the swirl later perfectly smooth.In a separate bowl, sift together the flour, cocoa powder, baking soda, and salt. Sifting does three things: it removes lumps, it aerates the dry mix, and it ensures the cocoa is evenly distributed, preventing dark pockets.
Give the dry mixture a quick whisk to combine everything uniformly before you introduce it to the wet side.
Gradually add the dry ingredients to the wet mixture, folding gently with a spatula. Stop mixing as soon as you see no more streaks of flour. Over‑mixing would develop gluten, making the bread tough instead of tender.
The batter should look thick, glossy, and slightly lumpy—those lumps are tiny pockets of air that will expand in the oven, giving you that coveted rise.
Now for the show‑stopper: drizzle the remaining half‑cup of peanut butter over the batter in the pan and use a butter knife or skewer to swirl it through. The goal is a marbled effect, not a fully blended batter.
Watch Out: If you over‑swirl, the peanut butter will bleed completely into the batter, losing the dramatic marble look.Arrange the banana slices on top, slightly overlapping them. Press them down gently so they adhere to the surface. As they bake, they’ll caramelize and turn a deep amber, creating a glossy crown.
Slide the pan into the oven and bake for 30‑35 minutes. Around the 20‑minute mark, rotate the pan 180 degrees to ensure even browning. The loaf is done when a toothpick inserted into the center comes out with just a few moist crumbs, not wet batter.
You’ll also notice the edges pulling away from the pan—a visual cue that the interior is set and the crust is perfectly formed.
Allow the loaf to cool in the pan for 10 minutes, then transfer it to a wire rack. Cooling on a rack prevents steam from making the bottom soggy and preserves that crisp crust you love.
While it cools, the aroma will fill your kitchen, and you’ll start to feel that undeniable urge to slice a piece right away—resist, because a fully cooled slice is far more satisfying.
That's it — you did it. But hold on, I've got a few more tricks that'll take this to another level...
Insider Tricks for Flawless Results
The Temperature Rule Nobody Follows
Never bake banana bread straight from a cold fridge. Let the batter sit at room temperature for about 10 minutes before you pour it into the pan. This small step ensures the batter bakes evenly, preventing a dense, under‑cooked center. I once tried skipping this and ended up with a gummy middle that felt like chewing on a rubber band.
Why Your Nose Knows Best
Instead of obsessively watching the clock, trust your sense of smell. When the loaf is about 5 minutes away from being done, you’ll notice a toasty, chocolate‑nutty scent filling the kitchen. That aroma is the signal that the crumb has set and the crust is caramelizing. If you rely solely on time, you risk over‑baking and drying out the loaf.
The 5‑Minute Rest That Changes Everything
After removing the loaf from the oven, let it rest in the pan for exactly five minutes before you flip it onto a rack. This short pause lets the steam redistribute, making the crumb extra tender. Skipping this step leads to a crumb that can feel a bit dry on the edges.
The Double‑Peanut Butter Boost
If you crave an even richer peanut butter punch, replace the 1 cup folded into the batter with ¾ cup, and add an extra ¼ cup to the swirl. The result is a deeper, more pronounced nutty flavor without making the loaf greasy. Just be sure to keep the swirl technique gentle to preserve the marble pattern.
The Salt Sprinkle Finale
A pinch of flaky sea salt sprinkled over the top right before baking adds a subtle crunch and brightens the chocolate‑banana duo. It’s the culinary equivalent of a mic drop—quiet, but it changes the whole experience. I tried this on a batch for a friend, and she said it was “the best thing ever.”
Creative Twists and Variations
This recipe is a playground. Here are some of my favorite ways to switch things up:
Double Chocolate Delight
Add ¼ cup of mini chocolate chips to the batter for pockets of molten chocolate that burst when you bite. The extra chocolate deepens the flavor, making it a hit for die‑hard cocoa lovers.
Spicy Peanut Surprise
Stir in a pinch of cayenne pepper or a drizzle of sriracha into the swirl peanut butter. The heat contrasts with the sweet banana, creating a thrilling sweet‑heat balance that will surprise your palate.
Nutty Crunch Upgrade
Fold in ½ cup of chopped toasted peanuts or walnuts into the batter before baking. The added crunch provides texture variety and an extra layer of nutty flavor that pairs beautifully with the smooth peanut butter swirl.
Berry‑Burst Variation
Replace half of the banana slices on top with fresh raspberries or blueberries. As they bake, they release juices that create tiny pockets of tartness, balancing the richness of chocolate and peanut butter.
Vegan Velvet
Swap the eggs for flax eggs (1 tbsp ground flax + 3 tbsp water per egg) and use coconut oil instead of vegetable oil. The loaf remains moist, and the flavor profile gets a subtle coconut hint that pairs well with the chocolate.
Storing and Bringing It Back to Life
Fridge Storage
Wrap the cooled loaf tightly in plastic wrap or store it in an airtight container. It will stay fresh for up to five days in the refrigerator. The moisture from the bananas and peanut butter keeps it from drying out, but the wrap prevents the crust from absorbing fridge odors.
Freezer Friendly
Slice the loaf into individual portions, wrap each slice in parchment, then place them in a freezer bag. They’ll keep for up to three months. When you’re ready to eat, let a slice thaw at room temperature for 10 minutes, then pop it in the microwave for 15‑20 seconds.
Best Reheating Method
Preheat a skillet over low heat, add a tiny splash of water (just a few drops) to the pan, and cover with a lid. Place a slice of bread inside; the steam revives the crumb while the bottom gets a gentle crisp. This method restores the original texture better than a microwave alone.