It started with a kitchen catastrophe that still haunts my pantry—an over‑mixed batch of shortbread that turned into a rubbery, flavorless slab. I was standing there, butter melting into a puddle, sugar clumping like a snowstorm, and the thought that “I could have done better” burning brighter than the oven light. That night, I vowed to reinvent the humble shortbread into something that would make my taste buds dance, my friends swoon, and my Instagram feed go viral. I’m talking about the ultimate sweet chocolate shortbread with toffee, a cookie that marries buttery richness with a caramelized crunch and a chocolatey kiss.
Picture the kitchen: a warm, buttery scent filling the air, the sound of a wooden spoon rhythmically beating against the bowl, and the faint hiss of butter melting. The dough itself feels like a silky, slightly gritty cloud that clings to your fingers. When you bake it, the edges puff up like a golden sunrise, while the center stays soft, almost like a molten chocolate dream. The first bite releases a burst of sweet, salty, chocolate, and caramel flavors that mingle on the tongue, leaving a lingering buttery aftertaste that makes you reach for a second cookie. It’s that moment of pure bliss that I’ve been chasing for years, and now I’m finally sharing the secret.
I know you’re probably thinking, “What makes this version different?” The answer is simple: I’ve cracked the code on texture, flavor layering, and the perfect balance of sweetness. I’ve also discovered a technique that gives the dough a melt‑in‑your‑mouth quality that most recipes miss. I dare you to taste this and not go back for seconds—because once you’ve had one, the rest will feel like a guilty indulgence you’ll have to admit you love. My goal? To give you a cookie that’s not just a cookie but a sweet, buttery, chocolatey hug you can share with the world.
Now, let’s dive deep. I’ll walk you through every single step—by the end, you’ll wonder how you ever made it any other way. Get your apron on, because this is going to be a sweet, buttery, chocolatey adventure that will change your cookie game forever.
What Makes This Version Stand Out
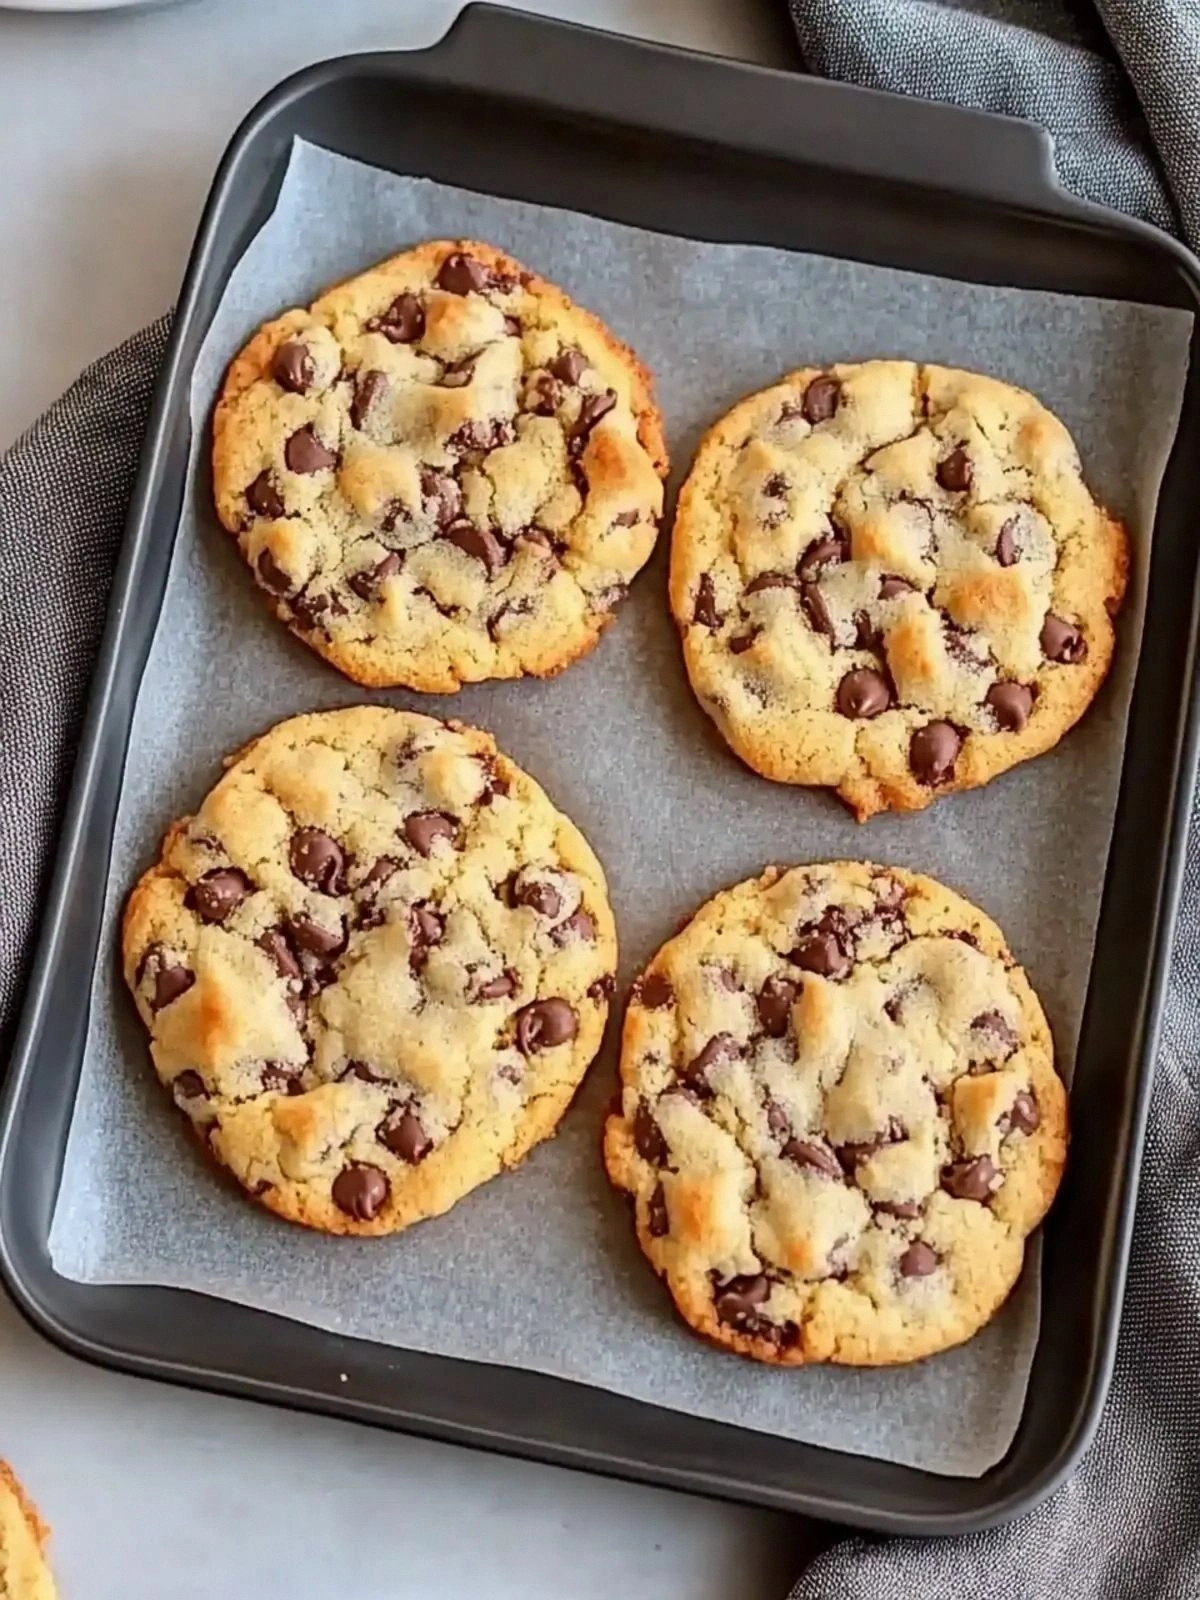
- Flavor: The combination of salted butter, vanilla, chocolate morsels, and toffee pieces creates a complex, layered taste that feels indulgent without being cloying. Each bite offers a burst of chocolate, a hint of caramel, and a subtle salty finish that keeps the palate intrigued.
- Texture: The dough is firm enough to hold its shape yet soft enough to melt in your mouth. The toffee adds a satisfying crunch that contrasts beautifully with the smooth chocolate.
- Ingredient Quality: Using high‑grade salted butter and premium chocolate morsels elevates the entire cookie, turning a simple shortbread into a gourmet treat.
- Make‑Ahead: The dough can be prepared a day ahead, refrigerated, and baked fresh, which means you can focus on other things while the cookies finish their final transformation.
- Crowd Reaction: Friends and family rave about the balance of sweet and salty, and the cookies keep disappearing in seconds.
- Minimal Steps: Despite the depth of flavor, the method is straightforward—no complex techniques, just a few key steps that deliver professional results.
- Versatility: The base can be tweaked for vegan or gluten‑free versions without compromising the core experience.
- Visual Appeal: The glossy chocolate chips and glossy toffee pieces give the cookies a stunning look that’s perfect for special occasions.
Alright, let’s break down exactly what goes into this masterpiece…
Inside the Ingredient List
The Flavor Base
Salted butter is the cornerstone of this cookie, providing a rich, savory depth that balances the sweetness of the sugar and chocolate. Its high fat content ensures a tender crumb and a glossy finish. If you replace salted butter with unsalted, you’ll need to add a pinch of sea salt to mimic the salty undertone. For a dairy‑free version, coconut butter offers a subtle tropical hint, but be cautious as it can alter the melt‑in‑your‑mouth feel.
The Texture Crew
All‑purpose flour gives the cookie structure while keeping it light. The ratio of flour to butter is critical; too much flour and the cookies become crumbly, too little and they collapse. A good rule of thumb is to sift the flour to incorporate air and prevent clumps. If you prefer a gluten‑free option, use a 1:1 blend of rice flour and potato starch for similar results.
The Unexpected Star
Mini chocolate morsels are more than just chocolate—they’re a textural contrast that melts slightly during baking, leaving a gooey center. Using dark chocolate morsels adds a slightly bitter note that offsets the sugar. If you’re a white chocolate lover, simply swap the morsels for white chocolate pieces; the flavor profile will shift but remain delightful.
The Final Flourish
Toffee pieces are the secret weapon that adds crunch and caramel sweetness. Their buttery, caramelized flavor deepens the cookie’s profile. If you can’t find pre‑made toffee, you can make your own by caramelizing sugar in a pan, then adding butter and vanilla, and letting it cool into chunks. For a nutty twist, sprinkle chopped pecans or walnuts over the dough before baking.
Everything’s prepped? Good. Let’s get into the real action…
The Method — Step by Step
- Step 1: Cream the Butter and Sugar. In a large mixing bowl, combine the salted butter and confectioners’ sugar. Beat on medium speed until the mixture is light, fluffy, and pale. The butter should be at room temperature so it incorporates smoothly. This step is crucial for achieving that tender crumb. Keep an eye on the mixture; once it starts to lighten, you’re in the zone.
- Step 2: Add Vanilla. Pour the vanilla extract into the creamed mixture and mix until fully integrated. Vanilla adds a warm, aromatic undertone that elevates the chocolate. Don’t rush; let the flavors mingle for a minute. This is the moment where the dough starts to smell like a bakery. Feel free to adjust the amount if you prefer a stronger vanilla note.
- Step 3: Combine Dry Ingredients. In a separate bowl, whisk together the all‑purpose flour. Sift it once more to avoid lumps. This ensures a light, airy texture. Add a pinch of sea salt if you used unsalted butter. The dry mix should be fluffy and ready to fold into the wet ingredients.
- Step 4: Fold in Flour. Slowly add the flour mixture to the creamed butter, mixing on low speed until just combined. Over‑mixing will develop gluten and make the cookie tough. The dough should be cohesive but still a bit crumbly. If it’s too dry, add a teaspoon of milk; if too wet, add a tablespoon more flour.
- Step 5: Fold in Chocolate and Toffee. Gently fold in the mini chocolate morsels and toffee pieces. Spread them evenly to ensure each bite has a balanced flavor. The toffee will caramelize slightly, giving a buttery crunch. This step is pure joy; watch those morsels glimmer in the bowl. Remember, less is more—overloading can make the dough greasy.
- Step 6: Chill the Dough. Wrap the dough in plastic wrap and refrigerate for at least 30 minutes. This firm‑up step reduces spreading during baking and locks in flavors. The dough should feel firm to the touch, not sticky. If you’re short on time, a quick chill of 10 minutes will still yield great results. Keep the dough chilled until you’re ready to bake.
- Step 7: Preheat and Prepare Baking Sheet. Preheat the oven to 350°F (175°C). Line a baking sheet with parchment paper or a silicone mat. This prevents sticking and ensures even heat distribution. Place the sheet on the middle rack for optimal baking. The oven should be fully preheated before the dough goes in.
- Step 8: Shape and Bake. Roll the chilled dough into 1-inch balls and place them on the prepared sheet, spacing them about 2 inches apart. Flatten each ball slightly with the palm of your hand or the bottom of a glass. Bake for 12–15 minutes, or until the edges are golden and the centers are set. The cookies should still feel soft in the middle. Let them cool on the sheet for 5 minutes before transferring to a wire rack.
- Step 9: Cool and Store. Once the cookies are cool, taste the first one—there’s no better test. Store in an airtight container at room temperature for up to a week. For longer freshness, keep them in the fridge or freezer. The cookies stay fresh longer when they’re in a sealed container. If you’re storing them in the freezer, thaw at room temperature for 15 minutes before serving.
That's it — you did it. But hold on, I've got a few more tricks that'll take this to another level…
Insider Tricks for Flawless Results
The Temperature Rule Nobody Follows
Many bakers bake at 375°F, but lowering the temperature to 350°F gives the cookies a gentle rise and a perfectly golden edge. This subtle drop in heat prevents the butter from separating too quickly, keeping the cookie tender. I’ve baked this recipe at 350°F for years and the results are consistently buttery and soft. If you’re in a hurry, you can bump it up to 375°F, but be prepared for a slightly firmer texture.
Why Your Nose Knows Best
Before you pull the cookies out of the oven, pause and inhale. A subtle sweet, buttery aroma means the chocolate is just starting to melt. If the scent is overpoweringly sweet, the cookies are overbaked and will be dry. Trust your nose; it’s the most reliable indicator of doneness. A quick sniff can save you from a batch of over‑baked cookies.
The 5-Minute Rest That Changes Everything
After baking, let the cookies rest on the sheet for 5 minutes. During this time, the heat continues to distribute evenly, creating a more uniform crumb. Skipping this step can leave the edges too crisp and the center under‑cooked. A short rest also makes the cookies easier to transfer to a wire rack without breaking.
Use a Silicone Mat for Even Baking
Silicone baking mats provide a consistent, non‑stick surface that eliminates the need for parchment paper. They also help maintain even heat distribution, ensuring that each cookie bakes uniformly. If you don’t have a silicone mat, parchment paper works just fine, but double‑layering can help mimic the evenness of silicone.
Keep the Dough Cold Until Baking
Even if you’re in a rush, keep the dough in the fridge until the oven is preheated. Cold dough spreads less, preserving the cookie’s shape. If you’re short on time, a quick chill of 10 minutes will still reduce spread, but the cookies will be a little softer.
Creative Twists and Variations
This recipe is a playground. Here are some of my favorite ways to switch things up:
Nutty Crunch
Swap the toffee pieces with chopped toasted pecans or walnuts. The nutty flavor adds a savory depth that pairs beautifully with the chocolate. The crunch remains, but the caramel notes are replaced by a subtle earthiness. Perfect for fall gatherings.
Minty Delight
Add a teaspoon of peppermint extract to the vanilla stage. The mint will cut through the sweetness, leaving a refreshing aftertaste. Pair with dark chocolate morsels for a sophisticated flavor profile. Great for holiday parties.
Spiced Variation
Stir in 1/2 teaspoon of ground cinnamon and a pinch of cayenne pepper before adding the flour. The warm spice complements the chocolate, while a hint of heat adds intrigue. This version works well for a cozy winter afternoon.
Vegan Version
Replace the butter with coconut oil and use a dairy‑free confectioners’ sugar. Swap the chocolate morsels for dairy‑free chocolate chips. The texture may be slightly firmer, but the flavor remains decadent. Ideal for plant‑based guests.
Gluten‑Free Twist
Use a 1:1 blend of rice flour and potato starch in place of all‑purpose flour. The cookies will still be tender and slightly chewy. Keep the rest of the ingredients unchanged. This version is suitable for gluten‑sensitive diners.
Holiday Edition
Replace the mini chocolate morsels with mini eggnog‑flavored candies and add a sprinkle of crushed gingerbread cookies. The holiday spices mingle with the buttery base, creating a festive treat. Serve alongside hot cocoa for a full experience.
Storing and Bringing It Back to Life
Fridge Storage
Keep the cookies in an airtight container at room temperature for up to a week. The butter will firm slightly, but the cookies remain moist. If the cookies become too firm, let them sit at room temperature for a few minutes before serving.
Freezer Friendly
Place the cookies on a parchment‑lined tray and freeze until solid, then transfer to a freezer bag. They can be stored for up to three months. To thaw, leave at room temperature for 30 minutes. This method preserves the texture and flavor.
Best Reheating Method
Reheat in a preheated oven at 300°F (150°C) for 5 minutes, or until warmed through. For a quick fix, microwave on low power for 10–15 seconds. Adding a tiny splash of water before reheating creates steam, keeping the cookies soft and fresh.