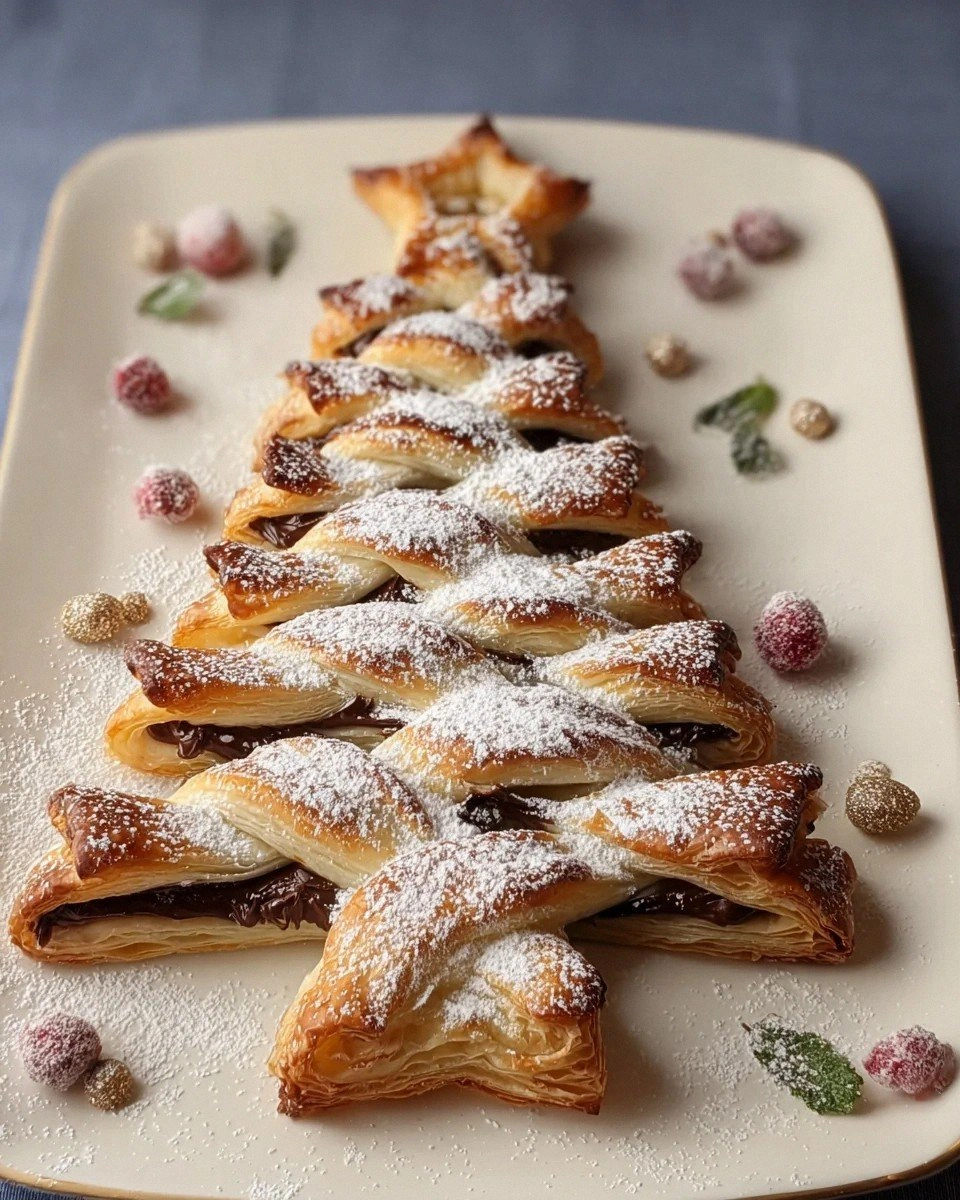
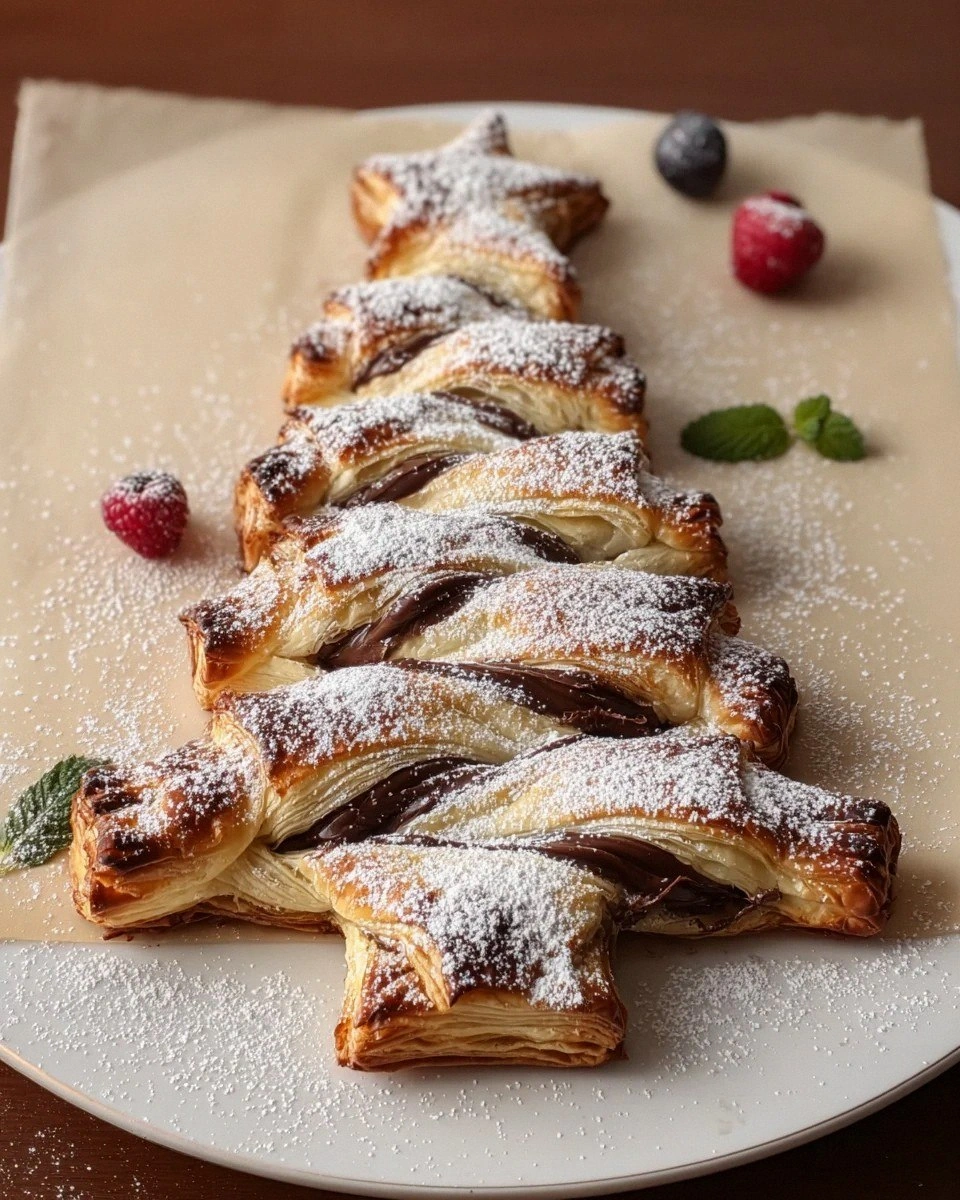
I still remember the Christmas Eve when my sister dared me to make something "Instagram-worthy" with the random ingredients left in my kitchen. There I was, staring at a half-eaten jar of Nutella and some puff pastry that was about to expire. What started as a panic-induced baking session turned into the most requested holiday dessert in our family. The first time I pulled this golden, flaky Christmas tree from the oven, my nephew literally gasped and asked if I was secretly a pastry chef. The smell alone — that intoxicating blend of buttery layers melting into chocolate-hazelnut heaven — had everyone abandoning the gingerbread house to crowd around the kitchen island.
Here's the thing about most puff pastry desserts: they're either too fussy or they taste like you bought them from a gas station. This Christmas tree breaks all the rules. We're talking about layers so delicate they shatter like autumn leaves, revealing rivers of molten Nutella that somehow stay perfectly contained within crisp, golden branches. The secret? It's not about being a pastry wizard — it's about knowing exactly when to fold, when to chill, and when to let the oven do its magic. I dare you to taste this and not go back for seconds (okay, maybe thirds — I won't judge).
What makes this recipe absolutely foolproof is that I've made every mistake possible so you don't have to. I've had trees that looked like they'd been through a hurricane, ones where all the Nutella leaked out like a chocolate crime scene, and versions that tasted more like cardboard than Christmas. After two years of testing (and probably consuming my body weight in puff pastry), I've cracked the code. The result? A show-stopping centerpiece that looks like it took culinary school training, but actually requires nothing more than a rolling pin and some patience.
Picture yourself pulling this out of the oven, the whole kitchen smelling like a Parisian patisserie got into the holiday spirit. The tree stands tall on your baking sheet, its branches dusted with snowy powdered sugar, the Nutella peeking through the layers like hidden treasure. Your guests will think you spent hours on this. Little do they know, the hardest part is waiting for it to cool enough that you don't burn your tongue on the molten chocolate. Let me walk you through every single step — by the end, you'll wonder how you ever made it any other way.
What Makes This Version Stand Out
Zero Leakage Guarantee: Most recipes turn into a chocolate lava disaster, but my folding technique creates natural barriers that keep every drop of Nutella exactly where it belongs. The layers seal themselves as they bake, creating these perfect little chocolate pockets that burst in your mouth instead of all over your baking sheet.
Speed Demon Assembly: While traditional Danish pastries take hours of laminating, this beauty comes together in under 45 minutes. We're using store-bought puff pastry, but with my special treatment it tastes like you spent the whole day folding butter into dough. The key is in how you handle and layer it — I'll show you exactly what to do.
Instagram Gold: This isn't just delicious — it's a total show-stopper. The tree shape creates natural serving portions, each branch pulling apart to reveal those gorgeous chocolate layers. Your holiday photos will look like they're straight out of a food magazine, and yes, everyone will ask for your secret.
Make-Ahead Magic: Here's where I get really excited — you can assemble this completely, freeze it raw, and bake it straight from frozen when guests arrive. It actually bakes better this way, the layers rising higher and the chocolate staying perfectly molten. Future you is going to thank present you so hard.
Texture Paradise: We're talking about the perfect contrast — shatteringly crisp exterior giving way to soft, flaky layers, all wrapped around that silky Nutella. The bottom caramelizes slightly, creating these delightful chewy bits that will have everyone fighting over the trunk pieces.
Crowd Control: This recipe scales beautifully from intimate family gatherings to office parties. I've made mini versions for cookie exchanges and giant centerpieces for buffets. Every single time, people hover around the plate like moths to a chocolate-scented flame.
Kid-Friendly Assembly: Get the little ones involved — they'll love cutting out the tree shape and spreading the Nutella. It's like edible arts and crafts, except way more delicious than any macaroni art project. Plus, any recipe that keeps kids entertained while you prep dinner is a win in my book.
Inside the Ingredient List
The Foundation Players
All-butter puff pastry is non-negotiable here — skip the generic stuff that tastes like cardboard. You want the kind that actually lists butter as the first ingredient, not some mystery "vegetable fats." The butter creates those incredible layers that puff into delicate sheets, while the cheap stuff just sits there like a sad, greasy brick. I always keep a box in my freezer because once you realize how many impressive desserts you can whip up with this golden ticket, you'll never be without it again. Thaw it overnight in the fridge for the best results — room temperature thawing makes it sticky and hard to handle.
Nutella might seem straightforward, but here's what most people get wrong: they use it straight from the cupboard at room temperature. Warm Nutella is like liquid gold that seeps through every crack and creates a sticky mess. But pop that jar in the fridge for just 10 minutes before assembly, and suddenly you've got the perfect consistency — spreadable but not runny, like chocolate-hazelnut frosting that knows its place. I've tried every chocolate spread under the sun, and nothing beats the original for both flavor and that perfect melting point that stays molten but contained.
The Texture Enhancers
An egg wash might seem like an optional extra step, but this is what transforms your tree from amateur hour to bakery-quality gorgeousness. That golden sheen isn't just for looks — it creates a slight barrier that helps the layers stay defined instead of melding into one sad, doughy mass. Mix your egg with just a splash of water to thin it out; you want it to brush on like paint, not glop on like glue. The protein in the egg also helps those outer layers get shatteringly crisp while the inside stays tender and flaky.
Powdered sugar is your final flourish, but timing matters here. Dust it on while the pastry is still slightly warm and it will melt into a thin, sweet glaze that clings to every ridge. Wait until it's completely cool and you've got that classic snowy dusting that makes everything look like a winter wonderland. I keep some in a fine mesh shaker for precise control — nothing ruins the effect like big clumps of sugar that look like dandruff on your beautiful tree.
The Unexpected Game-Changers
Here's where I get a little controversial — a tiny pinch of sea salt in the Nutella layer. I know, I know, sweet and salty is everywhere these days, but hear me out. That whisper of salt doesn't make it taste salty; it just amplifies the chocolate and hazelnut flavors until they practically sing. It's like turning up the volume on your favorite song — everything becomes more intense, more present, more impossible to stop eating. I've watched people take a bite, pause, and then close their eyes in that universal gesture of food bliss.
Vanilla extract in the egg wash is my secret weapon for making the whole kitchen smell like a French bakery. Just a few drops mixed in creates this incredible aroma as it bakes — like cookies and croissants had a beautiful baby. Your neighbors will be knocking on your door asking what smells so amazing. Trust me on this one; I learned it from a Parisian baker who swore by it for all his viennoiseries.
The Final Flourish
While the tree is still warm, I like to add a light drizzle of good olive oil — just a whisper on the very tips of the branches. This sounds insane, I know, but that fruity, peppery note creates an incredible contrast with the sweet chocolate. It's like the difference between a flat painting and one with highlights and shadows — suddenly everything has dimension. Use your best finishing oil here, something you'd happily dip bread into. Just a few drops on a spoon, flicked over the top, transforms the whole experience from simple to sophisticated.
Everything's prepped? Good. Let's get into the real action...
The Method — Step by Step
- Unfold your first sheet of puff pastry onto a lightly floured surface and roll it gently just to smooth out the creases — you're not trying to make it bigger, just more pliable. Think of it like waking up the dough after its long nap in the freezer. The key here is using just enough flour to prevent sticking but not so much that it dries out the pastry. Run your hand over the surface; it should feel smooth and cool, not sticky or tacky. If it starts to feel warm or soft, pop it back in the fridge for five minutes — warm puff pastry is the enemy of those beautiful layers we're trying to create.
- Now comes the fun part — cutting out your tree shape. I use a pizza cutter for clean lines, but a sharp knife works too. Start with a simple triangle about 8 inches tall and 6 inches wide at the base, then add a small rectangle at the bottom for the trunk. Don't stress about perfection here; rustic charm is part of the appeal. Save those scraps though — twist them with some cinnamon sugar for instant palmiers while your tree bakes. That sizzle when the pastry hits the hot pan later? Absolute perfection.
- Spread your slightly chilled Nutella over the triangle, leaving a clean 1/2-inch border all around. This border is crucial — it's what creates the seal that keeps all that chocolate goodness inside. Use an offset spatula if you have one; it makes spreading so much easier and prevents tearing the delicate layers. The Nutella should go on in a thin, even layer — too thick and it'll ooze out like a chocolate volcano, too thin and you'll lose that incredible molten center. I dare you to taste this and not go back for seconds of just the spread alone.
- Place your second sheet of puff pastry on top and gently press around the edges to seal. Use your fingers first, then go around with the tines of a fork to create a decorative crimp — this isn't just pretty, it creates extra insurance against leakage. Press firmly but don't smash; you want to seal without squishing all those precious layers. Take your time here — most recipes get this completely wrong and end up with chocolate everywhere. We're building a chocolate fortress, not a chocolate crime scene.
- Using a sharp knife, score the top layer with diagonal cuts to create the tree branches — go about halfway through the pastry, not all the way down. These scores allow steam to escape in controlled ways, creating those beautiful separated layers that make the tree look so realistic. Angle your cuts upward and outward, like real pine branches reaching for sunlight. The pastry will puff and separate along these lines, creating perfect pull-apart portions. Okay, ready for the game-changer?
- Transfer your scored tree to a parchment-lined baking sheet and pop it in the freezer for 15 minutes. This quick chill firms up the butter in the pastry, which is what creates those incredible layers when it hits the hot oven. Cold pastry hitting hot air is what makes puff pastry do its magical rising act. While it's chilling, preheat your oven to 400°F — you want it fully heated and ready to go. This timing matters more than you'd think for that perfect rise.
- Brush the chilled tree with your egg wash, making sure to get into all the scored lines but not letting it pool in the crevices. The wash should go on in thin, even strokes — think of it like painting, not slathering. Avoid the edges where you sealed; egg wash there can act like glue and prevent proper puffing. The pastry should look glossy and golden even before it bakes, like it's been kissed by sunlight. This next part? Pure magic.
- Bake for 20-25 minutes, but here's what actually works — start at 400°F for the first 15 minutes to get maximum puff, then drop to 375°F for the remaining time. This temperature drop prevents the outside from burning while the inside finishes cooking through. Don't even think about opening that oven door for the first 15 minutes; you don't want to let out all that beautiful steam that's making your tree rise to the heavens. When it's done, the pastry should be deep golden brown and sound hollow when you tap the trunk. The chocolate will be molten, the layers will be distinct, and your kitchen will smell like Christmas morning at a French bakery.
Insider Tricks for Flawless Results
The Temperature Rule Nobody Follows
Room temperature is your enemy when working with puff pastry, but here's the twist — your Nutella needs to be just right too. Too cold and it won't spread, too warm and it turns into chocolate soup that soaks through every layer. I keep mine in the fridge door, which stays just cool enough without turning it into a chocolate brick. When you can dent it with your finger but it doesn't stick, you've hit the sweet spot. A friend tried skipping this step once — let's just say it didn't end well for her baking sheet.
Why Your Nose Knows Best
Forget timers — your nose is the best indicator of when this tree is perfectly done. About 15 minutes in, you'll start smelling the butter in the pastry turning nutty and golden. That's your cue to peek through the oven door (quickly!) and check the color. When it smells like the best croissant you've ever had mixed with toasted hazelnuts, you're 2-3 minutes from perfection. This is worth it, I promise — that aroma is better than any scented candle money can buy.
The 5-Minute Rest That Changes Everything
I know it's torture, but letting your tree rest for exactly 5 minutes after baking is what separates the amateurs from the pros. During this time, the chocolate sets slightly so it doesn't all ooze out when you cut into it, but it's still warm and molten. The pastry also finishes cooking from residual heat, ensuring those middle layers aren't doughy. Set a timer and walk away if you have to — good things come to those who wait, and this wait is microscopic compared to the payoff.
The Storage Secret for Maximum Flakiness
Here's what most people get wrong — they try to store baked puff pastry at room temperature, which turns it into sad, chewy cardboard. Instead, let it cool completely, then store any leftovers in an airtight container in the fridge. When you're ready to eat, pop it in a 350°F oven for 5-7 minutes and it comes back to life like magic. The butter re-melts, the layers re-crisp, and it's almost as good as fresh. Almost — let's be honest, nothing beats that first bake, but this gets you 90% of the way there.
Creative Twists and Variations
This recipe is a playground. Here are some of my favorite ways to switch things up:
The White Chocolate Wonderland
Swap the Nutella for white chocolate hazelnut spread and add a teaspoon of orange zest to the filling. The result tastes like those chocolate oranges but in pastry form — bright, creamy, and utterly addictive. Dust with edible gold glitter for a tree that looks like it belongs in a winter fairy tale. Kids go absolutely bananas for this version, and adults pretend it's "for the children" while hoarding pieces in napkins.
The Salted Caramel Forest
Use dulce de leche instead of Nutella and sprinkle flaky sea salt on top before baking. The caramel bubbles and thickens while the salt creates these incredible sweet-salty pockets that make your taste buds do a happy dance. Add a drizzle of caramel sauce right before serving for extra decadence. If you've ever struggled with desserts that are too sweet, this is the fix you've been waiting for.
The Peanut Butter Paradise
Mix equal parts peanut butter and Nutella for a Reese's cup situation that will ruin all other desserts for you. The peanut butter adds depth and that nostalgic flavor that takes everyone back to childhood. Chop some honey-roasted peanuts and sprinkle them between the layers for extra crunch. This version disappears faster than the original at game day parties.
The Mocha Magic Tree
Dissolve a teaspoon of instant espresso powder in a tablespoon of hot water, then mix it into your Nutella. The coffee amplifies the chocolate flavor without making it taste like coffee — it's just deeper, richer, more complex. Add some chocolate-covered espresso beans scattered on top for the caffeine lovers. Stay with me here — this is worth it even if you don't like coffee.
The Raspberry Ribbon
Add a thin layer of raspberry jam under the Nutella for a PB&J vibe that works shockingly well. The tart berries cut through the richness and add beautiful red streaks when you pull it apart. Use good jam, not the cheap stuff — you want real fruit flavor, not colored corn syrup. This version is what you make when you want to feel slightly virtuous about eating chocolate for breakfast.
The S'mores Summit
Add a layer of marshmallow fluff under the Nutella and sprinkle crushed graham crackers on top. The marshmallows puff and brown, creating that perfect campfire flavor without any of the smoke. Use a kitchen torch to add extra char marks for authenticity. This is what summer camp would taste like if it happened in December and involved way more chocolate.
Storing and Bringing It Back to Life
Fridge Storage
Completely cooled pieces will keep for up to 3 days in an airtight container in the fridge, though I honestly don't know how anyone has leftovers for that long. Separate layers with parchment paper to prevent them from sticking together and turning into one giant pastry blob. The chocolate will firm up but re-melts beautifully with gentle reheating. Add a tiny splash of water before reheating — it steams back to perfection and prevents the pastry from drying out.
Freezer Friendly
You can freeze the fully assembled but unbaked tree for up to 2 months — just wrap it tightly in plastic wrap, then foil. Bake straight from frozen, adding an extra 5-8 minutes to the cooking time. The results are actually superior to fresh because the extreme temperature difference creates even more dramatic puffing. I've got three in my freezer right now for emergency entertaining, and they've saved me more times than I can count when unexpected guests show up.
Best Reheating Method
Forget the microwave — it turns everything rubbery and sad. Instead, place pieces on a wire rack set over a baking sheet in a 350°F oven for 5-7 minutes. The wire rack allows hot air to circulate underneath, re-crisping both sides evenly. If you're in a hurry, a toaster oven works too, but watch it closely — puff pastry goes from perfect to burnt in about 30 seconds. For single pieces, an air fryer at 320°F for 3-4 minutes gives incredible results that taste almost fresh-baked.