I was standing in my kitchen, half‑heartedly scrolling through endless “quick dinner” ideas, when my roommate shouted, “If you can’t bake a decent roll, you’re not even trying!” I laughed, but the challenge lingered like the faint scent of yeast on a summer night. That night, I tossed a half‑baked batch of store‑bought Hawaiian rolls into the oven, only to be greeted by a soggy, rubbery disappointment that made me swear off “Hawaiian” forever. I stared at the mess, feeling the weight of that dare, and thought, “What if I could combine the tropical sweetness of pineapple with the tang of sourdough and actually nail the fluff?” The idea sparked a fire that kept me up until sunrise, mixing starter, pineapple juice, and a pinch of daring ambition.
Picture this: a warm kitchen humming with the low‑pitched whirr of the mixer, the golden glow of sunrise slipping through the blinds, and the air thick with a perfume that’s part buttery caramel, part tropical sunrise. The dough feels like a living thing, stretching under my fingertips, elastic yet yielding, whispering promises of airy clouds and caramel‑kissed crusts. When it finally bakes, the rolls rise like tiny moons, their tops glossy with honey‑glazed sheen, and the interior? Imagine a cloud that’s been kissed by pineapple sunshine—soft, fragrant, and impossibly fluffy. The first bite is a revelation: a buttery melt that sings of sweet pineapple, a subtle sourdough tang that keeps you guessing, and a honeyed finish that lingers like a tropical sunset on your tongue.
Most recipes get this completely wrong. They either drown the dough in sugary syrup, turning the rolls into a cloying dessert, or they forget the magic of sourdough, resulting in flat, flavor‑less breads that crumble at the slightest touch. My version flips the script by marrying a disciplined sourdough starter with the bright acidity of fresh pineapple juice, a splash of milk for richness, and a modest amount of honey for that perfect sweet‑savory balance. The secret? A gentle, slow fermentation that builds flavor without sacrificing that coveted pillowy texture. The result is a roll that’s not just a side dish—it’s the star of any gathering, stealing the spotlight from the main course.
Okay, ready for the game‑changer? I’m about to walk you through every single step—mixing, folding, proofing, and that final burst of oven‑magic. By the end, you’ll wonder how you ever settled for anything less, and I dare you to taste this and not go back for seconds. Let me walk you through every single step — by the end, you'll wonder how you ever made it any other way.
What Makes This Version Stand Out
- Flavor Fusion: The pineapple juice adds a bright, tropical acidity that cuts through the buttery richness, while the sourdough starter brings a depth of flavor you won’t find in any “quick‑mix” roll.
- Cloud‑Like Texture: A careful balance of milk, butter, and honey creates a dough that traps air like a sponge, giving each roll a feather‑soft crumb that practically melts in your mouth.
- Simplicity Meets Sophistication: Despite the impressive results, the ingredient list is short, the steps are straightforward, and you don’t need any fancy equipment—just a bowl, a whisk, and a sense of adventure.
- Unique Sweet‑Savory Balance: Most Hawaiian rolls are either too sweet or too bland; this recipe walks the tightrope perfectly, letting the honey shine without overwhelming the palate.
- Crowd‑Pleaser Factor: I’ve watched grown‑up kids and seasoned foodies alike line up for a second serving, and that’s the ultimate validation for any baker.
- Ingredient Quality: Fresh pineapple juice, active starter, and real butter give you a flavor profile that store‑bought mixes simply can’t replicate.
- Hands‑Off Fermentation: The dough develops flavor while you’re busy with other tasks, making it perfect for busy hosts who still want a wow factor.
- Make‑Ahead Potential: Shape and freeze the rolls ahead of time, then bake fresh when guests arrive—no compromise on texture or taste.
Inside the Ingredient List
The Flavor Base
The star of this recipe is the fresh pineapple juice. Its natural acidity brightens the dough, balancing the richness of butter and honey while also feeding the wild yeast in your starter. If you skip the juice and substitute water, you’ll lose that tropical zing, and the rolls will taste more like ordinary sourdough buns. For a subtle twist, try a 50/50 blend of pineapple and orange juice; the citrus note adds an extra layer of complexity without overpowering the honey.
The Texture Crew
Milk adds protein and fat, which strengthen gluten while keeping the crumb tender. Using whole milk is ideal; skim milk will work but may produce a slightly drier interior. Butter is the secret behind that melt‑in‑your‑mouth mouthfeel—softened and melted into the dough, it coats the gluten strands like a silk scarf. If you’re dairy‑free, swap with an equal amount of coconut oil; the flavor will shift toward a tropical vibe, which can be a fun surprise.
The Unexpected Star
Honey is more than just a sweetener; it acts as a humectant, locking moisture into the crumb and giving the rolls a subtle caramel aroma. A light drizzle over the tops before baking creates a glossy, golden crust that’s both visual and gustatory fireworks. If you prefer a deeper flavor, use a dark, robust honey like buckwheat; just remember it will tint the crust a richer amber.
The Final Flourish
All‑purpose flour is the backbone of any good roll. For this recipe, a blend of 3½ cups provides enough structure while still allowing the dough to stay airy. If you have bread flour on hand, you can substitute half of the amount for a chewier texture, but you’ll lose a bit of that delicate fluff. Sourdough starter is the living heart of the dough; an active, bubbly starter ensures a reliable rise and a signature tang. Keep your starter fed and lively—otherwise you’ll end up with a flat, bland loaf.
Everything's prepped? Good. Let's get into the real action...
The Method — Step by Step
-
In a large mixing bowl, combine 1 cup active sourdough starter with 1 cup fresh pineapple juice. Stir until the starter is fully dissolved, creating a fragrant, slightly tangy liquid that smells like a tropical sunrise. Let this mixture sit for 5 minutes; this short rest awakens the wild yeast and ensures an even fermentation later. While you wait, preheat your oven to 350°F (175°C) and line a baking sheet with parchment.
-
Add 1/2 cup milk, 1/4 cup melted butter, and 1/4 cup honey to the starter‑juice blend. Whisk vigorously until the honey fully dissolves, creating a glossy, amber‑colored batter that coats the back of a spoon. This is the moment where flavor layers start to intertwine—watch the honey swirl like molten gold.
Kitchen Hack: Warm the milk slightly (about 95°F) before adding; warm liquids accelerate gluten development without killing the starter. -
Sift 3½ cups all‑purpose flour and 1 teaspoon salt together into a separate bowl. This ensures even distribution of salt, preventing any “salt pockets” that could inhibit yeast activity. Create a well in the center of the dry ingredients and pour in the wet mixture.
-
Using a sturdy wooden spoon or a stand mixer on low speed, incorporate the flour into the liquid until a shaggy dough forms. The dough will look sticky at first—don’t panic. Let it rest for 10 minutes; this “autolyse” period lets the flour fully hydrate, making the later kneading smoother and the crumb more open.
-
Turn the dough onto a lightly floured surface and knead for about 6‑8 minutes, or until it becomes smooth, elastic, and slightly tacky. You’ll know it’s ready when a small piece of dough stretches without tearing, forming a thin, translucent membrane—what bakers call the “windowpane test.”
Watch Out: Over‑kneading can tighten the gluten too much, resulting in a dense roll; stop as soon as the windowpane test passes. -
Place the dough in a lightly oiled bowl, cover with a damp towel, and let it bulk‑ferment at room temperature for 2‑3 hours, or until it has roughly doubled in size. During this time, the dough should develop a pleasant, slightly sour aroma with hints of pineapple. If you’re in a hurry, you can extend the bulk rise in the fridge overnight for a deeper flavor.
-
Once risen, gently deflate the dough and divide it into 12 equal pieces. Shape each piece into a smooth ball by rolling it on the countertop, then tuck the seam underneath. Arrange the balls tightly on the prepared baking sheet, leaving just enough space for them to expand without touching the edges.
Kitchen Hack: Lightly dust each ball with a touch of flour before placing on the sheet; this prevents sticking and gives a subtle crust. -
Cover the tray loosely with plastic wrap and let the rolls proof for another 45‑60 minutes, or until they’ve puffed up and look like tiny, golden domes. The surface should feel slightly springy to the touch—press gently, and it should bounce back slowly.
-
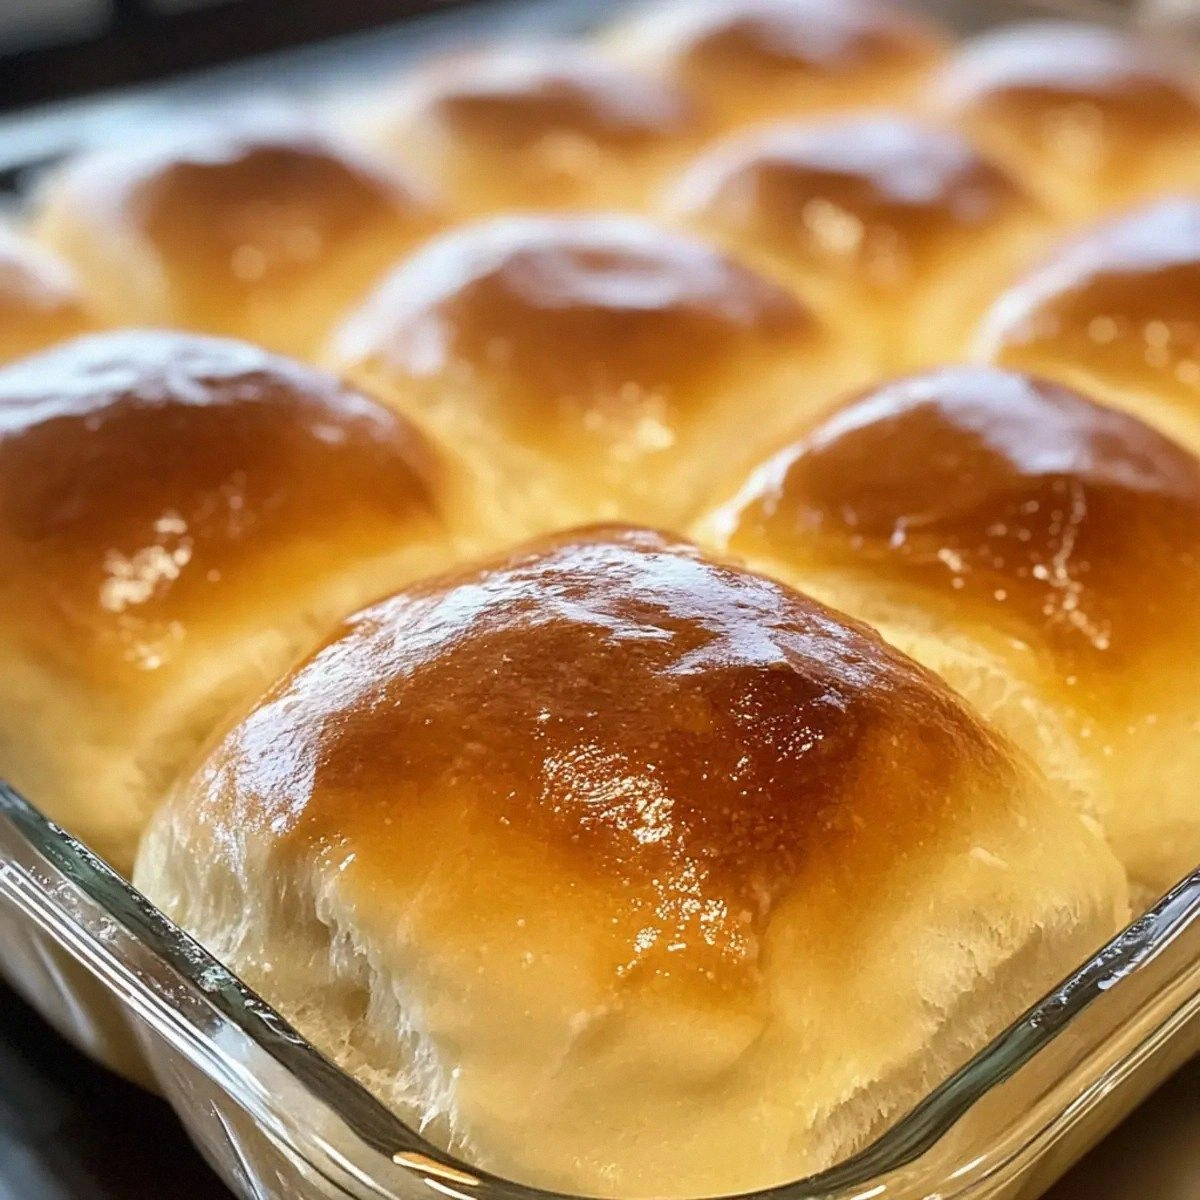
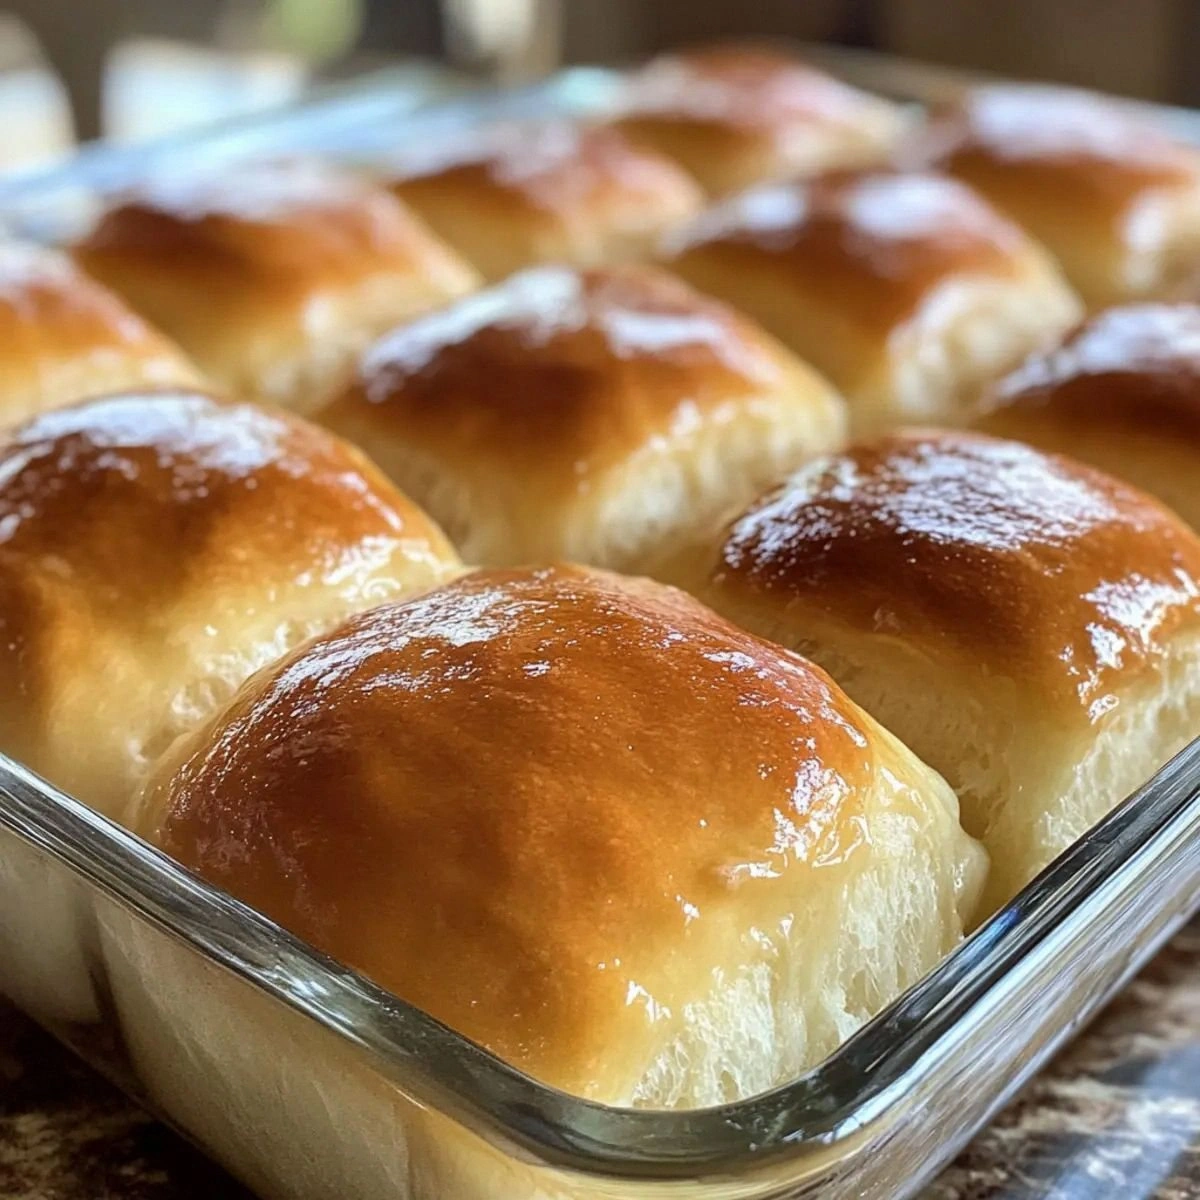
Brush the tops with a mixture of 1 tablespoon melted butter and a drizzle of honey for extra shine. Slide the tray into the preheated oven and bake for 20‑25 minutes, or until the rolls are a deep golden brown and sound hollow when tapped on the bottom. The aroma at this point is pure magic—think caramelized pineapple meets buttery toast.
-
Remove the rolls from the oven, let them cool on a wire rack for 10 minutes, then serve warm. The interior should be as fluffy as a cloud, with a subtle sweet‑savory flavor that makes you want to hug the baker. That’s it — you did it. But hold on, I've got a few more tricks that'll take this to another level...
Insider Tricks for Flawless Results
The Temperature Rule Nobody Follows
Never underestimate the power of a consistent room temperature. If your kitchen is too cold, the dough will ferment sluggishly, leading to a dense crumb. Aim for a sweet spot around 75°F (24°C) during bulk fermentation; a simple trick is to place the bowl in a turned‑off oven with the light on. I once tried to speed things up by moving the dough to a sunny windowsill, and the rolls turned out gummy—lesson learned.
Why Your Nose Knows Best
Your sense of smell is a far better indicator of readiness than any clock. When the dough has developed a fragrant, slightly tangy aroma with hints of pineapple, it’s ready for shaping. If it still smells flat or overly yeasty, give it a few more minutes. Trusting your nose saves you from under‑proofed rolls that collapse like a deflated balloon.
The 5‑Minute Rest That Changes Everything
After dividing the dough, let each ball rest uncovered for 5 minutes before the final shaping. This short pause relaxes the gluten, allowing the rolls to expand more evenly in the oven. I’ve seen bakers skip this step and end up with uneven tops that look like they’ve been stepped on. Those extra five minutes are a tiny investment for a professional‑grade finish.
Butter‑Brush Timing
Brush the rolls with butter **after** the first 10 minutes of baking, not before. This prevents the butter from burning and ensures the crust stays tender while still gaining that beautiful shine. If you apply the butter too early, you’ll get a slightly greasy top that loses its crispness.
The Secret of the Final Steam
Place a small pan of hot water on the bottom rack of the oven during the first half of baking. The steam it releases keeps the crust from forming too quickly, allowing the rolls to expand fully before the crust sets. The result is a soft interior with a subtly crisp exterior—a texture contrast that’s pure heaven.
Cool‑Down Strategy
Let the rolls rest on a wire rack, not on the baking sheet. This prevents the bottoms from becoming soggy from trapped steam. If you’re serving them within an hour, keep them loosely covered with a clean kitchen towel to retain warmth without trapping moisture.
Creative Twists and Variations
This recipe is a playground. Here are some of my favorite ways to switch things up:
Coconut‑Pineapple Dream
Swap the milk for coconut milk and add ¼ cup shredded coconut to the dough. The result is a tropical explosion that pairs perfectly with grilled shrimp or a fresh mango salsa.
Spicy Island Heat
Incorporate 1 teaspoon of finely chopped jalapeño and a pinch of cayenne into the flour mixture. The subtle heat balances the honey’s sweetness, making these rolls a hit at taco nights.
Savory Herb Infusion
Add 2 tablespoons of chopped fresh rosemary and a drizzle of olive oil to the dough. The herbaceous notes turn the rolls into an elegant side for roasted chicken or a hearty stew.
Chocolate‑Chip Surprise
Fold in ½ cup mini dark chocolate chips after the first knead. The chocolate melts slightly during baking, creating pockets of gooey indulgence—great for brunch or a sweet snack.
Whole‑Wheat Boost
Replace half of the all‑purpose flour with whole‑wheat flour and add a tablespoon of wheat germ. You’ll get a nuttier flavor and a boost of fiber without sacrificing the signature fluffiness.
Storing and Bringing It Back to Life
Fridge Storage
Place cooled rolls in an airtight container or zip‑top bag and store them in the refrigerator for up to 4 days. To revive, sprinkle a few drops of water on each roll and warm them in a 300°F oven for 5‑7 minutes; they’ll spring back to life like magic.
Freezer Friendly
Wrap each roll tightly in plastic wrap, then place them in a freezer‑safe bag. They’ll keep for up to 3 months. When you’re ready to serve, let them thaw at room temperature for 30 minutes, then give them a quick 10‑minute bake at 350°F to refresh the crust.
Best Reheating Method
Add a tiny splash of water (about a teaspoon) to the roll before reheating. The steam generated inside prevents the crumb from drying out, ensuring each bite remains as soft as the first one out of the oven.