Ever had a kitchen disaster that turned into a culinary revelation? I was standing in my cramped apartment, a bag of stale rice flour in one hand and a handful of bright, bruised strawberries in the other, trying to salvage a birthday cake that had collapsed into a sad, sticky mess. The smell of burnt sugar filled the air, and I swear I heard the faint sigh of the dough as it tried to rise and failed. In that moment of culinary panic, I decided to ditch the cake entirely and experiment with something that could use that flour and those strawberries in a way that would make the kitchen smell like summer.
Fast forward a few hours, and the kitchen was alive with the sweet, earthy aroma of toasted rice flour mingling with the sharp, fruity scent of fresh strawberries. The sound of the saucepan bubbling was like a tiny drumbeat, and the first bite of the mochi felt like a soft, chewy cloud that carried the bright burst of strawberry all the way to the back of the tongue. The texture was unlike any other dessert I had tried—soft, elastic, and just the right amount of stickiness that made it a challenge to bite into without losing your grip. I could almost hear my friends gasp when they tasted it, and I knew I had stumbled upon something special.
What makes this version of strawberry mochi stand out isn’t just the combination of ingredients; it’s the way each element is treated with reverence and precision. The rice flour is toasted just enough to give a nutty undertone, the gelatin is pre‑soaked to ensure a perfectly smooth chew, and the strawberries are pureed into a silky sauce that coats the mochi like velvet. I dare you to taste this and not go back for seconds because the flavor profile is so balanced—sweet, slightly tart, and utterly comforting.
This recipe is hands down the best version you'll ever make at home because it takes the classic Japanese mochi and infuses it with fresh, juicy strawberries, creating a dessert that feels both nostalgic and brand new. If you've ever struggled with mochi that turns out too dry or too gummy, you're not alone—and I've got the fix. Picture yourself pulling these from the pan, the whole kitchen smelling incredible, and the first bite sending a wave of joy through your taste buds.
Let me walk you through every single step—by the end, you'll wonder how you ever made it any other way. I promise you, the journey from raw flour to the final bite is a playful, almost magical experience that will have you laughing, learning, and craving more. So grab your apron, gather your ingredients, and let’s dive into a dessert adventure that’s as fun to make as it is to eat.
What Makes This Version Stand Out
- Flavor Depth: Toasting the mochiko flour adds a subtle nutty note that balances the bright strawberry sweetness, turning a simple dessert into a complex flavor experience.
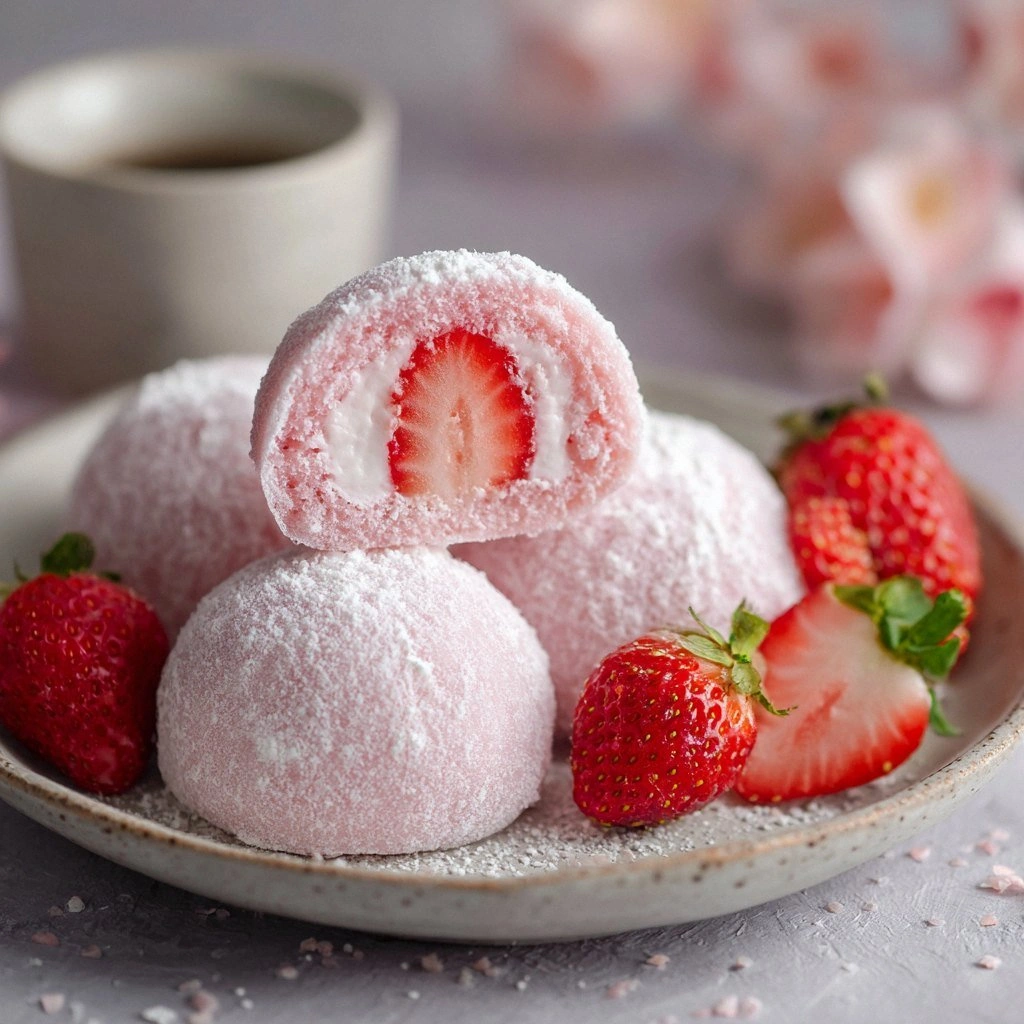
- Texture Perfection: The gelatin is pre‑soaked and blended into the dough, giving the mochi a silky, elastic bite that melts in your mouth like a cloud.
- Visual Appeal: The glossy strawberry sauce coats each mochi, creating a vibrant pink sheen that looks as good as it tastes.
- Easy Make‑Ahead: The dough can be prepared ahead of time and refrigerated for up to 24 hours, making it a stress‑free option for parties or last‑minute dessert cravings.
- Kid‑Friendly: The soft, chewy texture and natural fruit sweetness make it a hit with children—no sticky fingers or choking hazards.
- Ingredient Quality: Using fresh, ripe strawberries and high‑quality mochiko flour ensures that every bite delivers maximum flavor.
Alright, let's break down exactly what goes into this masterpiece...
Inside the Ingredient List
The Flavor Base
At the heart of this dessert is mochiko (sweet rice flour), the backbone that gives mochi its signature chew. Toasting it in a dry skillet until it turns a light amber color unlocks a nutty aroma that pairs beautifully with strawberry. If you skip the toasting step, the mochi will taste raw and the texture will be less refined. For the best flavor, use mochiko from a reputable Asian grocery store—look for a fine, powdery consistency without clumps. A quick alternative is to replace mochiko with a 1:1 blend of all‑purpose flour and cornstarch, but the authentic taste will be slightly different.
The Sweetness Layer
Sugar is the sweetener that balances the tartness of the strawberries. In this recipe, we use white granulated sugar for its clean sweetness, but you can experiment with brown sugar for a deeper molasses note. If you prefer a lower‑sugar option, substitute with honey or agave syrup, keeping in mind the liquid content will change. Skipping sugar will result in a dish that tastes overwhelmingly sour and unbalanced.
The Gelatin Glow
Gelatin is the secret weapon that transforms the dough into a silky, cohesive mass. We use powdered gelatin because it dissolves evenly without lumps. Pre‑soaking it in cold water ensures it hydrates fully before being mixed into the dough. If you’re vegan, replace gelatin with agar‑agar or carrageenan, but the chewiness will be noticeably firmer.
The Strawberry Star
Fresh strawberries are the star of this dessert, providing natural sweetness, bright color, and a juicy burst with every bite. We puree half of the strawberries to create a smooth sauce that coats the mochi, while the rest are diced and folded into the dough for texture. If you can’t find fresh strawberries, frozen berries work fine—just thaw them and squeeze out excess moisture. Remember, the quality of the fruit directly affects the flavor profile; choose ripe, firm berries for the best result.
Everything's prepped? Good. Let's get into the real action...
The Method — Step by Step
- Toast 2 cups mochiko flour in a dry skillet over medium heat until it turns a light golden brown, stirring constantly to avoid clumps. The aroma should be nutty, almost toasty. Once toasted, set aside to cool while you prep the rest of the ingredients.
- In a small bowl, combine 1 cup sugar with 1 cup water. Heat over medium heat, stirring until the sugar dissolves completely. The mixture should become clear and slightly syrupy. Remove from heat and let it cool to room temperature.
- While the syrup cools, pre‑soak 2 tsp gelatin powder in 1/4 cup cold water for 5 minutes. Then gently warm the gelatin mixture in the microwave for 10 seconds, stirring until fully dissolved. This step is critical—skipping it will leave lumps in your dough.
- Puree 2 cups fresh strawberries until smooth, then strain through a fine sieve to remove seeds, yielding 1 cup strawberry puree. The puree should be glossy and free of pulp. Set aside.
- In a large mixing bowl, combine the toasted mochiko flour, cooled sugar syrup, dissolved gelatin, and 1 cup strawberry puree. Stir vigorously with a wooden spoon until the mixture forms a smooth, elastic dough. It should be tacky but not sticky.
- Fold in the diced strawberries gently, ensuring they’re evenly distributed without breaking them up too much. The strawberries should remain intact, providing bursts of flavor in each bite.
- Divide the dough into 8 equal portions. Roll each portion into a smooth ball, then flatten slightly with your palm. Place the mochi on a parchment‑lined tray, leaving a small gap between each. Cover with a damp cloth and let rest for 10 minutes to allow the flavors to meld.
- Preheat a non‑stick skillet over low heat. Gently place each mochi ball onto the skillet and cook for 2–3 minutes on each side, or until the surface becomes slightly translucent and the edges pull away. The key is low heat—too high and the mochi will burn on the outside while remaining raw inside.
- Transfer the cooked mochi onto a cooling rack. While still warm, drizzle a thin layer of strawberry puree over each mochi, letting it seep into the crevices. This final glaze locks in moisture and gives the mochi a glossy finish.
- Let the mochi cool completely before serving. The texture will firm up slightly, creating that perfect chewy bite. Serve immediately or store in an airtight container at room temperature for up to 2 days.
That's it—you did it. But hold on, I've got a few more tricks that'll take this to another level...
Insider Tricks for Flawless Results
The Temperature Rule Nobody Follows
Many people cook mochi over high heat, resulting in unevenly cooked centers. The secret is to keep the skillet at a steady low temperature—around 250°F (120°C). This slow cooking method allows the mochi to expand slowly, giving it a tender interior while the exterior stays crisp. I once tried a high‑heat approach and ended up with a rubbery center that made me question my life choices. Trust me, a slow, patient cook is worth the extra time.
Why Your Nose Knows Best
The aroma of toasted flour is a reliable indicator that your mochi is cooking correctly. When the dough starts to emit a warm, nutty smell, it’s a sign that the starches are gelatinizing. If the smell is faint or you notice a raw, floury odor, reduce the heat and let it cook longer. Your nose is a better judge than your eyes when it comes to mochi.
The 5-Minute Rest That Changes Everything
After the mochi has cooked, let it rest for 5 minutes on a cooling rack. During this rest period, the moisture redistributes, creating a uniform texture. Skipping this step can lead to uneven chewiness, with some parts too firm and others too gummy. I used to rush the mochi straight to the plate, only to find it was a sad, chewy mess.
Keep It Moist with a Light Dusting of Powdered Sugar
Dusting the finished mochi with a light sprinkle of powdered sugar not only adds a sweet finish but also creates a subtle barrier that keeps the mochi from drying out. This is especially helpful if you’re storing the mochi for a day or two. The sugar also gives the mochi a delicate, snowy appearance that looks as good as it tastes.
Use a Silicone Mat for Easy Cleanup
Because mochi is sticky, cleanup can be a chore. Lining your baking sheet with a silicone mat means you can simply lift the mochi off and toss the mat in the dishwasher. This saves you from scrubbing a sticky pan and gives you more time to enjoy the dessert.
Creative Twists and Variations
This recipe is a playground. Here are some of my favorite ways to switch things up:
Chocolate Drizzle Delight
After the mochi has cooled, drizzle melted dark chocolate over each piece. The bitterness of the chocolate pairs wonderfully with the sweet strawberry, creating a sophisticated flavor profile that’s perfect for a dinner party.
Minty Freshness
Fold finely chopped fresh mint into the dough before cooking. The mint adds a cooling contrast to the sweet strawberry, making the dessert feel lighter and more refreshing.
Almond Crumble Crunch
Top each mochi with a sprinkle of toasted almond slivers and a drizzle of honey. The crunch provides texture contrast, while the honey enhances the natural fruit sweetness.
Matcha Infusion
Replace half of the mochiko flour with matcha powder. The earthy green tea flavor adds depth, and the vibrant color makes the mochi look like a piece of art.
Blueberry Burst
Swap out strawberries for fresh blueberries and adjust the puree accordingly. The blueberry mochi will have a slightly tart undertone and a deeper color, offering a new twist on the classic.
Storing and Bringing It Back to Life
Fridge Storage
Store the mochi in an airtight container at room temperature for up to 2 days. If you need to keep them longer, refrigerate them for up to 5 days. The mochi will stay moist and chewy, thanks to the gelatin and butter content.
Freezer Friendly
Place the mochi on a parchment‑lined tray and freeze individually for up to 3 months. Once frozen, transfer them to a freezer bag. When ready to serve, thaw at room temperature for 30 minutes or microwave on low power for 10 seconds.
Best Reheating Method
To revive frozen or refrigerated mochi, gently microwave on low power for 10–15 seconds, or steam for 2 minutes. Add a tiny splash of water before reheating; this steams the mochi back to perfection, restoring its soft, elastic texture.