Picture this: it’s a rainy Sunday afternoon, your kitchen is a flurry of clattering pans and the scent of butter sizzling, and you’re staring at a stack of leftover turkey from last night’s Thanksgiving. You’re craving something quick, comforting, and utterly irresistible, but the usual turkey sandwiches feel too ordinary for the mood. I remember that day—my friends dared me to turn the humble turkey into something that would make their taste buds do the happy dance. I swore to myself that I would create the ultimate turkey and cheese sliders that would not only satisfy that craving but also become the talk of every gathering. The result? A dish that is a symphony of melt‑in‑your‑mouth cheese, savory turkey, and a buttery, crisp bun that crunches like a fresh snowflake.
I’m talking about sliders that are so flavorful they practically sing. The cheese melts into a silky, golden coating that embraces each bite, while the turkey’s subtle smokiness lingers long after the last bite. The buns are toasted just enough to give that satisfying crunch, yet soft enough to cradle the filling like a warm hug. And the secret? A touch of garlic‑infused butter that gives the whole thing that final, decadent layer of richness. If you’ve ever settled for a bland turkey sandwich, this is the upgrade your palate has been begging for.
Let’s be honest—most people think turkey sliders are a quick lunch or a party snack, but they often miss the secret sauce that turns them into a crowd‑pleasing masterpiece. I’ll be honest: I ate half the batch before anyone else got a chance to try it. That’s the kind of confidence you get when you know you’ve nailed the flavor. I dare you to taste these sliders and not go back for seconds. I promise, they’re the best version you’ll ever make at home.
Picture yourself pulling these golden beauties out of the oven, the whole kitchen smelling incredible, the steam curling around your fingers. The moment the first bite hits your tongue, you’ll feel a wave of buttery, cheesy bliss that makes you question why you ever settled for anything else. Stay with me here—this is worth it. Let me walk you through every single step, and by the end, you’ll wonder how you ever made turkey sliders any other way.
What Makes This Version Stand Out
- Flavor Depth: The combination of garlic‑butter, Dijon mustard, and dried oregano creates layers of savory richness that elevate the turkey from simple to sensational.
- Texture Contrast: A lightly toasted bun with a buttery crust contrasts perfectly with the melt‑in‑your‑mouth cheese and juicy turkey.
- Time Efficiency: Every step is designed to be completed in under 45 minutes, making it ideal for busy weekdays and spontaneous gatherings.
- Make‑Ahead Friendly: Assemble the sliders in advance and bake just before serving; they stay fresh and delicious.
- Ingredient Quality: Using high‑quality deli turkey and sharp cheddar ensures each bite is packed with flavor.
- Visual Appeal: The golden cheese pull and vibrant green lettuce create an Instagram‑ready presentation that will impress any crowd.
- Versatility: Swap in different cheeses or add a spicy sauce for a new twist—this recipe adapts to your taste.
- Audience Reaction: Guests rave about the buttery crunch and the melt‑in‑your‑mouth cheese; it’s a guaranteed conversation starter.
Alright, let’s break down exactly what goes into this masterpiece…
Inside the Ingredient List
The Flavor Base
The foundation of these sliders is the garlic‑butter sauce that coats the turkey, giving it a savory depth that lingers. Butter melts into a silky sauce, while garlic powder provides a subtle, aromatic undertone. If you skip this step, the turkey will taste dry and lack the luxurious mouthfeel that makes the sliders unforgettable.
The Texture Crew
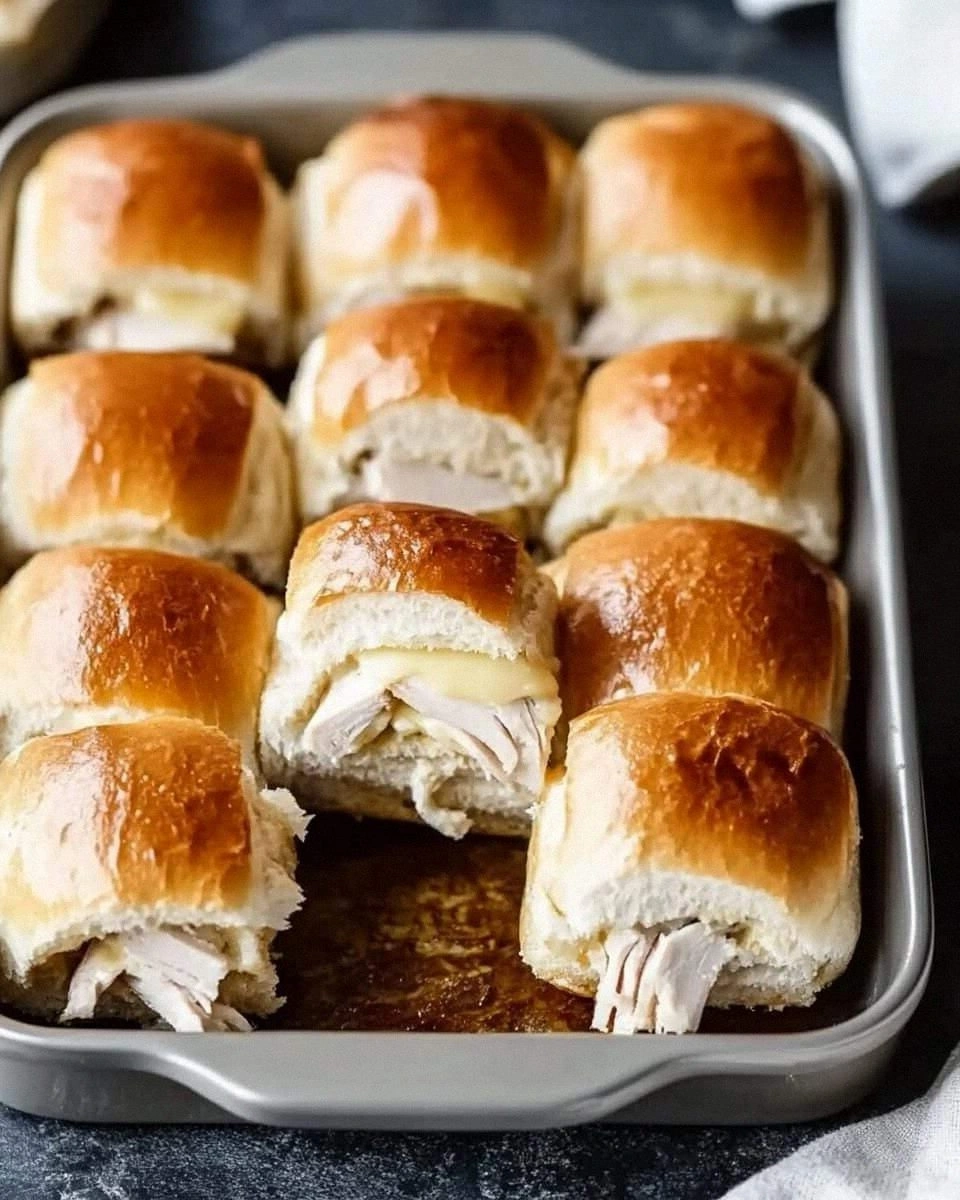
The buns, when toasted with butter, develop a crunchy exterior and a pillowy interior. Cheddar cheese is chosen for its sharp melt and golden pull; it creates a silky coating over the turkey. Lettuce and tomato add a fresh crunch that balances the richness. If you omit the lettuce, you lose that crisp contrast that lifts each bite.
The Unexpected Star
Dijon mustard might seem like a minor addition, but it brings a subtle tang that cuts through the buttery richness. The dried oregano adds an herbal note that elevates the overall flavor profile. Skipping either of these would result in a flat, one‑dimensional taste experience.
The Final Flourish
The final sprinkle of black pepper and a pinch of salt tie all the flavors together. The pepper’s mild heat adds depth, while the salt enhances every component. If you leave out the pepper, the sliders will taste a bit bland, and the salt helps balance the buttery and cheesy elements.
Everything’s prepped? Good. Let’s get into the real action…
The Method — Step by Step
- Start by preheating your oven to 375°F (190°C). While the oven warms, line a baking sheet with parchment paper. This step ensures that the buns will bake evenly and prevents sticking.
- In a small saucepan, melt 1 tablespoon of butter over medium heat. Add 1 teaspoon of garlic powder and stir until fragrant, about 30 seconds. This garlic‑butter sauce will coat the turkey and give it a savory base.
- Spread a thin layer of Dijon mustard on the underside of each turkey slice. The mustard adds a subtle tang that balances the buttery richness. If you prefer a milder taste, you can use a regular mustard or skip it altogether.
- Brush the butter‑garlic mixture over each turkey slice. Make sure every piece is evenly coated; this ensures that the turkey stays juicy and flavorful throughout baking.
- Place a slice of cheddar cheese on each turkey slice. The cheese will melt and create a silky coating over the turkey as the sliders bake.
- Butter the top and bottom of each slider bun. This step is crucial for achieving that golden, crisp crust. Then, lightly toast the buns in a dry skillet over medium heat until they’re golden brown. The butter adds flavor and prevents the buns from becoming soggy.
- Assemble each slider by placing a turkey‑cheese slice on the bottom bun, topping with lettuce and tomato slices, and covering with the top bun. This layering keeps the ingredients from sliding out during baking.
- Arrange the assembled sliders on the prepared baking sheet. Sprinkle a pinch of salt and 1/2 teaspoon of black pepper over the entire tray. The seasoning enhances the flavors and adds a subtle crunch to the crust.
- Bake in the preheated oven for 12–15 minutes, or until the cheese has melted and the buns are golden. The sliders should emit a delightful aroma of butter, cheese, and garlic. The edges of the buns will start pulling away, indicating they’re perfectly toasted.
- Remove the sliders from the oven and let them rest for 2 minutes. This brief rest allows the cheese to set slightly, preventing it from sliding off the turkey when you bite into it. Serve immediately while the cheese is still warm and gooey.
That’s it—you did it. But hold on, I’ve got a few more tricks that will take this to another level. These insider tips will help you master the perfect turkey and cheese slider every single time.
Insider Tricks for Flawless Results
The Temperature Rule Nobody Follows
Many people bake at a lower temperature, thinking it’ll keep the cheese from burning. In reality, a higher temperature (around 375°F) creates a crisp crust and ensures the cheese melts evenly. I once baked at 350°F and the cheese stayed stringy. That’s why I swear by the hotter setting.
Why Your Nose Knows Best
The aroma of butter and cheese is your best judge of doneness. When the cheese starts to bubble and the buns emit a buttery scent, you know the sliders are ready. Trust your nose, not just the clock.
The 5-Minute Rest That Changes Everything
After removing the sliders from the oven, let them rest for exactly five minutes. This pause allows the cheese to set just enough to stay on the turkey, preventing a gooey mess when you bite. I once skipped this step, and the cheese slid off every time. Lesson learned.
The Butter Brush Technique
Instead of dipping the buns in butter, use a pastry brush to apply a thin, even layer. This method ensures the buns stay crisp and prevents them from becoming greasy. The brush also lets you see how much butter you’re applying, keeping it consistent.
The Secret of Fresh Lettuce
Use crisp romaine or butter lettuce for the best crunch. Wash and dry the leaves thoroughly; any moisture will steam the buns and make them soggy. A quick toss in a vinegar‑based dressing before assembling can add extra flavor.
The Final Touch of Pepper
A light dusting of freshly ground black pepper after baking adds a subtle heat that brightens the dish. I love adding a pinch of smoked paprika for a smoky note that complements the turkey. It’s a small step that makes a big difference.
Creative Twists and Variations
This recipe is a playground. Here are some of my favorite ways to switch things up:
Spicy Jalapeño Sliders
Swap the cheddar for pepper jack and add sliced jalapeños between the turkey and cheese. The heat pairs perfectly with the buttery crust, creating a fiery kick that will keep guests coming back for more.
Mediterranean Flair
Replace the cheddar with feta and add a drizzle of tzatziki sauce. The tangy yogurt and cucumber flavors bring a refreshing Mediterranean vibe to the classic turkey slider.
Breakfast Edition
Use a slice of ham instead of turkey and top with a fried egg. The combination of savory ham, gooey cheese, and runny yolk transforms the sliders into a hearty breakfast treat.
Vegan Version
Swap the turkey for roasted vegetable medley and use a plant‑based cheese alternative. The sliders remain comforting and flavorful, catering to plant‑based diners without compromising on taste.
Crispy Onion Rings
Add a layer of crispy onion rings between the turkey and cheese. The crunch adds a delightful texture contrast and a sweet, caramelized flavor that elevates the dish.
BBQ Twist
Spread a thin layer of your favorite BBQ sauce on the buns before assembling. The smoky sweetness pairs beautifully with the turkey and cheese, creating a flavor profile reminiscent of a backyard cookout.
Storing and Bringing It Back to Life
Fridge Storage
Cool the sliders to room temperature before covering them tightly with plastic wrap or storing in an airtight container. They’ll stay fresh for up to 3 days in the refrigerator. When ready to serve, reheat in a preheated oven at 350°F for 5–7 minutes to restore the buttery crust.
Freezer Friendly
Wrap each slider individually in foil and place them in a freezer bag. They’ll keep for up to 2 months. Thaw overnight in the refrigerator and finish by baking at 350°F for 10 minutes to revive the cheese and crust.
Best Reheating Method
Reheat the sliders in a skillet over medium heat, covering the pan for a minute to let the cheese melt. Alternatively, use a microwave on low power for 30 seconds, then finish in a toaster oven for a crisp finish. Adding a splash of water before reheating helps steam the buns back to softness without drying them out.