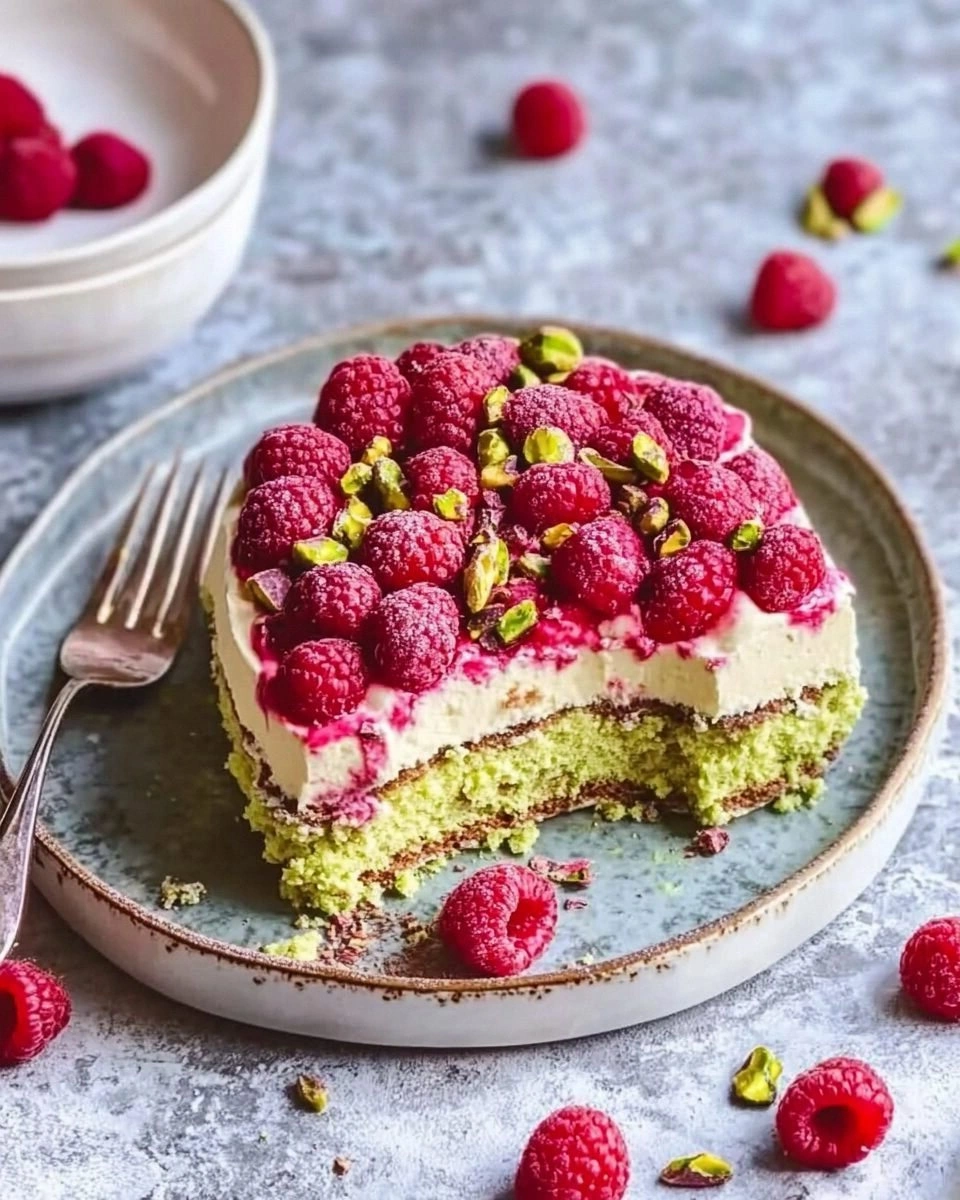
It started on a rainy Tuesday when I, in a panic to salvage a ruined batch of white chocolate mousse, decided to throw everything into a blender and call it a day. The result was a lumpy, half‑sour mess that still smelled like white chocolate, but I was already convinced that the key to salvation was to add something bright, something nutty, and something that would carry the weight of the dessert like a secret weapon. I dared myself to taste the concoction before anyone else could even see it, and the first bite was a revelation: creamy, sweet, with a tart whisper of raspberry and the crunch of pistachios that kept the texture from sinking into mush.
From that moment, I knew this was not a one‑off experiment. The kitchen was a playground of flavors, each ingredient fighting for the spotlight. The raspberries, plump and ruby‑red, sang a citrusy overture against the mellow backdrop of melted white chocolate. The pistachios added a subtle nutty depth, a whisper of earthiness that balanced the sweetness. The mascarpone, rich and silky, held everything together like a velvet blanket. And the espresso‑kissed ladyfingers, with their airy crunch, gave the dessert a subtle coffee bite that echoed the night’s rain on the windowpanes.
Most people think of tiramisu as a coffee‑heavy, dark chocolate affair, but this version flips the script. It is a dessert that feels like a late‑night confessional, a secret indulgence whispered between friends over a glass of sparkling wine. I’ve spent countless hours tweaking the ratios, adjusting the cocoa dusting, and perfecting the layering technique until every bite was a harmonious chorus of sweet, tart, nutty, and aromatic. The result? A tiramisu that feels like a whispered promise, a memory of summer berries in winter, a dessert that will have you reaching for seconds—and then thirds—without hesitation.
Picture yourself pulling this out of the oven, the kitchen filled with the intoxicating scent of coffee and white chocolate, the air tinged with the sweet perfume of raspberries. Imagine the first forkful, the creamy texture melting on your tongue, the pistachios cracking with a satisfying snap, the espresso notes lingering like a distant memory. That’s the experience I’m about to share with you, step by step, with the confidence of a seasoned cook and the humor of a kitchen enthusiast who’s seen a few too many burnt desserts. Let me walk you through every single step—by the end, you’ll wonder how you ever made it any other way.
What Makes This Version Stand Out
- Taste: The sweet, mellow flavor of white chocolate is elevated by the bright acidity of fresh raspberries, creating a balanced palate that feels both indulgent and refreshing.
- Texture: The creamy mascarpone‑white chocolate blend coats the palate like velvet, while the pistachios add a delightful crunch that contrasts beautifully with the airy ladyfingers.
- Simplicity: Despite its complex flavor profile, the recipe requires only basic kitchen tools—no fancy equipment needed, just a whisk, a blender, and a standard baking dish.
- Uniqueness: Few tiramisu recipes incorporate pistachios and raspberries, making this version a standout treat that will surprise guests and elevate any dinner party.
- Crowd Reaction: Friends who taste this dessert often comment that it feels like a “summer in a bowl,” even in the middle of a cold winter.
- Ingredient Quality: Using high‑quality white chocolate and fresh, hand‑picked raspberries ensures that every bite is a burst of pure flavor.
- Cooking Method: The method of layering espresso‑soaked ladyfingers with a creamy mousse is traditional, but the addition of pistachios and a cocoa dusting adds a modern twist.
- Make‑Ahead Potential: This dessert can be assembled a day in advance, allowing flavors to meld and the texture to set perfectly, making it ideal for busy evenings.
Inside the Ingredient List
The Flavor Base
At the heart of this tiramisu lies a trio of flavors: white chocolate, raspberries, and pistachios. The white chocolate provides a sweet, creamy foundation that is far less bitter than its dark counterpart, making it a perfect canvas for the tartness of the raspberries. The raspberries, chosen for their peak freshness, add a burst of acidity that cuts through the richness, preventing the dessert from feeling cloying. Pistachios bring a subtle nutty warmth and a satisfying crunch, elevating the overall texture profile. If you skip any of these, the dessert loses a key dimension—white chocolate without raspberries feels flat, while pistachios without white chocolate can overpower the delicate berry notes.
The Texture Crew
The mascarpone and heavy cream are the unsung heroes that bind everything together. Mascarpone’s high fat content gives the mousse a luxuriously silky mouthfeel, while the heavy cream adds volume and a lightness that counters the density of the chocolate. Together, they create a mousse that coats the tongue like a fine silk scarf. Swapping mascarpone for Greek yogurt would give a tangy twist but would also introduce a firmer texture, which might not meld as smoothly with the white chocolate. A pinch of salt is added to enhance the flavors, but if you prefer a saltless version, simply omit it; the result will still be deliciously balanced.
The Unexpected Star
The espresso is the secret sauce that ties the dessert to its tiramisu roots. A robust espresso, cooled to room temperature, infuses the ladyfingers with a deep, coffee aroma that complements the sweet white chocolate and tart raspberries. If you’re a fan of a milder coffee flavor, try using cold brew concentrate instead; it will give a smoother, less acidic profile. The espresso also helps the ladyfingers maintain their structure, preventing them from becoming soggy before the mousse sets. Remember, the espresso should be strong enough to leave a lingering aftertaste, but not so bitter that it overpowers the other flavors.
The Final Flourish
Cocoa powder, used for dusting, adds a subtle hint of bitterness that balances the dessert’s sweetness. It also gives the finished dish a professional, elegant appearance. If you’re avoiding chocolate for any reason, consider a dusting of finely ground cinnamon or a light sprinkle of powdered sugar instead. The ladyfingers are the classic base of any tiramisu; they provide a light, airy texture that absorbs the espresso and supports the creamy layers. Use a high‑quality brand to ensure they remain crisp until you dip them. Finally, a handful of whole pistachios left on top as a garnish adds a pop of color and crunch, turning each bite into a multi‑sensory experience.
Everything's prepped? Good. Let's get into the real action...
The Method — Step by Step
- Preheat your oven to 350°F (175°C). Line a 9×9 inch baking dish with parchment paper to ensure easy removal later. This step is essential because a properly lined dish prevents the dessert from sticking and makes cleanup a breeze. If you’re not using parchment, lightly spray the dish with non‑stick spray, but parchment is the gold standard. Let the oven heat fully before placing the dish inside, as an under‑heated oven can affect the final texture.
- Melt the white chocolate in a heatproof bowl set over a pot of simmering water, or use a microwave in 30‑second bursts, stirring in between. The goal is a silky, glossy sauce that coats the back of a spoon. Be careful not to over‑heat; once the chocolate is fully melted, remove the bowl from heat immediately. If you’re using a microwave, keep a close eye on it—white chocolate can seize if overheated. After melting, set the chocolate aside to cool slightly; you’ll want it warm but not hot when you fold it into the mousse.
- In a separate bowl, whip the heavy cream to soft peaks using an electric mixer. Once the peaks form, gradually add the powdered sugar and vanilla extract, continuing to whip until the mixture is glossy and holds stiff peaks. The sugar not only sweetens but also helps stabilize the whipped cream, giving it a smooth, airy texture. If the mixture seems too stiff, add a splash of milk to loosen it slightly. The key is to keep the cream light and fluffy, as it will be folded into the mascarpone later.
- Fold the mascarpone cheese into the whipped cream gently, using a spatula in a smooth, circular motion. This technique prevents the mixture from deflating, ensuring a light, airy mousse. If you’re using a stand mixer, switch to the whisk attachment and mix on low speed. The mascarpone adds body and richness, while the whipped cream keeps the mousse airy. Once the two are fully incorporated, you’ll have a creamy base that’s ready for the espresso infusion.
- Add the cooled espresso to the mascarpone‑cream mixture and fold until fully combined. The espresso not only adds depth but also helps the ladyfingers stay firm by slightly neutralizing their starch. If you prefer a milder coffee flavor, substitute the espresso with cold brew concentrate. After folding, taste the mousse; it should have a subtle coffee undertone without overwhelming the sweet notes. This is the moment of truth—if the espresso is too strong, it will dominate; if too weak, the dessert will lack complexity.
- Fold the cooled white chocolate into the mousse mixture, stirring gently until fully incorporated. The chocolate should blend seamlessly, giving the mousse a smooth, silky texture. The white chocolate also adds a subtle sweet richness that balances the tartness of the raspberries. If you’re short on time, you can fold the chocolate in a separate bowl before adding it to the mousse. Once combined, the mousse will be ready to layer.
- Arrange the ladyfingers in a single layer at the bottom of the prepared dish. Dip each ladyfinger quickly—just a few seconds—in the espresso, ensuring they soak up flavor without becoming soggy. The goal is to maintain the light, airy texture of the ladyfingers while infusing them with coffee. If you have a larger dish, you can add a second layer of ladyfingers for a thicker dessert. This layering technique is crucial for a balanced bite.
- Spread half of the mousse over the first layer of soaked ladyfingers, smoothing the surface with a spatula. Sprinkle half of the fresh raspberries and chopped pistachios evenly over the mousse. The raspberries will provide a burst of acidity, while the pistachios add crunch and a nutty flavor. This first layer sets the tone for the dessert’s flavor profile. Once the first layer is complete, repeat the process: add another layer of ladyfingers, mousse, raspberries, and pistachios.
- Dust the top of the dessert with a light coating of cocoa powder. The cocoa adds a subtle bitterness that balances the sweetness, and it also gives the dessert an elegant, professional finish. If you prefer a sweeter finish, consider dusting with powdered sugar instead. The cocoa should be sifted to avoid clumps. This final touch completes the dessert’s visual appeal.
- Cover the dish with plastic wrap and refrigerate for at least 4 hours, preferably overnight. The chilling time allows the flavors to meld and the mousse to set firmly. If you’re short on time, a 2‑hour chill will suffice, but the dessert’s texture will be less firm. During the chill, the ladyfingers will absorb moisture from the mousse, creating a harmonious consistency. Once chilled, the dessert will hold its shape and be ready to serve.
- Just before serving, sprinkle a few whole pistachios on top for a decorative crunch and a pop of color. Slice the dessert into squares or use a chilled knife for clean cuts. Serve chilled, and watch as guests marvel at the layers of flavor. If you want to elevate the presentation, drizzle a thin line of white chocolate ganache over the top. This final flourish adds an extra touch of luxury and a glossy finish.
That's it — you did it. But hold on, I've got a few more tricks that'll take this to another level...
Insider Tricks for Flawless Results
The Temperature Rule Nobody Follows
Many bakers believe that room‑temperature ingredients are always best, but for this dessert, slightly chilled mascarpone and cream produce a firmer mousse that holds its shape. Chill the mascarpone in the fridge for an hour before mixing, and keep the cream refrigerated until you’re ready to whip it. This small adjustment ensures that the mousse sets properly and doesn’t collapse when you cut the first slice. A quick test: if the mixture feels too loose, let it chill for an additional 15 minutes before whipping.
Why Your Nose Knows Best
Before you even taste the mousse, give it a sniff. A faint aroma of coffee should be present, indicating that the espresso has been fully integrated. If the scent is weak, you may need to add a splash of espresso or let the mousse sit a bit longer for the flavors to meld. Your nose is a reliable guide; trust it to tell you when the dessert is ready for the next step.
The 5‑Minute Rest That Changes Everything
After whisking the cream, let the mixture rest for exactly five minutes before folding in the mascarpone. This brief pause allows the proteins in the cream to relax, resulting in a smoother, more stable mousse. Many people skip this step, leading to a slightly grainy texture. By giving the cream a moment to settle, you’ll achieve a velvety finish that feels like silk on the tongue.
Using a Stand Mixer Saves Time
While a hand whisk can get the job done, a stand mixer on low speed is a time‑saver and ensures consistent whipping. Attach the whisk attachment, start on low, and gradually increase speed until soft peaks form. The mixer’s even motion reduces the risk of overwhipping, a common pitfall when whipping by hand.
Choosing the Right Ladyfingers
Not all ladyfingers are created equal. Look for a brand that offers a crisp texture and a subtle vanilla flavor. If you can’t find ladyfingers, you can substitute with sponge cake or angel food cake cut into thin slices. The key is to maintain an airy structure that can absorb espresso without becoming soggy.
Storing the Dessert Properly
Once assembled, cover the dessert tightly with plastic wrap and store it in the refrigerator. Avoid leaving it uncovered, as it can absorb odors from other foods. If you’re preparing the dessert for a large gathering, keep it chilled until just before serving. A quick rinse with cold water before serving can help maintain the crispness of the ladyfingers.
Creative Twists and Variations
This recipe is a playground. Here are some of my favorite ways to switch things up:
Chocolate‑Infused Raspberries
Soak fresh raspberries in melted dark chocolate for a few minutes, then chill before adding them to the mousse. This adds a deep, bittersweet layer that pairs beautifully with the white chocolate. The chocolate coating also provides a slight crunch as it melts in your mouth.
Almond Crunch Variation
Replace pistachios with chopped toasted almonds for a nuttier, slightly sweeter crunch. The almonds also add a subtle caramel flavor when toasted, complementing the espresso notes. This version is perfect for those who prefer a less exotic nut profile.
Minty Fresh Twist
Add a few drops of mint extract to the mousse for a refreshing aftertaste. The mint pairs well with the raspberry’s tartness and gives the dessert a cool finish. Be cautious with the amount; too much mint can overpower the other flavors.
Berry Medley Version
Swap out fresh raspberries for a mix of fresh strawberries, blueberries, and blackberries. This creates a colorful, fruity medley that adds variety to the flavor profile. The berries’ natural juices also help keep the mousse moist.
Chocolate Ganache Drizzle
Prepare a thin white chocolate ganache and drizzle it over the top of the assembled tiramisu right before serving. The ganache adds a glossy finish and an extra layer of chocolate richness. Use a fine‑mesh sieve to ensure an even drizzle.
Spiced Cinnamon Layer
Sprinkle ground cinnamon into the mousse before layering. The warm spice complements the coffee and adds depth to the dessert. A pinch of cinnamon also adds a subtle aromatic note that enhances the overall experience.
Storing and Bringing It Back to Life
Fridge Storage
After assembling, cover the tiramisu tightly with cling film or foil and refrigerate for up to 48 hours. The dessert will stay firm and flavorful, with the ladyfingers maintaining their structure. For best results, keep it away from strong‑smelling foods, as it can absorb odors over time.
Freezer Friendly
You can freeze the dessert for up to one month. Wrap it in two layers of plastic wrap and then a layer of aluminum foil to prevent freezer burn. Thaw in the refrigerator overnight before serving. A quick 10‑minute microwave defrost on low power will also work if you’re short on time.
Best Reheating Method
To reheat, place the dessert in a shallow dish and warm in a preheated oven at 300°F (150°C) for 5–7 minutes. This gentle heat will revive the mousse without melting the chocolate. Alternatively, let it sit at room temperature for 20 minutes to restore the original texture. A tiny splash of water before reheating can help steam the dessert back to a silky consistency.