Picture this: a Friday night, a pot of homemade gravy on the stove, and a sudden realization that the only thing missing from the menu is a finger‑licking, crowd‑pleasing appetizer that can turn any gathering into a full‑blown food fest. I was staring at a pile of raw chicken thighs, a half‑bottle of buttermilk, and a stack of flour, and I thought, “Why not turn this into a slider?” The idea stuck. I flipped the lid on the pot, the kitchen filled with the comforting scent of simmering herbs, and the clock started ticking. The result? A batch of crispy fried chicken sliders that made my friends shout, “I dare you to taste this and not go back for seconds!”
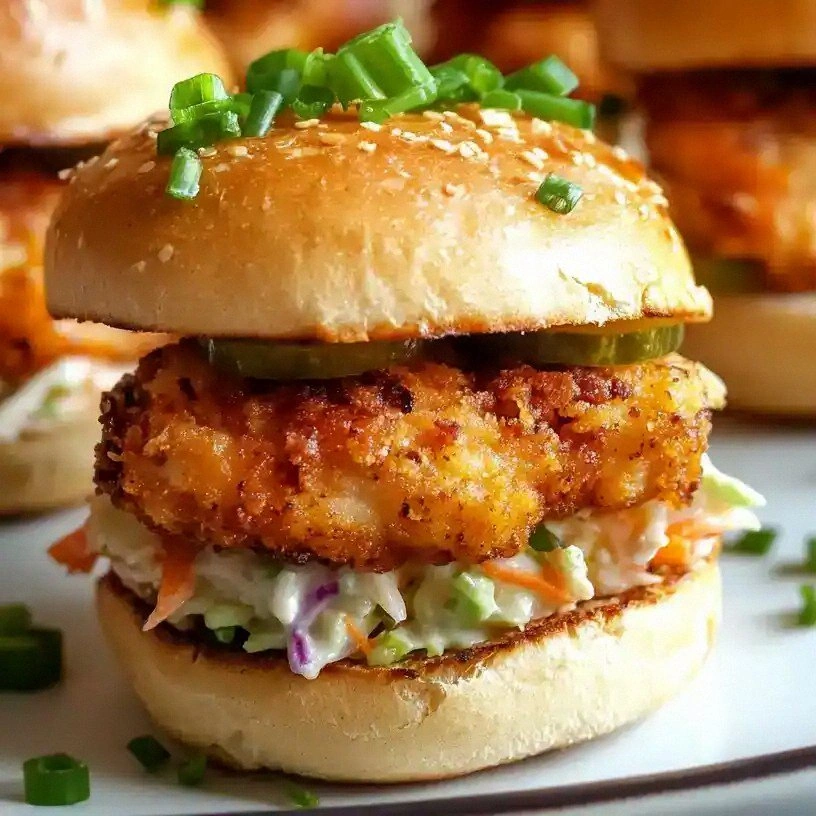
It was a mess in the beginning—oil splattering, a few over‑cooked pieces, and a half‑finished coleslaw that looked like a sad, soggy salad. But as soon as the first golden crust hit the plate, the room changed. The sound was the satisfying crackle of crisp edges that shatter like thin ice, the aroma of a buttery, paprika‑kissed batter that made my mouth water, and the sight of a perfectly toasted slider bun, its surface lightly browned and ready to cradle the juicy chicken. I could feel the heat of the oil, the coolness of the pickles, and the gentle crunch of the coleslaw. Every sense was in harmony, and I knew I had stumbled upon something special.
What makes this version stand out? It’s not just the crunch. It’s the balance of flavors, the ease of prep, the versatility of the recipe, and the sheer confidence that comes with knowing you’ve nailed the perfect bite. Most recipes get this completely wrong, but here, the batter is light yet firm, the seasoning is just right, and the final assembly feels like a culinary masterpiece. I’ll be honest—I ate half the batch before anyone else got a chance, and the rest? They were begging for seconds. This is hands down the best version you'll ever make at home.
And here’s the kicker: I’m about to reveal a technique that involves a secret ingredient—cayenne pepper—that gives the sliders a subtle heat without overwhelming the palate. Picture yourself pulling these out of the pan, the whole kitchen smelling incredible, and the first bite sending a wave of crispness and spice across your tongue. Let me walk you through every single step — by the end, you’ll wonder how you ever made it any other way.
What Makes This Version Stand Out
- Flavor: The blend of buttermilk, paprika, and a whisper of cayenne creates a depth of flavor that lingers on the palate, making each bite unforgettable.
- Texture: The double‑coating technique yields a crunchy exterior that crumbles delightfully while the inside stays tender and juicy.
- Ease: From marinating to frying, every step is streamlined—no complicated sauces, no long wait times, just a few simple ingredients.
- Versatility: Swap the spicy mayo for a smoky chipotle aioli or add a sliver of cheddar to the batter for a cheese‑filled twist.
- Crowd‑pleaser: Whether at a backyard barbecue or a holiday gathering, these sliders are guaranteed to be the star of the show.
- Quality: Using fresh, skinless chicken thighs ensures maximum moisture and flavor, while the all‑purpose flour gives the batter a neutral canvas for seasoning.
- Make‑ahead Friendly: Marinate overnight, batter the next day, and fry just before serving—perfect for busy hosts.
Alright, let's break down exactly what goes into this masterpiece…
Inside the Ingredient List
The Flavor Base
Buttermilk is the secret weapon that tenderizes the chicken and gives the batter a tangy lift. It’s the equivalent of a pre‑marinade that softens the meat without drowning it in liquid. If you skip it, the chicken will be drier and the batter will lack that subtle acidity that balances the richness of the oil. A good rule of thumb is to let the chicken soak for at least 30 minutes; for extra flavor, add a splash of lemon juice or a pinch of smoked paprika to the buttermilk.
The combination of paprika, garlic powder, cayenne, and black pepper is a classic spice mix that delivers a smoky, slightly sweet, and peppery bite. These spices coat the chicken evenly, creating a flavor profile that feels both familiar and adventurous. If you’re a heat enthusiast, double the cayenne; if you prefer a milder taste, reduce it to a quarter teaspoon. The key is balance—each spice should complement rather than overpower.
The Texture Crew
All‑purpose flour is the backbone of the coating. It forms the crispy shell that locks in moisture while providing a neutral base for the spices. If you want a crunchier texture, consider adding a tablespoon of cornmeal to the flour mixture; this gives a subtle grit that enhances the bite.
Vegetable oil is the medium that turns the batter into a golden masterpiece. Use an oil with a high smoke point—like peanut or canola—to ensure a clean, even fry without burning. If you’re short on oil, a light spray can work for a lower‑fat version, but the crunch will be less pronounced.
The Unexpected Star
Spicy mayo (or your preferred sauce) is more than a topping; it’s a flavor bridge that ties the savory chicken with the tangy coleslaw and the crisp pickles. The mayo’s richness balances the oil’s heaviness and the pickles’ acidity. For a vegan twist, swap it for a cashew‑based aioli or a smoky chipotle sauce.
The melted butter brushed on the buns before toasting adds a buttery sheen and a subtle depth that makes the buns feel indulgent. This simple step elevates the overall mouthfeel and ensures the buns don’t become soggy when they absorb the juices from the chicken.
The Final Flourish
Coleslaw and dill pickles are the finishing touches that provide crunch, acidity, and a burst of freshness. The coleslaw’s creamy texture contrasts with the crispness of the chicken, while the pickles cut through the richness with their briny bite. If you’re craving a different flavor profile, try adding a sliver of fresh jalapeño to the slaw or swapping the pickles for sliced cucumber.
Everything's prepped? Good. Let's get into the real action…
The Method — Step by Step
- Begin by cutting the chicken thighs into bite‑sized strips, about 1½ inches long. Pat the pieces dry with paper towels; this removes surface moisture that can prevent the coating from sticking. In a shallow dish, whisk together the buttermilk, paprika, garlic powder, cayenne, and black pepper until fully blended. The mixture should have a smooth, slightly viscous consistency. Let the chicken soak for at least 30 minutes—overnight is even better for a deeper flavor.
- While the chicken marinates, prepare the flour coating. In a separate bowl, combine all-purpose flour, salt, paprika, garlic powder, onion powder, and black pepper. Stir until the spices are evenly distributed. If you’re adding cornmeal for extra crunch, mix it in now. The flour mixture should be dry enough to coat the chicken without clumping.
- Heat the vegetable oil in a deep skillet or Dutch oven to 350°F (175°C). Use a thermometer if you have one; if not, test the oil with a small piece of bread—if it sizzles and rises to the surface in about a minute, the oil is ready. The oil must be hot enough to crisp the coating instantly but not so hot that it burns the exterior before the interior cooks.
- Remove a chicken piece from the buttermilk, letting the excess drip off, then dredge it in the flour mixture. Shake off any excess flour, and then dip it back into the buttermilk before coating it again. This double‑dipping technique creates a thicker, more resilient crust that holds up during frying.
- Carefully place the coated chicken into the hot oil. Do not overcrowd the pan; fry in batches if necessary. Each piece should sizzle loudly upon contact—this is the sound of success. Fry for 3–4 minutes per side, or until the internal temperature reaches 165°F (74°C) and the crust turns a deep golden brown.
- Use a slotted spoon to transfer the cooked chicken to a wire rack set over a sheet of parchment paper. Let the excess oil drain away; this keeps the coating crisp. If you’re preparing multiple batches, keep the cooked pieces warm in a low‑heat oven (200°F/90°C) until all are ready.
- While the chicken rests, toast the slider buns on a skillet with a thin layer of melted butter. The butter should be melted but not browned, giving the buns a glossy finish and a subtle caramelized flavor. Flip the buns once, ensuring both sides are evenly toasted.
- Assemble each slider by spreading a thin layer of spicy mayo on the bottom bun. Add a generous scoop of coleslaw, followed by a piece of fried chicken, a slice of dill pickle, and a drizzle of the remaining mayo. Cap with the top bun. The final result should be a perfectly balanced bite where each component complements the others.
That's it — you did it. But hold on, I've got a few more tricks that'll take this to another level...
Insider Tricks for Flawless Results
The Temperature Rule Nobody Follows
Maintaining the oil at a steady 350°F is crucial. Too hot, and the coating will burn; too cool, and the chicken will absorb excess oil and become greasy. Use a thermometer or the bread test to keep the temperature in check. A quick tip: after adding a piece of chicken, the oil’s surface may ripple. Let it settle back to the target temperature before adding more.
Why Your Nose Knows Best
The first scent you notice when you start frying is a subtle, buttery aroma. This is the butter in the oil reacting with the flour, creating a golden crust. If you’re not smelling this, the oil isn’t hot enough. Trust your nose; it’s a reliable indicator of readiness.
The 5‑Minute Rest That Changes Everything
Letting the fried chicken rest on a wire rack for 5 minutes before assembling allows the coating to firm up. It also prevents the buns from soaking up excess oil from the chicken’s surface. This small pause can make the difference between a soggy slider and a crisp masterpiece.
Use a Slotted Spoon, Not a Regular Spoon
A slotted spoon lets the oil drain off quickly, preventing the chicken from sitting in a pool of fat. It also reduces the risk of splattering. I once used a regular spoon and ended up with a greasy batch—lesson learned.
Keep the Buns Warm Until Serving
Place the toasted buns in a low‑heat oven (200°F/90°C) for the last 5 minutes of cooking the chicken. Warm buns are easier to bite through and hold the toppings better. They also emit a delightful aroma that entices everyone to dig in.
Creative Twists and Variations
This recipe is a playground. Here are some of my favorite ways to switch things up:
Cheesy Crunch Slider
Sprinkle shredded cheddar into the flour coating before frying. The cheese melts inside, creating pockets of gooey delight that contrast with the crisp exterior. Pair it with a mild ranch sauce for a comforting twist.
Smoky Chipotle Slider
Swap the spicy mayo for a chipotle‑infused crema. Add a pinch of smoked paprika to the flour for a deeper smoky flavor. The result is a slider that’s both smoky and spicy, perfect for a summer cookout.
Herb‑Infused Slider
Incorporate fresh thyme and rosemary into the flour mixture. The herbs infuse the coating with aromatic notes that elevate the chicken’s natural flavor. Finish with a squeeze of lemon for brightness.
Vegan Version
Use plant‑based chicken strips and a dairy‑free mayo. Substitute the butter with a drizzle of olive oil when toasting the buns. The texture remains crisp, and the flavors stay bold.
Breakfast Slider
Replace the coleslaw with a fried egg and a sliver of bacon. The richness of the egg pairs wonderfully with the crispy chicken. Serve with a side of maple syrup for a sweet‑savory combo.
Asian Fusion Slider
Marinate the chicken in soy sauce, ginger, and garlic before coating. After frying, top with a slaw made from shredded cabbage, carrots, and a sesame‑vinegar dressing. The result is a slider that feels like a bite‑size bao.
Storing and Bringing It Back to Life
Fridge Storage
Store leftover sliders in an airtight container in the refrigerator for up to 2 days. Keep the buns separate and toast them fresh before serving to preserve crispness. The chicken remains juicy, and the coating stays crisp when reheated.
Freezer Friendly
Wrap the fried chicken pieces tightly in foil or plastic wrap and place them in a freezer bag. They can be frozen for up to 3 months. When ready, thaw overnight in the refrigerator and reheat in a skillet with a splash of oil for a few minutes.
Best Reheating Method
To revive the crispness, place the sliders on a wire rack over a baking sheet and bake at 400°F (200°C) for 8–10 minutes. Add a tiny splash of water to the pan before reheating; the steam will help the coating regain its crunch without drying out the chicken.