I burned half a pan of turnovers last summer because I got cocky and tried to multitask during the most crucial five minutes of baking. The smoke alarm was shrieking like a banshee, the dog was howling in sympathy, and I was frantically waving a dish towel under the detector while my neighbor banged on the door asking if everything was okay. That disaster led me down a rabbit hole of testing, tweaking, and obsessive note-taking until I cracked the code for what I now call the holy grail of handheld desserts. These homemade cherry puff turnovers have since become my go-to party trick, the thing people text me about at midnight, and the reason my coworkers pretend to like me during potluck season.
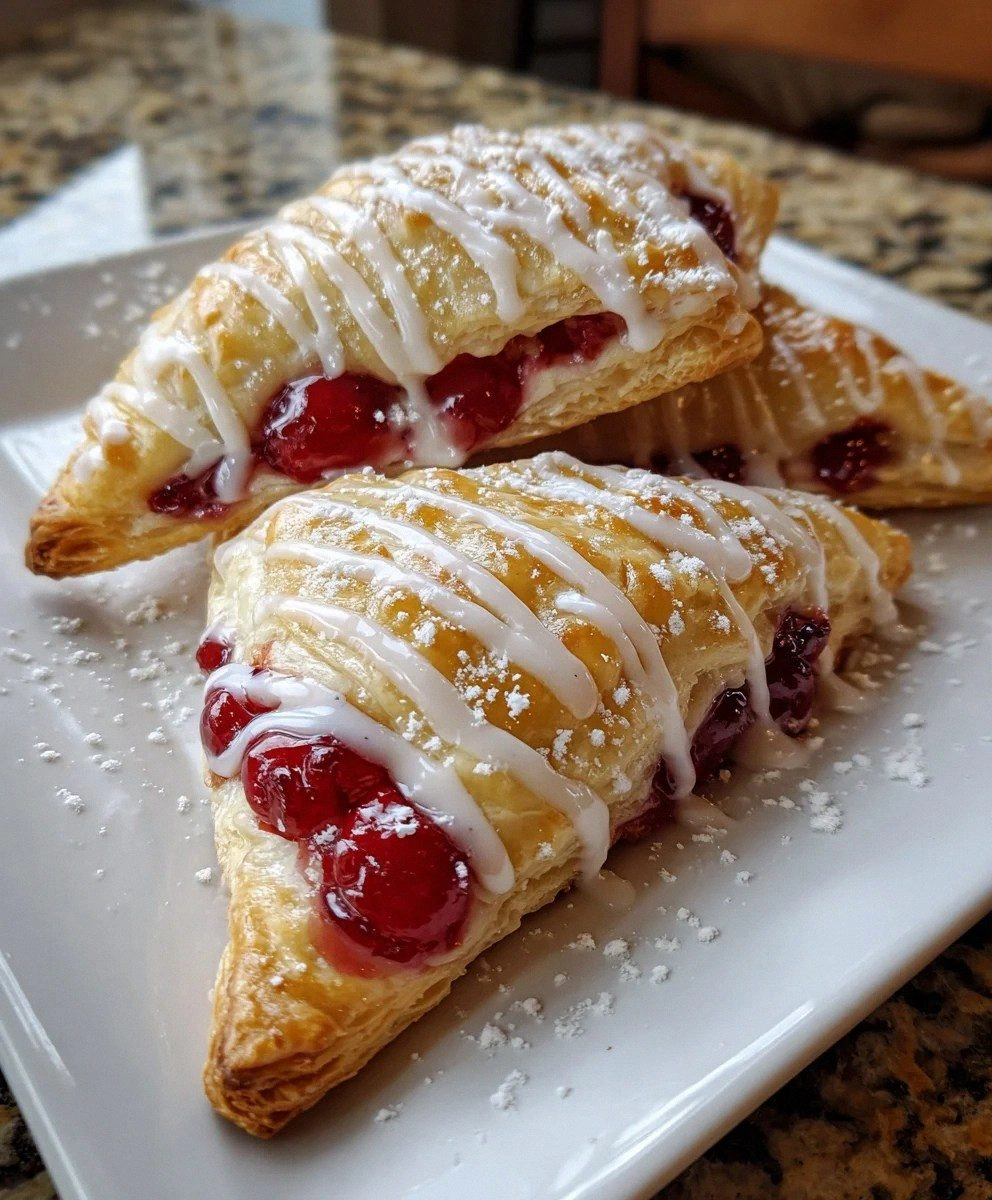
Picture this: paper-thin layers of butter-crisp pastry shattering under your fork, releasing a plume of fragrant steam that smells like summer camp and first kisses all rolled into one. The filling is a glossy river of tart-sweet cherries that have been coaxed into surrendering their juices until they become this jewel-toned jam that somehow stays put instead of leaking everywhere like a crime scene. The edges are bronzed and caramelized, the bottoms are golden and sturdy enough to hold everything together, and the top gets this delicate sugar-kissed crackle that makes a sound like stepping on fresh snow when you bite into it.
I dare you to taste one of these warm from the oven and not immediately go back for seconds. Seriously, I keep track — nobody has ever stopped at one, not even my friend who claims she's "not really a dessert person" and then proceeded to inhale three while standing at my kitchen counter, powdered sugar drifting down her shirt like edible confetti. The best part? They're deceptively simple once you know the moves, and I'm about to hand you the complete playbook so you can become the hero of your next family gathering, book club, or Tuesday night when you just need something spectacular.
Most recipes get this completely wrong by overcomplicating the process or using shortcuts that leave you with soggy bottoms and flavor that tastes like it came from a vending machine. We're not doing that. This version relies on a few key techniques that feel like kitchen magic but are actually just smart science, plus one ingredient swap that will make you question every other turnover you've ever eaten. Let me walk you through every single step — by the end, you'll wonder how you ever made it any other way.
What Makes This Version Stand Out
Lightning Fast: From freezer to plate in under 45 minutes, which means you can decide you want turnovers and actually be eating them before your favorite show's opening credits finish rolling. No waiting for dough to rise, no chilling for hours, no special equipment beyond a baking sheet and some parchment paper.
Foolproof Flakes: The pastry technique I'm sharing creates layers so distinct and crisp that they practically sing when you break them apart. We're talking about edges that shatter like thin ice on a winter pond, releasing little puffs of buttery steam that smell like heaven's bakery.
Leak-Proof Guarantee: I've cracked the code on keeping that gorgeous cherry filling exactly where it belongs instead of watching it bleed out and create those sad, empty turnovers that look like deflated balloons. The secret is in the temperature dance and one simple folding trick.
Freezer Friendly: Make a double batch, flash-freeze the shaped turnovers on a tray, then toss them in a bag for instant dessert emergencies. They bake straight from frozen in about 25 minutes, which means you're always 25 minutes away from homemade pastry glory.
Flavor Bomb: We're not just using cherry pie filling straight from the can — we're doctoring it with a few pantry staples that wake up the fruit and make it taste like you spent hours simmering fresh cherries with vanilla beans and citrus zest.
Conversation Starter: Bring these to any gathering and watch people lose their minds. I've seen grown adults fight over the last one, and my neighbor's teenage son — who normally communicates only in grunts — once said "these are fire" which I assume is high praise.
Beginner Approved: If you can fold a letter and crack an egg, you can make these turnovers. No pastry school required, no fancy laminating techniques, no stress about whether your butter is the right temperature for optimal layer formation.
Alright, let's break down exactly what goes into this masterpiece...
Inside the Ingredient List
The Flavor Base
Puff pastry is the undisputed star here, and not all brands are created equal. Look for one that lists butter as the first ingredient rather than shortening — the flavor difference is like comparing a symphony to a kazoo. The all-butter versions create those shatteringly crisp layers that make people close their eyes when they take the first bite, while the cheaper alternatives leave you with something that tastes like it came from a gas station microwave. If you're feeling ambitious and want to make your own puff pastry, I salute you, but I've found that good frozen pastry plus my doctoring techniques produces results that fool even professional bakers.
Cherry pie filling forms the heart of these turnovers, but we're not just cracking open the can and calling it a day. The standard canned filling is perfectly serviceable but tends to be a bit one-note and overly sweet, like it's trying too hard to be liked. By adding a splash of fresh lemon juice and a whisper of almond extract, we wake up the fruit and create this complex flavor that makes people ask "what's your secret?" The lemon brightens everything and cuts through the sweetness, while the almond extract adds this haunting background note that makes the cherries taste more intensely like themselves.
The Texture Crew
The egg wash is where most home bakers phone it in and then wonder why their pastries look anemic and sad. We're using a combination of egg and whole milk that creates this lacquered, golden-brown finish that looks like it came from a French bakery. The milk adds proteins that help with browning, while the egg provides that glossy sheen that makes people want to lick their screens when they see your photos. Whisk it until it's completely smooth — nobody wants scrambled egg bits clinging to their beautiful pastry like tiny yellow barnacles.
Powdered sugar for the glaze might seem basic, but the brand matters more than you'd think. The cheap stuff often contains cornstarch that can make your glaze taste chalky, while better quality powdered sugar dissolves into this silky smooth icing that drapes over the turnovers like liquid velvet. I keep both vanilla bean paste and extract on hand — the paste gives you those gorgeous little black specks that scream "I know what I'm doing," but extract works perfectly fine and costs about half as much.
The Unexpected Star
Here's where we get a little weird and wonderful: a pinch of coarse sea salt sprinkled on top just before baking. This isn't about making the turnovers salty — it's about creating these little flavor bombs where the salt hits your tongue first, making the sweet cherry filling taste even more intensely sweet by comparison. It's the same principle behind salted caramel or chocolate-covered pretzels, that magical contrast that makes your brain light up with pleasure signals.
Vanilla extract in both the glaze and a few drops mixed into the filling creates this warm, aromatic backbone that ties everything together. Don't use the imitation stuff here — real vanilla extract has over 200 flavor compounds that create this complex symphony of taste, while the fake version is basically vanillin and disappointment. If you're feeling fancy, vanilla bean paste gives you those gorgeous little black specks that make people think you spent a fortune on ingredients.
The Final Flourish
Coarse sugar for sprinkling before baking adds these little pockets of crunch and sparkle that catch the light like tiny edible diamonds. Regular granulated sugar melts into the pastry and disappears, but coarse sugar (sometimes called sanding sugar or pearl sugar) maintains its structure and creates these delightful textural surprises. You can find it in the baking aisle, or if you're feeling resourceful, crush up some sugar cubes — they work beautifully and give you the same effect.
A tiny bit of butter brushed on the turnovers right when they come out of the oven adds this final layer of richness and shine that makes them look like they came from a professional bakery. Use unsalted butter here since you've already got salt working its magic elsewhere, and just a whisper-thin layer — you're not trying to grease a cake pan, just add a subtle glow.
Everything's prepped? Good. Let's get into the real action...
The Method — Step by Step
- Start by thawing your puff pastry according to package directions, but here's the crucial part — you want it pliable but still cold. If it gets too warm, the butter layers start to melt and you'll end up with sad, flat turnovers that taste like cardboard. I usually thaw mine on the counter for about 20 minutes while I'm prepping everything else, checking every few minutes by gently bending a corner. It should flex without cracking but still feel cool to the touch, like a crisp autumn morning.
- Unfold the pastry on a lightly floured surface and roll it out just a bit to smooth the creases and make it slightly larger — you're not trying to make it paper-thin, just encouraging it to relax and expand by about an inch in each direction. Use gentle, even pressure with your rolling pin, working from the center outwards like you're giving the pastry a relaxing massage. The goal is to create a smooth, even surface that'll bake up into those gorgeous layers we want, not to crush all the beautiful butter pockets that make puff pastry magical.
- Cut the pastry into squares or rectangles depending on your preference — I like 5-inch squares for generous turnovers that feel substantial but not overwhelming. Use a sharp knife or pizza cutter for clean cuts that won't pinch the layers together, and try to cut in decisive, single motions rather than sawing back and forth. If you're making these for a party, smaller 3-inch squares create adorable two-bite turnovers that people can pop in their mouths while mingling.
- Now for the game-changing filling enhancement: dump your canned cherry pie filling into a bowl and add 1 teaspoon of fresh lemon juice, 1/4 teaspoon of almond extract, and if you're feeling fancy, a tablespoon of good cherry jam for extra intensity. Stir gently — you want to distribute the flavors without completely breaking down the cherry pieces into mush. Taste it and adjust: if it's too sweet, add another squeeze of lemon, if it needs more depth, a drop more almond extract goes a long way.
- Beat your egg with the milk until it's completely smooth and homogenous — no streaks of white or yellow allowed. This wash is going to be your secret weapon for creating that professional bakery shine that makes people think you went to culinary school. I like to strain it through a fine-mesh sieve to catch any stubborn bits of egg white that might create weird spots on my beautiful turnovers, but that's optional if you're not feeling quite that obsessive.
- Spoon about 2 tablespoons of the enhanced filling onto one half of each pastry square, leaving a clear border around the edge for sealing. Resist the urge to overfill — I know it's tempting to cram in as much cherry goodness as possible, but too much filling will burst through the seams and create a sticky mess that burns onto your baking sheet. The filling should mound up slightly in the center but not overflow when you fold the pastry over.
- Brush the edges of the pastry with your egg wash — this acts like glue to create a tight seal that won't burst open during baking. Fold the pastry over to create a triangle or rectangle, depending on your aesthetic preference, and press the edges firmly together. Then use a fork to crimp the edges, creating those classic ridges that look professional and actually help reinforce the seal. Dip your fork in flour occasionally to prevent sticking.
- Transfer the shaped turnovers to a parchment-lined baking sheet and refrigerate for 15 minutes while your oven preheats to 400°F. This chilling step is crucial — it firms up the butter layers again so they create maximum puff in the hot oven. Don't skip this even if you're in a hurry; those 15 minutes make the difference between bakery-worthy turnovers and sad, flat pastry pillows. While they're chilling, preheat your oven and position a rack in the center.
- Just before baking, brush the tops with egg wash and sprinkle with coarse sugar for that professional bakery sparkle. Cut a small vent in the top of each turnover with a sharp knife — just a 1/2-inch slit to let steam escape so they don't burst at the seams. Bake for 20-25 minutes until they're puffed and deeply golden brown, rotating the pan halfway through for even coloring. They're done when they're mahogany-colored underneath and sound hollow when you tap the bottoms.
- While the turnovers bake, whisk together the glaze: powdered sugar, vanilla extract, and enough milk to create a thick but pourable consistency. You want it thick enough to set into a smooth, opaque layer but thin enough to drizzle easily. Start with less milk than you think you need — you can always thin it out, but adding more powdered sugar to thicken is a pain and often creates a gloppy mess that looks like kindergarten craft paste.
- Let the turnovers cool for exactly 5 minutes on the baking sheet — any longer and the glaze won't adhere properly, any shorter and it'll melt into a transparent sheen. Transfer to a wire rack set over parchment (for easy cleanup) and drizzle with the glaze while they're still warm. The glaze will set into a smooth, opaque layer that cracks slightly when you bite into it, adding another textural element to the experience.
That's it — you did it. But hold on, I've got a few more tricks that'll take this to another level...
Insider Tricks for Flawless Results
The Temperature Rule Nobody Follows
Cold pastry, hot oven — this is non-negotiable and the reason most home bakers end up with leaden, sad turnovers instead of the puffed-up beauties they were dreaming about. Your puff pastry should be cold enough that the butter layers are solid, but pliable enough to work with without cracking. If it starts to feel soft or warm while you're shaping, pop the whole tray in the freezer for 10 minutes rather than forging ahead and hoping for the best. Conversely, your oven needs to be fully preheated and screaming hot — I mean 400°F for at least 15 minutes before the turnovers go in. That initial blast of heat is what creates the steam that separates the layers and gives you that dramatic rise.
Why Your Nose Knows Best
Don't trust the timer alone — your sense of smell is actually the most reliable indicator that these are perfectly done. When the butter in the pastry starts to brown, it releases this incredible nutty, toasty aroma that drifts through your kitchen like an invitation to happiness. That smell means the Maillard reaction is happening, creating hundreds of flavor compounds that transform simple ingredients into something transcendent. When you catch that first whiff of buttery perfection, start checking visually — they should be deep golden brown, not pale yellow, and the bottoms should be the color of a perfectly toasted marshmallow.
The 5-Minute Rest That Changes Everything
Here's where patience pays off in spades: let the turnovers rest for exactly 5 minutes on the baking sheet before transferring to a wire rack. This brief pause allows the pastry to set up so it doesn't fall apart when you move it, but it's not so long that the bottoms get soggy from trapped steam. It's like the pastry needs a moment to collect itself after its dramatic rise in the oven. During this time, the filling also settles slightly so it doesn't come rushing out like molten lava when you break into one, which saves you from both burns and the disappointment of losing half your filling to the plate.
The Secret to Even Browning
Rotate your pan halfway through baking — and I don't mean just spinning it 180 degrees. Every oven has hot spots, and rotating ensures each turnover gets equal time in the sweet spots where browning happens fastest. But here's the pro move: flip them over for the last 5 minutes of baking. This sounds crazy, but it allows the bottoms to get that same gorgeous color as the tops, and since the pastry has already set, they won't lose their shape. The result is turnovers that are perfectly golden all over, not pale and doughy underneath like so many sad bakery versions.
Storage That Actually Works
If you somehow have leftovers (I never do, but hypothetically), store them in a paper bag at room temperature for up to 2 days. The paper allows just enough air circulation to keep the pastry crisp, unlike plastic which traps moisture and turns your beautiful flakes into rubber. For longer storage, freeze them unglazed on a tray, then transfer to a freezer bag. They reheat beautifully in a 350°F oven for 8-10 minutes, and you can add fresh glaze right before serving. Never microwave them unless you enjoy the taste of wet cardboard — the microwave steams the pastry and destroys all those gorgeous layers you worked so hard to create.
Creative Twists and Variations
This recipe is a playground. Here are some of my favorite ways to switch things up:
Black Forest Dream
Add a tablespoon of cocoa powder to your glaze and swap the almond extract for cherry brandy (Kirsch) in the filling. The chocolate-cherry combo tastes like you spent hours making Black Forest cake, but it's ready in under an hour. Top with chocolate shavings if you're feeling fancy, or just embrace the messy drizzle look that says "I made this with love and also I'm human."
Breakfast Turnovers
Fill these with cream cheese mixed with a touch of honey and lemon zest, plus a spoonful of cherry jam. The tangy cream cheese balances the sweet fruit perfectly, and suddenly you've got a legitimate excuse to eat turnovers for breakfast. I won't tell if you add a few chocolate chips "for energy."
Tropical Escape
Replace the cherry filling with mango jam and add a pinch of cardamom to the glaze. The tropical flavors transport you straight to a beach vacation, even if you're actually eating these in your kitchen while it's raining outside. Add some toasted coconut flakes on top for the full island experience.
Apple Pie Remix
Use apple pie filling instead of cherry, but add a handful of dried cranberries and a splash of bourbon to the mix. The cranberries provide little bursts of tartness that make the apple taste more interesting, and the bourbon adds warmth without screaming "I put alcohol in this." Perfect for fall when you want apple pie vibes without the hour-long bake time.
Savory Surprise
Fill with brie and cherry preserves for the most sophisticated version imaginable. The creamy brie melts into this luxurious pool that mingles with the sweet-tart cherries, creating a flavor profile that would make a French chef weep with joy. These are dangerous — once you serve them at a party, people will expect them at every gathering forever.
S'mores Version
Fill with chocolate chips, mini marshmallows, and a spoonful of cherry jam. The marshmallows puff up and get toasty on top while the chocolate melts into gooey perfection underneath. It's like summer camp and cherry pie had a delicious baby that you can hold in your hand.
Storing and Bringing It Back to Life
Fridge Storage
These turnovers are best eaten the day they're made, but if you must store them, skip the fridge entirely. The refrigerator is where pastry goes to die a sad, soggy death. Instead, keep them in a paper bag at room temperature for up to 48 hours. The paper allows just enough air circulation to maintain some crispness while preventing them from drying out completely. If they start to feel a bit stale, pop them in a 350°F oven for 5-7 minutes and they'll perk right back up, almost like you just baked them.
Freezer Friendly
Here's the make-ahead magic: shape the turnovers, place them on a parchment-lined tray, and freeze until solid (about 2 hours). Once frozen, transfer to a freezer bag with layers of parchment between them. They'll keep for up to 2 months, though honestly they've never lasted more than a week in my house. Bake straight from frozen — just add 5-7 minutes to the baking time and keep an eye on them. Don't thaw first or they'll become soggy messes that stick to your pan and break your heart.
Best Reheating Method
If you've stored baked turnovers, the oven is your friend and the microwave is your enemy. Reheat in a 350°F oven for 8-10 minutes until warmed through and crisp again. For an extra boost of freshness, brush them with a tiny bit of melted butter before reheating — it brings back that just-baked shine and flavor. If you're in a rush, a toaster oven works too, but avoid the microwave unless you enjoy the texture of wet cardboard. Pro tip: add fresh glaze after reheating for that just-made appearance that fools everyone into thinking you baked them fresh.