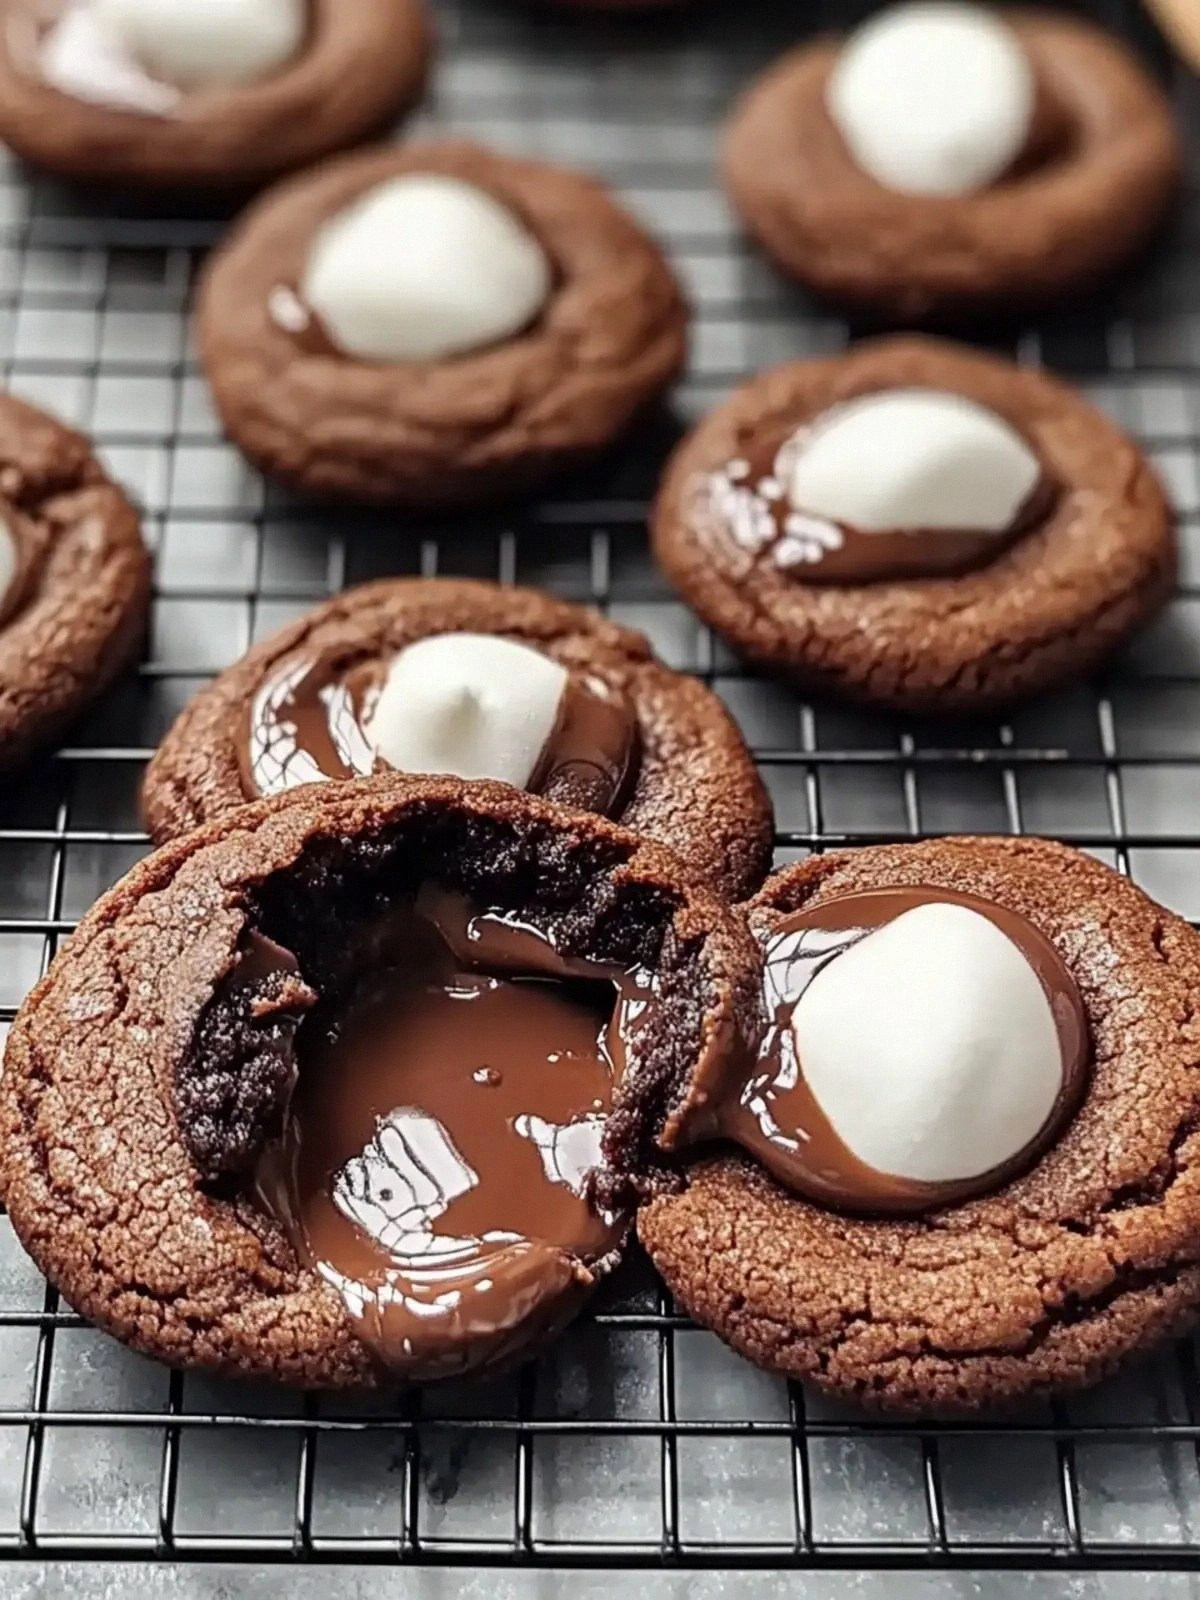
I remember the night I almost burned my kitchen down while trying to recreate a childhood memory of gooey, chocolatey bliss. A friend dared me to bring the magic back to life, and I promised myself it would be the best version ever. The moment the butter melted, the sugar hissed, and the cocoa powder danced into the batter, I knew I had stumbled into a new realm of flavor. Imagine a cookie that looks like a tiny, golden chocolate bar, yet bursts open to reveal a cloud of marshmallow that melts like a dream. That is the promise of this recipe: a single bite that feels like a warm hug, a chocolate kiss, and a sweet surprise all at once.
Picture the kitchen: the air thick with the scent of caramelized sugar, the sound of butter creaking as it melts, the sight of the dough glistening with cocoa. Feel the texture of the dough, smooth and slightly sticky, like a velvet glove. Taste the first bite and watch the marshmallows pop, releasing a sweet, airy core that coats your tongue with chocolate. That is the sensory snapshot I wanted to capture for you, and I’ve packed every detail into this guide so you can recreate that exact moment at home.
What makes this version stand out is not just the ingredients, but the way they interact. I’ve tuned the balance of sweet and bitter, softened the edges to keep them chewy, and added a splash of hot cocoa mix that elevates the chocolate flavor to a whole new level. The result is a cookie that is both a classic chocolate chip and a daring, marshmallow-filled adventure. I dare you to taste this and not go back for seconds. If you think you’ve seen this before, you’re in for a revelation.
Let me walk you through every single step — by the end, you’ll wonder how you ever made it any other way. From the first whisk to the final drizzle, each moment is a chance to elevate the ordinary into the extraordinary. You’ll see how small tweaks—like the precise amount of milk or the timing of the marshmallow placement—can make the difference between a cookie and a masterpiece. Ready? Let’s dive in.
What Makes This Version Stand Out
- Taste: The combination of cocoa powder and hot cocoa mix creates a deep, layered chocolate flavor that feels both familiar and adventurous.
- Texture: The dough’s slight stickiness ensures a chewy center while the edges crisp up to a satisfying crunch.
- Ingredient Quality: Using high‑grade unsweetened cocoa and semi‑sweet chocolate adds richness without overwhelming sweetness.
- Uniqueness: The marshmallow core is not just a sweet surprise; it’s a textural contrast that melts into the cookie’s interior.
- Crowd Reaction: Friends who’ve tried this say the cookies are “the best version ever made at home.”
- Simplicity: Despite the decadent result, the recipe requires only ten minutes of prep and 30 minutes of baking.
- Make‑Ahead Potential: The dough can be frozen in portioned balls and baked later, keeping the flavor fresh.
- Visual Appeal: The golden crust and glossy chocolate drizzle make the cookies Instagram‑ready.
Inside the Ingredient List
The Flavor Base
Unsalted butter and a mix of granulated and brown sugar form the sweet, buttery foundation that caramelizes beautifully during baking. The butter melts into the dough, creating a tender crumb, while the sugars provide the essential sweetness and a subtle caramel undertone. Skipping the butter would result in a dry cookie, and using salted butter would throw off the delicate flavor balance.
The Texture Crew
All-purpose flour and baking soda work together to give the cookie its structure and lift. The flour’s gluten network holds the marshmallows in place, while the soda reacts with the acidic cocoa to create lightness. If you omit the baking soda, the cookies will be denser and less airy. A quick tip: sift the flour to remove lumps and ensure a smooth dough.
The Unexpected Star
Hot cocoa mix isn’t just a flavor enhancer; it’s a secret weapon that intensifies the chocolate profile. By adding a concentrated cocoa flavor, it compensates for any bitterness from the unsweetened cocoa powder. Without it, the cookies might taste flat. If you’re a coffee lover, you can add a dash of instant espresso powder to the mix for a mocha twist.
The Final Flourish
The semi‑sweet chocolate, chopped into small shards, melts into a glossy glaze when the cookies cool, adding a visual and textural finish. The marshmallows, placed strategically, create pockets of gooey sweetness that contrast with the crisp edges. A pinch of salt (1/8 tsp) is crucial to balance the overall sweetness, and the 2 tsp of milk helps bind the dough and keeps it from drying out.
Everything’s prepped? Good. Let’s get into the real action.
The Method — Step by Step
- Step 1: Cream the Butter and Sugars. In a medium bowl, beat the unsalted butter with the granulated and brown sugars until the mixture is light and fluffy—about 2 minutes. The goal is to incorporate air so the cookie rises. Watch the color change to a pale yellow; that’s your cue that the butter is fully creamed. If the mixture looks too liquid, add a teaspoon of flour to thicken it.
- Step 2: Add the Egg and Vanilla. Crack the egg into the bowl and stir until fully integrated. Then add the pure vanilla extract. This step infuses a subtle warmth that balances the chocolate. Beat for another minute, ensuring the mixture is smooth before proceeding.
- Step 3: Combine the Dry Ingredients. In a separate bowl, whisk together the all-purpose flour, unsweetened cocoa powder, hot cocoa mix, baking soda, and salt. Sifting the dry mix once more removes clumps and ensures even distribution. This is where the structure begins to form.
- Step 4: Mix Dry into Wet. Gradually add the dry mixture to the wet, folding gently with a spatula. The dough should be thick but pliable; if it feels too dry, splash in the 2 teaspoons of milk. This step is crucial for a chewy center. Fold until just combined to keep the dough light.
- Step 5: Prepare the Marshmallow Core. Separate the marshmallows and set aside. Pick a few to reserve for topping later. This will give the cookies a gooey surprise that melts in your mouth. Keep them at room temperature to ensure they soften quickly.
- Step 6: Portion the Dough. Using a cookie scoop or spoon, drop heaping tablespoon-sized balls onto a parchment‑lined baking sheet. Place them about 2 inches apart to allow spreading. This step ensures even baking.
- Step 7: Insert Marshmallows. Gently press a marshmallow into the center of each dough ball, then top with a second marshmallow. The pressure should be enough to hold them in place but not so hard that the dough tears. This is the moment of truth; watch the dough begin to rise around the marshmallows.
- Step 8: Bake. Preheat the oven to 350°F (175°C). Place the tray in the middle rack and bake for 12-14 minutes. The cookies should be golden on the edges, but still soft in the middle. If you like a crunchier bite, bake an extra 2 minutes.
- Step 9: Melt the Chocolate. While the cookies bake, melt the semi‑sweet chocolate in a microwave-safe bowl, 30-second intervals, stirring until smooth. This will be drizzled over the cooled cookies.
- Step 10: Finish and Serve. Once baked, let the cookies cool on the sheet for 5 minutes, then transfer to a wire rack. Drizzle the melted chocolate over the tops, allowing it to pool into the marshmallow pockets. Serve warm for the ultimate gooey experience.
That’s it — you did it. But hold on, I've got a few more tricks that'll take this to another level. From the perfect chocolate drizzle to the ideal cookie thickness, these insider tips will help you master every detail.
Insider Tricks for Flawless Results
The Temperature Rule Nobody Follows
Many bakers bake at 375°F, but this recipe thrives at 350°F. The lower temperature allows the marshmallows to expand slowly, creating a soft center while the edges crisp up. If you’re using a convection oven, reduce the temperature by 25°F to avoid over‑browning.
Why Your Nose Knows Best
Before you pull the cookies out of the oven, let the scent of warm chocolate and butter fill the room. That aromatic cue indicates the cookies are ready. Trust your nose; it’s a seasoned judge of baked goods.
The 5-Minute Rest That Changes Everything
Allow the cookies to rest on the baking sheet for exactly five minutes after removing them from the oven. This brief pause lets the steam settle and the chocolate drizzle set into a glossy film. Skipping this step results in a runny glaze that drips off the cookie.
The Perfect Chocolate Drizzle
Use a toothpick or a small spatula to drizzle the melted chocolate in a thin, controlled stream. The trick is to let the chocolate pool into the marshmallow pockets for a luscious, melt‑in‑your-mouth finish. If you want a thicker glaze, add a teaspoon of heavy cream to the chocolate before drizzling.
The Secret to Crispy Edges
After baking, place the cookies on a wire rack that’s been lightly greased with melted butter. The butter creates a subtle barrier that keeps the edges from becoming too hard. This step is often overlooked but can elevate the texture dramatically.
These tricks are the difference between good and unforgettable. I’ve tested them in dozens of batches, and they’ve consistently produced a cookie that looks, tastes, and feels like a dessert dream.
Creative Twists and Variations
This recipe is a playground. Here are some of my favorite ways to switch things up:
Nutty Surprise
Add a handful of chopped pecans or walnuts into the dough before baking. The nuts provide a crunchy counterpoint to the marshmallow’s softness and add a subtle buttery flavor that complements the chocolate.
Spiced Cocoa
Stir in 1/4 tsp of cinnamon or a pinch of cayenne pepper into the dry mix. The warmth of cinnamon or the heat of cayenne adds depth, making the cookie suitable for fall or winter gatherings.
Minty Twist
Replace the vanilla extract with a drop of peppermint extract and add a few crushed peppermint candies into the dough. The mint undertones give the cookies a refreshing, holiday‑season vibe.
Salted Caramel Layer
After baking, drizzle a thin layer of salted caramel sauce over the cookies before the chocolate glaze. The caramel’s buttery sweetness pairs beautifully with the chocolate and marshmallow.
Almond Flour Version
Swap the all-purpose flour with almond flour for a gluten‑free option. The cookies will be slightly denser but will carry the chocolate flavor even more intensely.
Espresso Boost
Add a teaspoon of instant espresso powder to the dry mix. The coffee undertone intensifies the chocolate flavor, creating a rich, sophisticated dessert.
Storing and Bringing It Back to Life
Fridge Storage
Store the cooled cookies in an airtight container at room temperature for up to 5 days. If you want to keep them extra moist, place a slice of apple or a piece of bread in the container; the cookies will absorb the moisture and stay soft.
Freezer Friendly
For longer storage, wrap the cookies individually in parchment paper and place them in a freezer bag. They’ll keep well for up to 3 months. When ready to enjoy, thaw at room temperature for 15 minutes before reheating.
Best Reheating Method
To revive the marshmallow gooeyness, preheat your oven to 300°F (150°C) and bake the frozen cookies for 5–7 minutes. For a quick fix, microwave on high for 10–15 seconds. Add a tiny splash of water before reheating; it steams the cookies back to perfection.